Managing KaseyaOne groups
NAVIGATION Header > Admin Settings > Groups
PERMISSIONS Admin role
Groups are used to control user access to modules connected to the KaseyaOne account. When users log in to KaseyaOne, they will only see modules that belong to the group(s) they are a member of. The modules users have access to are visible in the following locations in KaseyaOne:
- My Modules widget on the KaseyaOne home page dashboard
- App Launcher list
-
Module Management page within My Settings
NOTE The Discover More section of the App Launcher will continue to list all the available Kaseya modules the user does not have an account for or does not have access to.
This article explains the different types of groups and how to use the Groups page to create a group, add or remove users to/from a group, assign modules to a group, and activate or deactivate a group.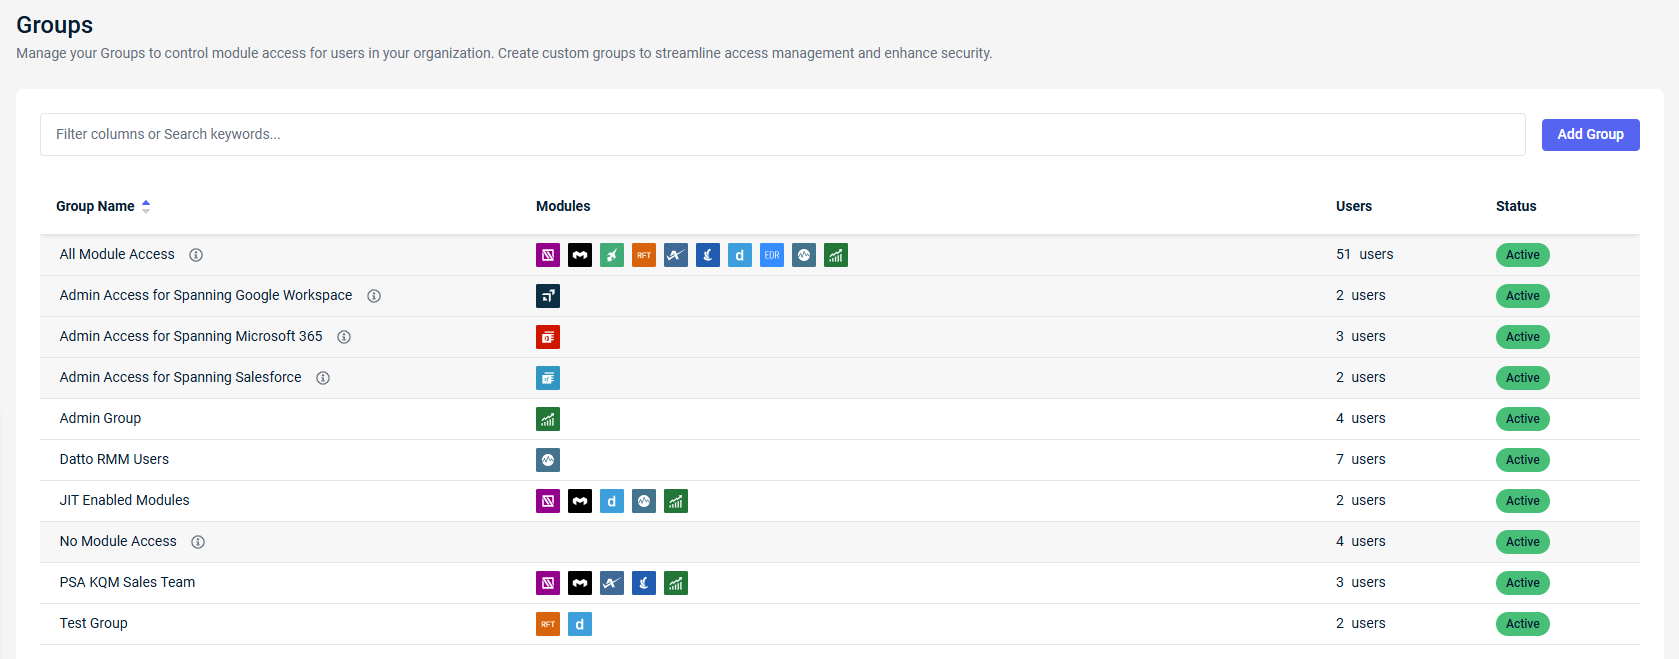
NOTE On the module side, each module must enable role-based access control (Enable Access Groups) and assign one or more roles to each KaseyaOne group to control module access. Refer to Role-based access control.
System groups vs. custom groups
The following two types of groups exist in KaseyaOne:
- System groups are special-purpose groups that are built into KaseyaOne and cannot be changed (that is, renamed, deleted, or deactivated). In the list of groups in the account, system groups have a gray background.
- Custom groups can be created by any user with the Admin role for any purpose. In the list of groups in the account, custom groups have a white background.
Types of system groups
Expand the following drop-downs to learn about each system group available in KaseyaOne. Users with the Admin role cannot change the module assignment for these groups, but they can add or remove users to/from the group at any time.
This system group has all modules assigned to it, giving members access to all modules in KaseyaOne.
Modules are added to this system group when they connect with KaseyaOne. When a module disconnects from KaseyaOne, it is removed from this group.
NOTE The Root Admin user cannot be removed from this group.
This system group has no modules assigned to it. Users assigned to this group do not have access to any modules in KaseyaOne.
An example of a user suitable for this group is a Billing and Purchasing role user who logs in to pay invoices but doesn't require access to modules.
Three different system groups control administrative access to Spanning modules. Each group has a specific Spanning module assigned to it, and the Spanning module name is reflected in the group name. The spanning system groups are:
- Admin Access for Spanning Google Workspace
- Admin Access for Spanning Microsoft 365
- Admin Access for Spanning Salesforce
How to...
Complete the following steps to create a new group:
- Navigate to the Groups page. Refer to Security and navigation.
- In the Add Group pane that opens, enter a name for the new group in the Group Name field.
- In the Users tab, select the check box next to each user you want to add to the group. The number of users selected will appear next to the Users tab label.
- To assign modules to the users you selected, click the Assign Modules tab.
- Select the check box next to each module that you want to assign to the group.The number of modules selected will appear next to the Assign Modules tab label.
- Click Review to see a summary of the users in the group and the assigned modules.
- Click Add Group.
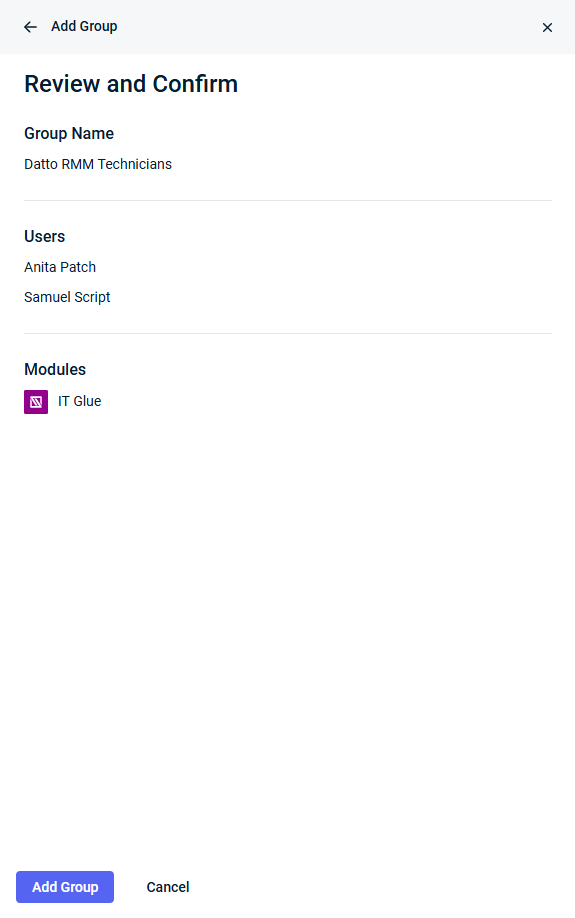
The new group is added to the Groups list with a status of Active.
Complete the following steps to modify an existing group:
- Navigate to the Groups page. Refer to Security and navigation.
- In the Groups list, click a group to open it.
- In the Group Details pane that opens, click Edit.
- Change the name of the group in the Group Name field if required.
- From here, you can change the group name, add users or modules to the group by selecting their check boxes, or remove users or modules from the group by clearing their check boxes.
- Click Review to see a summary of the changes that will be implemented.
- A New label appears next to any user or module you added.
- The name of any user or module you removed appears in the Removing list(s).
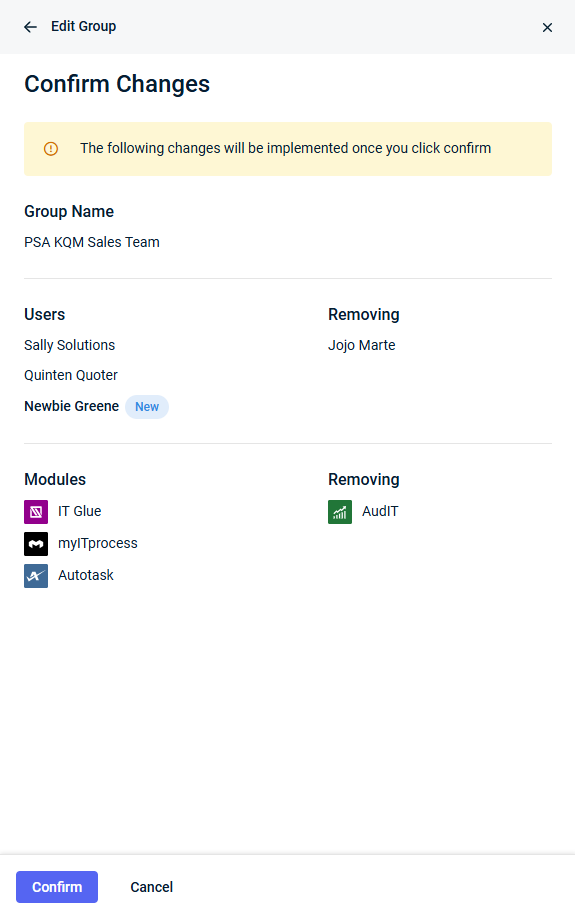
- Click Confirm to apply the changes to the group.
IMPORTANT When you deactivate a group, all members of the group will lose access to the modules that belong to the group unless otherwise assigned access to those modules through a different group or unless the group is reactivated.
Complete the following steps to deactivate a group but preserve the option to reactivate it:
- Navigate to the Groups page. Refer to Security and navigation.
- In the Groups list, select a group with a status of Active.
- In the Group Details dialog box that opens, click Deactivate.
The group status changes to Inactive in the Groups list.
Complete the following steps to activate a currently inactive group:
- Navigate to the Groups page. Refer to Security and navigation.
- In the Groups list, select a group with a status of Inactive.
- In the Group Details dialog box that opens, click Activate.
The group status changes to Active in the Groups list.
IMPORTANT When you delete a group, all members of the group will lose access to the modules that belong to the group unless otherwise assigned access to those modules through a different group.
Complete the following steps to delete a group:
- Navigate to the Groups page. Refer to Security and navigation.
- In the Groups list, select a group to open it.
- In the Group Details dialog box that opens, click Delete.
- Click Delete again to confirm the action.
The group is removed from the Groups list.


