Enable Log In with KaseyaOne
PERMISSIONS In respective module: Superuser, Administrator, Global Administrator, Security Admin (Datto Partner Portal)
Unified Login (otherwise known as Log In with KaseyaOne) is the process of logging in once to KaseyaOne to automatically gain access to all the Kaseya platform modules to which you are subscribed. You must set up the integration between KaseyaOne and the module by configuring Log In with KaseyaOne for the module.
Instructions follow on how to configure Unified Login for a module, which you must do from the individual module. The prerequisites to configure Log In with KaseyaOne are:
-
You must be a user with the highest permission level (Admin, Superuser, Administrator, Global Administrator, Security Admin, or Manager) in KaseyaOne and the module.
-
You must have a user account and log in credentials for both KaseyaOne and the module with the same email address or username.
-
You must be a member of a group in KaseyaOne that provides access to the module you are going to integrate with KaseyaOne. Refer to Managing KaseyaOne groups.
After you turn on or enable Log In with KaseyaOne between KaseyaOne and the module, all users will automatically gain access to the module through Log In with KaseyaOne. In addition, the module is automatically added to KaseyaOne — refer to My Modules and App Launcher.
NOTE If Log In with KaseyaOne is not working for you, make sure that your email and/or username in the module match the email and username in your KaseyaOne account. For additional requirements, see Requirements for Log In with KaseyaOne.
Enable Log In with KaseyaOne from individual modules
Instructions to configure Log In with KaseyaOne from individual modules follow.
NOTE For INKY, Log In with KaseyaOne is enabled automatically and there is no manual procedure for enabling this feature.
Please refer to your module documentation and module release notes for more information.
To enable Log In with KaseyaOne for Autotask, do the following:
- In Autotask (www.autotask.net), navigate to Left Navigation Menu > Admin > Extensions & Integrations > Kaseya Integrations > KaseyaOne.
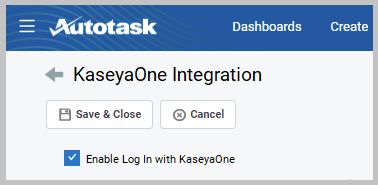
- On the KaseyaOne page that opens, select Enable Log In with KaseyaOne.
NOTE If you are already logged in to KaseyaOne, then you will not be prompted to log in again and your account association will be completed automatically. Wait for the serial redirects to process the load and you will be redirected back to Autotask.
- The KaseyaOne login page opens, prompting you to log in. Enter your KaseyaOne credentials and then the verification code.
Unified Login for Autotask is now enabled and users will automatically gain access to Autotask through Log In with KaseyaOne. For more information, refer to KaseyaOne integration for Autotask in the Autotask Help.
To enable Log In with KaseyaOne for BMS/Vorex, do the following:
-
Log in to BMS in the usual way.
Direct login URLs for each region are given here:
Europe, Middle East, and Africa: https://bmsemea.kaseya.com/
Asia-Pacific: https://bmsapac.kaseya.com/
All other regions: https://bms.kaseya.com/
- From the home page, navigate to Admin > Integrations > KaseyaOne.
- Turn on the Log in with KaseyaOne toggle.
-
The KaseyaOne login page opens, prompting you to log in. Enter your KaseyaOne credentials and then the verification code.
NOTE If you are already logged into KaseyaOne, you will not be redirected but remain in BMS/Vorex. BMS/Vorex will be registered as a Unified Login module in your KaseyaOne instance.
- After you have successfully logged in to KaseyaOne, you will be redirected back to the BMS portal tab where the Log in with KaseyaOne toggle is enabled and a message appears indicating that the operation was successful.
Unified Login for BMS/Vorex is now enabled and users will automatically gain access to BMS/Vorex through Log In with KaseyaOne. For more information, refer to KaseyaOne Settings: JIT in the BMS/Vorex Help.
To enable Log In with KaseyaOne for BullPhish ID, do the following:
- Log in to BullPhish ID (https://bullphishid.com/login) using your credentials in the usual way.
- On your Organization's dashboard, click Settings and the Settings page opens with the KaseyaOne tab selected.

- In the Unified Login section, turn on Enable Log In with KaseyaOne.
- The KaseyaOne login page opens, prompting you to log in. Enter your KaseyaOne credentials and then the verification code.
NOTE If you are already logged into KaseyaOne, you will not be redirected but remain in BullPhish ID. BullPhish ID will be registered as a Unified Login module in your KaseyaOne instance.
- After you have successfully logged into KaseyaOne, you will be redirected back to the BullPhish ID portal where the Enable Log In with KaseyaOne toggle is enabled and a message appears indicating that Log In with KaseyaOne for your organization has been successfully enabled.
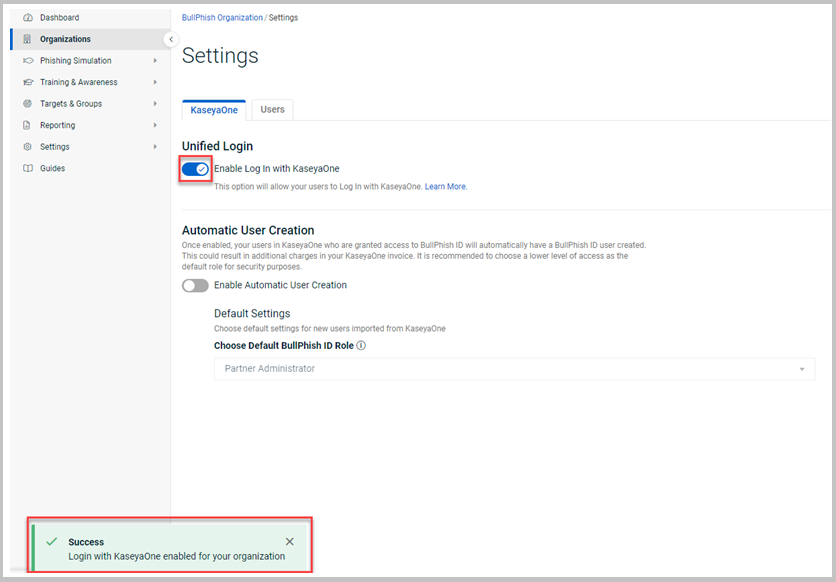
Unified Login for BullPhish ID is now enabled and users will automatically gain access to BullPhish ID through Log In with KaseyaOne. For more information, refer to Enabling KaseyaOne Unified Login for your BullPhish ID Organization in the BullPhish ID Help.
To enable Log In with KaseyaOne for ConnectBooster, do the following:
- Log in to ConnectBooster at https://youremaildomain.connectboosterportal.com, where youremaildomain is your company email domain.
- Click Configurations > KaseyaOne on the left navigation menu.
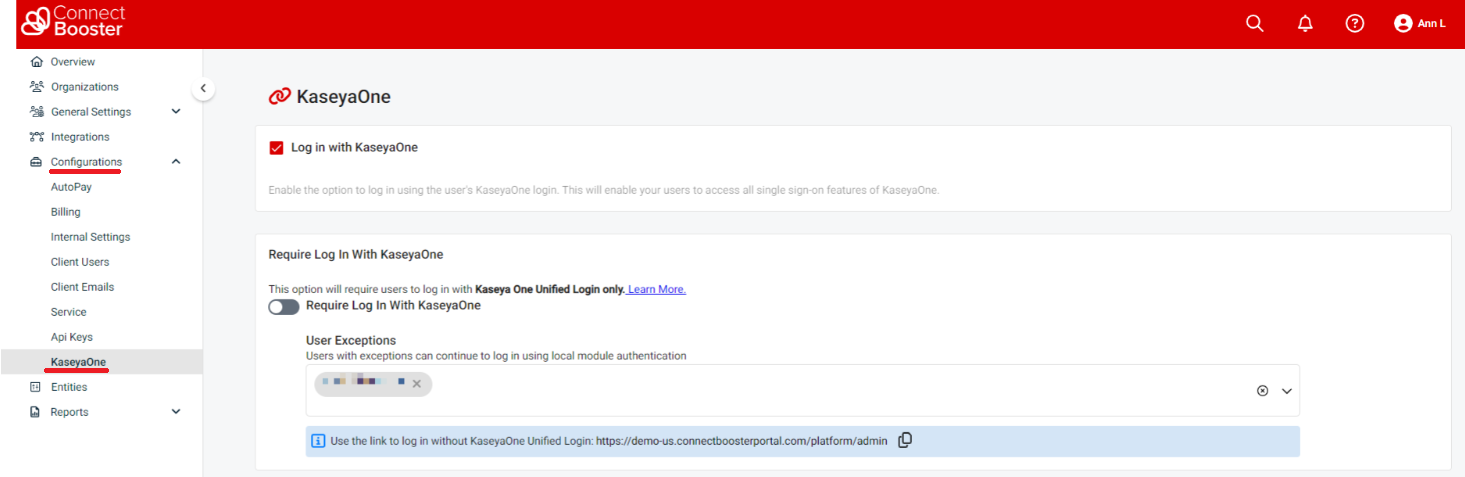
- Toggle the Enable Log in with KaseyaOne slider.
- The Enable Automatic User Creation prompt appears. Select Dismiss to keep the feature turned off or select Enable to turn the feature on.
- The KaseyaOne login page opens, prompting you to log in. Enter your KaseyaOne credentials and then the verification code to complete enabling Log In with KaseyaOne.
NOTE If you are already logged in to KaseyaOne, then you will not be prompted to log in again and your account association will be completed automatically. Wait for the serial redirects to process the load and you will be redirected back to ConnectBooster.
- After you have successfully logged in to KaseyaOne, you will be redirected back to ConnectBooster.
Unified Login for ConnectBooster is now enabled and users will automatically gain access to ConnectBooster through Log In with KaseyaOne. For more information, refer to Associate your ConnectBooster and KaseyaOne Accounts in the ConnectBooster Help.
To enable Log In with KaseyaOne for Dark Web ID, do the following:
- Log in to Dark Web ID (https://secure.darkwebid.com/user/login) in the usual way.
- Navigate to My Account > Organization Settings> KaseyaOne.
- In the Single Sign-Onsection, turn on the Enable Log In with KaseyaOne toggle.
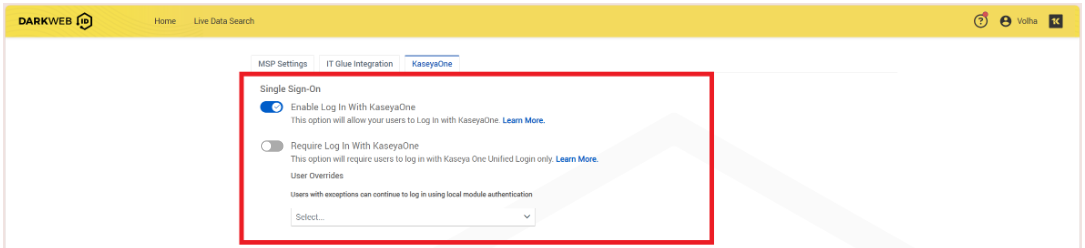
- The KaseyaOne login page opens, prompting you to log in. Enter your KaseyaOne credentials and then the verification code to complete enabling Log In with KaseyaOne.
Unified Login for Dark Web ID is now enabled and users will automatically gain access to Dark Web ID through Log In with KaseyaOne.
To enable Log In with KaseyaOne for Datto EDR, do the following:
- Log in to Datto EDR through the Datto Partner Portal (https://auth.datto.com/login) in the usual way.
- In the upper-right corner, hover over your username and select Admin.
- In the left navigation pane, select Settings and click the KaseyaOne tab.

- In the Unified Login section, turn on Enable Log In with KaseyaOne.

- The KaseyaOne login page opens, prompting you to log in. Enter your KaseyaOne credentials and then the verification code.
NOTE If you are already logged into KaseyaOne, you will not be redirected but remain in EDR. Datto EDR will be registered as a Unified Login module in your KaseyaOne instance.
- After you have successfully logged into KaseyaOne, you will be redirected back to the Datto EDR portal.
IMPORTANT If Log in with KaseyaOne is enabled and Access Groups are not, then user roles will be reverted from Admin to Analyst when those users log in with KaseyaOne. To prevent this, create an Admin group in KaseyaOne by following the steps in Managing KaseyaOne groups. Be sure to include your Admin account as part of the group. Then, enable access groups and map the access group to the Admin role as instructed in the article Role-based access control.
Unified Login for Datto EDR is now enabled and users will automatically gain access to Datto EDR through Log In with KaseyaOne. For more information, refer to Datto EDR Help.
To enable Log In with KaseyaOne for Datto File Protection, do the following:
- Log in to Datto File Protection (http://fileprotection.datto.com/) in the usual way.
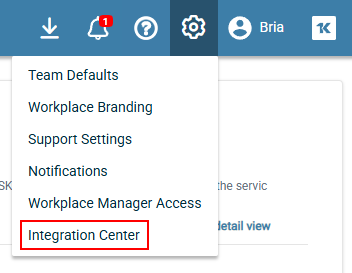
- Go to the Settings menu and select Integration Center.
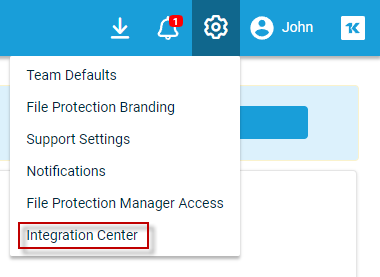
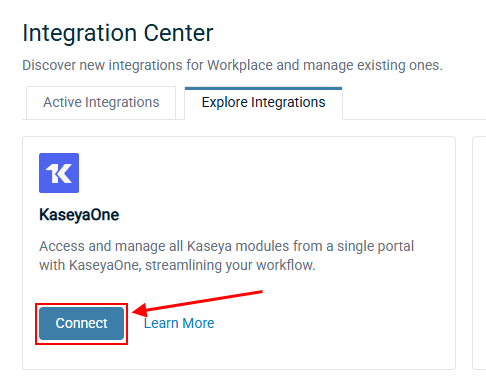
- Go to the Explore Integrations tab and click Connect on the KaseyaOne card.
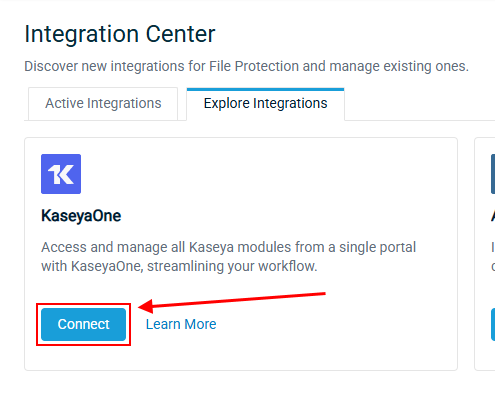
- In the Manage Login with IT Complete window that opens, turn on the Enable Log In with KaseyaOne toggle to enable the Unified Login feature, and then click Save at the bottom of the window.
- The KaseyaOne login page opens, prompting you to log in. Enter your KaseyaOne credentials and then the verification code.
NOTE If you are already logged in to KaseyaOne, then you will not be prompted to log in again and your account association will be completed automatically. Wait for the serial redirects to process the load and you will be redirected back to Datto File Protection.
- After you have successfully logged in to KaseyaOne, you will be redirected back to the Datto File Protection portal.
Unified Login for Datto File Protection is now enabled and users will automatically gain access to Datto File Protection through Log In with KaseyaOne. For more information, refer to KaseyaOne Unified Login in the Datto File Protection Manager Help.
NOTE The following Datto modules do not currently have direct single sign-on (SSO) integration with KaseyaOne but you can access them through the Datto Partner Portal:
- Datto Backup for Microsoft Azure
- Datto BCDR
- Datto/Unitrends Endpoint Backup for PCs
- Datto Endpoint Backup with Disaster Recovery
- Datto Networking
- Datto Saas Protection
After you enable Unified Login in the Datto Partner Portal, you can access these modules from KaseyaOne by launching SSO to Datto Partner Portal. Once in the portal, you can switch to the module you want to access from there.
IMPORTANT You must be assigned the Security Admin role to see and access the Security Settings menu. Refer to Assign a Security Admin in the Datto Partner Portal Help system.
To enable Log In with KaseyaOne for Datto Partner Portal, do the following:
-
Log in to the Datto Partner Portal (https://auth.datto.com/login) and navigate to Admin > Security Settings.

-
Go to the Single Sign-on section of the page that opens and click Enable Log In with KaseyaOne to enable the feature.

-
The KaseyaOne login page opens, prompting you to log in. Enter your KaseyaOne credentials and then the verification code to complete enabling Log In with KaseyaOne.
Unified Login on for Datto Partner Portal is now enabled, users will automatically gain access to Datto Partner Portal through Log In with KaseyaOne, and Datto Portal will appear in the My Modules list in KaseyaOne.
For more information, refer to KaseyaOne integration with Datto Partner Portal in the Datto Partner Portal Help.
To enable Log In with KaseyaOne for Datto RMM, do the following:
- Log in to Datto RMM through the Datto Partner Portal (https://auth.datto.com/login) in the usual way.
- Navigate to Setup > Integrations > KaseyaOne.
- In the Unified Login section, click Turn On.

- The KaseyaOne login page opens, prompting you to log in. Enter your KaseyaOne credentials and then the verification code. This registers Datto RMM as a single sign-on(SSO) module in your KaseyaOne instance.
NOTE If you are already logged in to KaseyaOne, then you will not be prompted to log in again and your account association will be completed automatically. Wait for the serial redirects to process the load and you will be redirected back to Datto RMM.
- After you have successfully logged in to KaseyaOne, you will be redirected back to the Datto RMM portal.
Unified Login for Datto RMM is now enabled and users will automatically gain access to Datto RMM through Log In with KaseyaOne. For more information, refer to Unified Login with KaseyaOne in the Datto RMM Help.
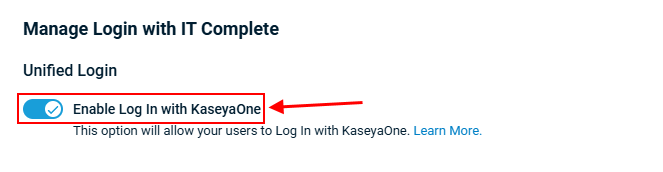
To enable Log In with KaseyaOne for Datto Workplace, do the following:
- Log in to Datto Workplace (https://workplace.datto.com/) in the usual way.
- Go to the Settings menu and select Integration Center.
- Go to the Explore Integrations tab and click Connect on the KaseyaOne card.
- In the Manage Login with IT Complete window that opens, turn on the Enable Log In with KaseyaOne toggle to enable the Unified Login feature, and then click Save at the bottom of the window.
- The KaseyaOne login page opens, prompting you to log in. Enter your KaseyaOne credentials and then the verification code.
NOTE If you are already logged in to KaseyaOne, then you will not be prompted to log in again and your account association will be completed automatically. Wait for the serial redirects to process the load and you will be redirected back to Datto Workplace.
- After you have successfully logged in to KaseyaOne, you will be redirected back to the Datto Workplace portal.
Unified Login for Datto Workplace is now enabled and users will automatically gain access to Datto Workplace through Log In with KaseyaOne. For more information, refer to KaseyaOne Unified Login in the Datto Workplace Manager Help.
To enable Log In with KaseyaOne for Graphus, do the following:
- Log in to Graphus in the usual way.
- Click MSP Administration on the top menu and then click KaseyaOne on the left navigation menu.
- In the Unified Login section, turn on Enable Log In with KaseyaOne.

- The KaseyaOne login page opens, prompting you to log in. Enter your KaseyaOne credentials and then the verification code.
NOTE If you are already logged into KaseyaOne, you will not be redirected but remain in Graphus. Graphus will be registered as a Unified Login module in your KaseyaOne instance.
- After you have successfully logged in to KaseyaOne, you will be redirected back to the Graphus portal.
- Click Save.
Unified Login for Graphus is now enabled and users will automatically gain access to Graphus through Log In with KaseyaOne. For more information, refer to Enabling KaseyaOne Unified Login for Graphus in the Graphus Help.
NOTE The My Glue and Network Glue modules are add-ons to IT Glue, and you access them from the IT Glue portal. After Unified Login is enabled for the IT Glue portal, each module can be accessed through Log In with KaseyaOne.
To enable Log In with KaseyaOne for IT Glue/My Glue/Network Glue, do the following:
-
From the IT Glue home page, navigate to Admin > Settings > Authentication.
To access IT Glue, use the URL for your region, where yourcompany is your company name.
Europe: https://yourcompany.eu.itglue.com
Australia: https://yourcompany.au.itglue.com
All other regions: https://yourcompany.itglue.com
- Turn on the Enable Log In with KaseyaOne toggle in the Single Sign-On section.
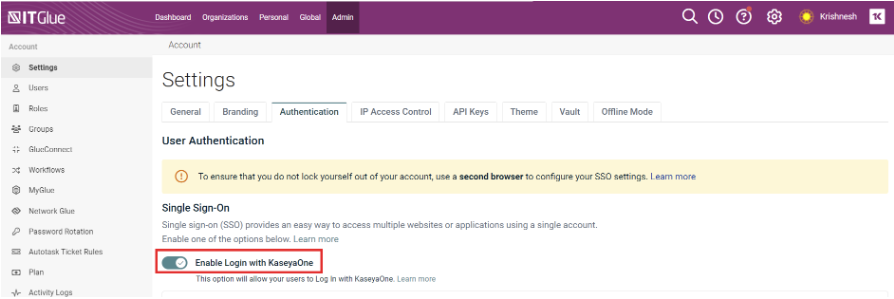
- The KaseyaOne login page opens, prompting you to log in. Enter your KaseyaOne credentials and then the verification code.
- After you have successfully logged in to KaseyaOne, you will be redirected back to the IT Glue portal.
Unified Login for IT Glue is now enabled and users will automatically gain access to IT Glue through Log In with KaseyaOne. For more information, refer to Setting up single sign-on to IT Glue in the IT Glue Help.
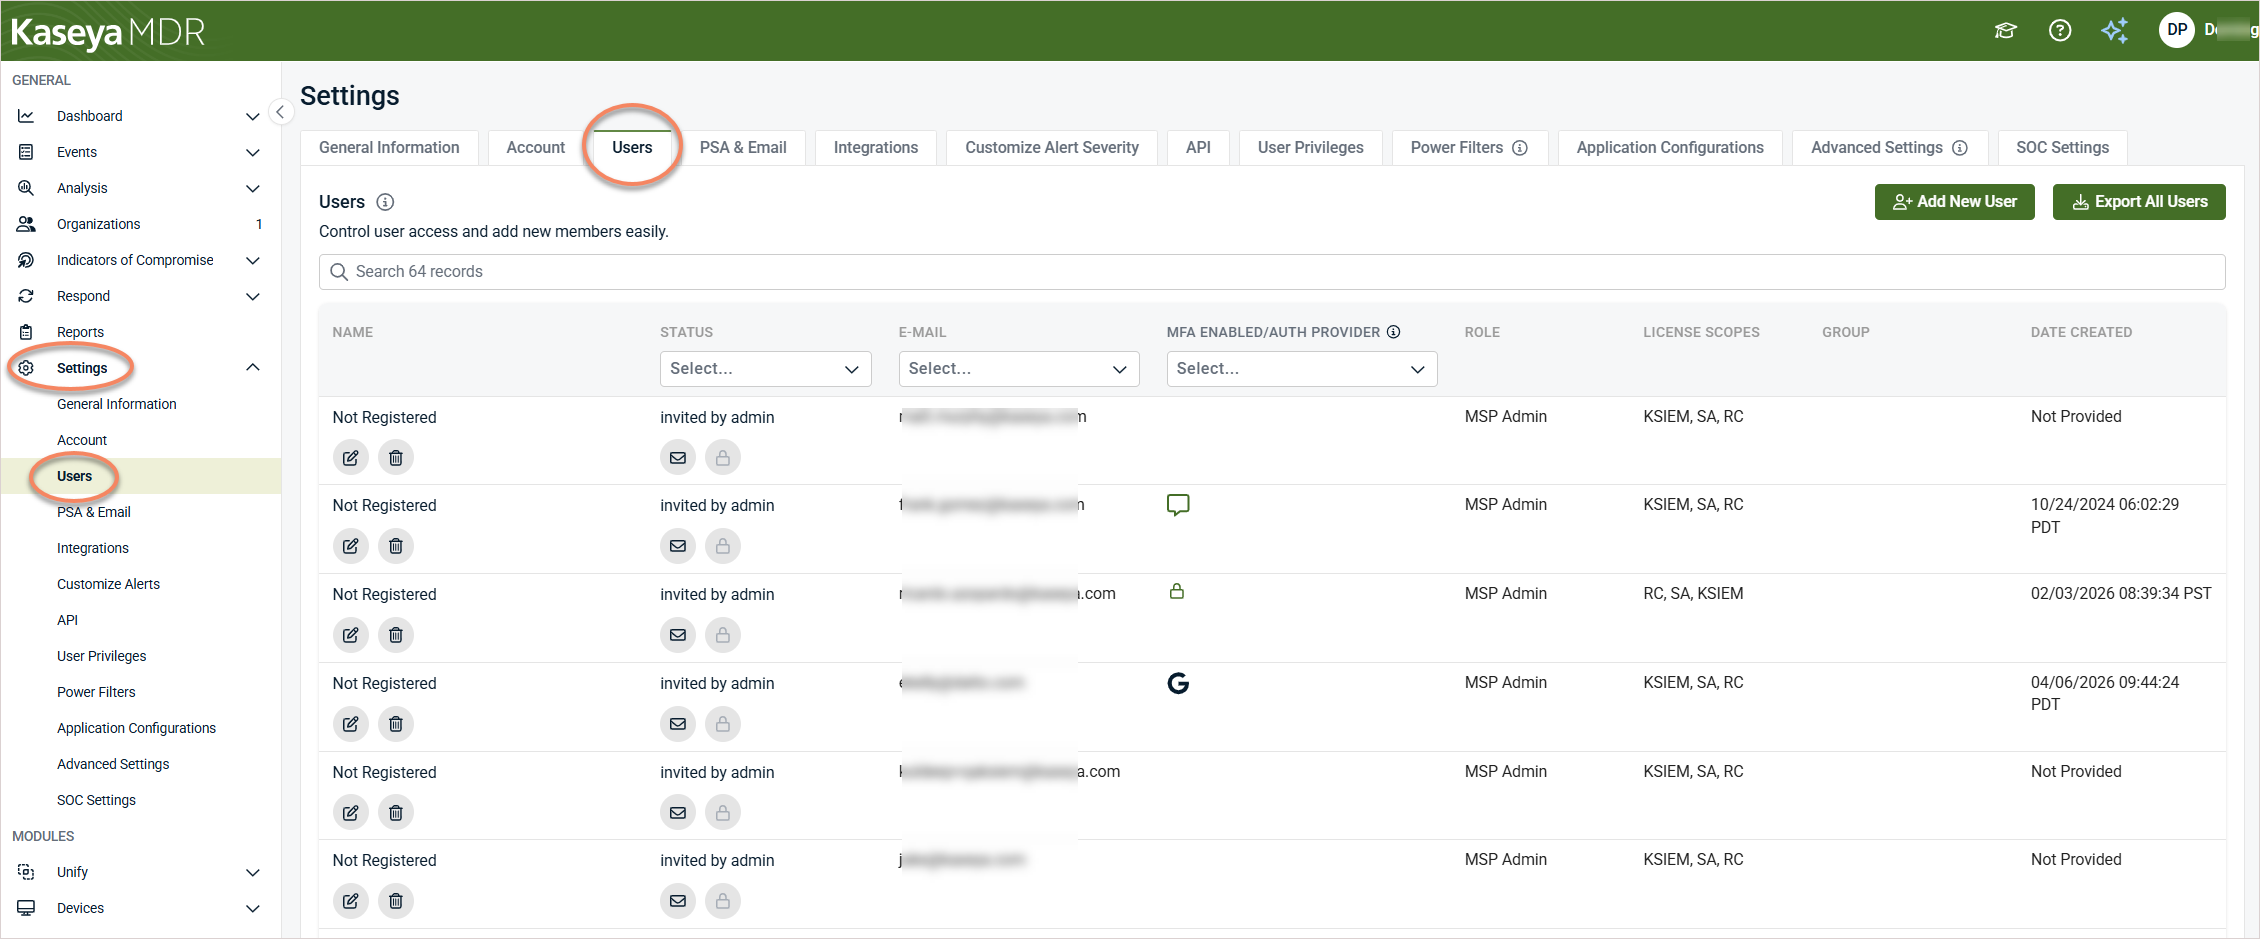
A KaseyaOne administrator with Admin‑level permissions can enable Unified Login for the Kaseya MDR module, making KaseyaOne authentication available to all eligible users in Kaseya MDR.
To enable Log In with KaseyaOne for Kaseya MDR, do the following:
-
In Kaseya MDR (https://manage.kaseyamdr.com/), navigate to Settings > Users.
-
In the Single Sign‑On section, turn on the Allow Users to Login with KaseyaOne toggle.
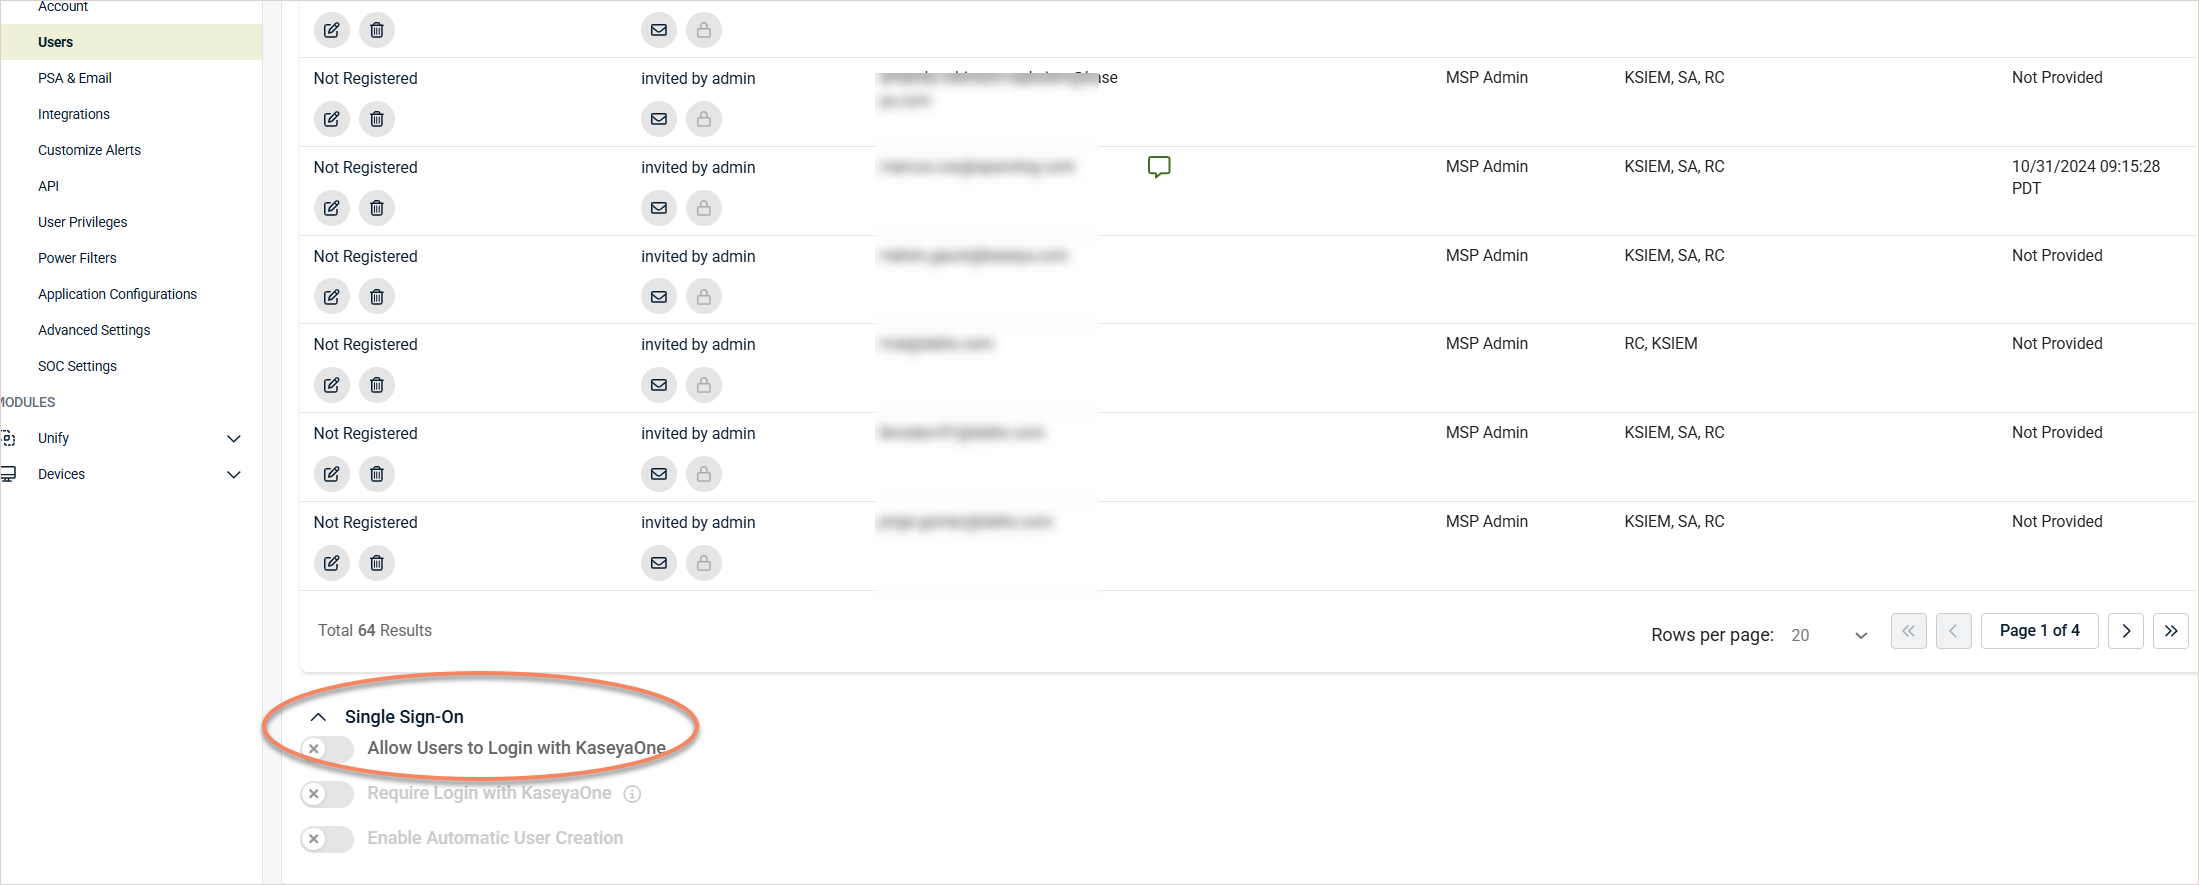
If you are not already signed in to KaseyaOne, you are prompted to authenticate. This registers Kaseya MDR as a Unified Login module in your KaseyaOne account.
Unified Login for Kaseya MDR is now enabled and:
-
Users can access Kaseya MDR using their KaseyaOne credentials.
-
The Kaseya MDR shortcut appears in the KaseyaOne dashboard for eligible users.
-
Authentication and multi‑factor enforcement occur through KaseyaOne.
For more information, refer to this Kaseya MDR article: Unified login with KaseyaOne.
Use this procedure to enable Log In with KaseyaOne for Kaseya MSP Success:
-
Log in to Kaseya MSP Success with Manager credentials.
NOTE Need help logging in? Contact your account manager or open a ticket with MSP Success.
-
In the upper-right corner of the MSP Success dashboard, click the K1 icon, and then turn on the Enable Log In With KaseyaOne toggle.

-
Log In with KaseyaOne is now enabled and:
Users can access Kaseya MSP Success using their KaseyaOne credentials.
The Kaseya MSP Success shortcut appears on the home page dashboard in KaseyaOne for eligible users.
To enable Log In with KaseyaOne for Kaseya Quote Manager, do the following:
- Log in to Kaseya Quote Manager at https://youremaildomain.mykaseyaquotemanager.com, where youremaildomain is your company's email domain.
- From the left navigation menu, navigate to Settings > KaseyaOne.
- In the Unified Login section, turn on the Enable KaseyaOne toggle.

- The KaseyaOne login page opens, prompting you to log in. Enter your KaseyaOne credentials and then the verification code.
- After you have successfully logged in to KaseyaOne, you will be redirected back to the Kaseya Quote Manager portal.
Unified Login for Kaseya Quote Manager is now enabled and users will automatically gain access to Kaseya Quote Manager through Log In with KaseyaOne. For more information, refer to KaseyaOne integration for Kaseya Quote Manager in the Kaseya Quote Manager Help.
To enable Log In with KaseyaOne for myITprocess, do the following:
- From the MyITprocess home page (https://login.live.myitprocess.com/login), navigate to Settings> Account Settings and then the Security tab.
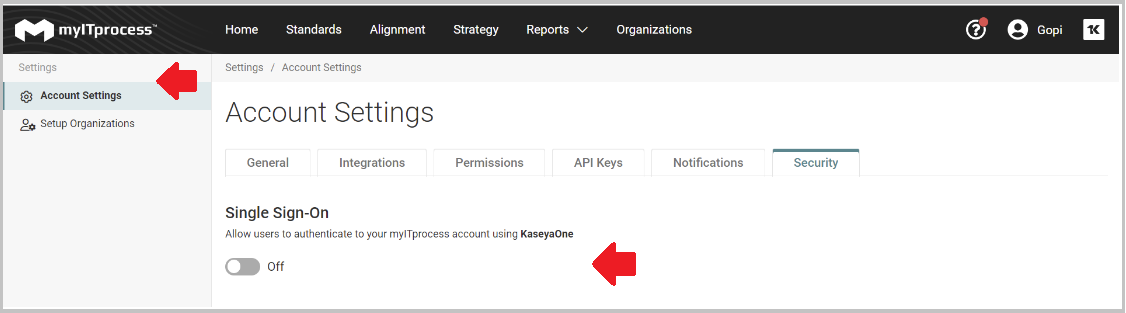
- Turn on the toggle in the Single Sign-On section.
- The KaseyaOne login page opens, prompting you to log in. Enter your KaseyaOne credentials and then the verification code.
- If this is your first time logging in to myITprocess through Log In with KaseyaOne, click Connect when prompted to connect your myITprocess account with your KaseyaOne account.
Unified Login for myITprocess is now enabled and users will automatically gain access to myITprocess through Log In with KaseyaOne. For more information, refer to Log In with KaseyaOne for myITprocess in the myITprocess Knowledge Base.
NOTE All RapidFire modules (Compliance Manager, Cyber Hawk, Network Detective Pro, VulScan), although purchased individually, are accessed from the RapidFire Tools portal. After Unified Login is enabled for the RapidFire Tools portal, each module can be accessed through Log In with KaseyaOne.
- Go to the RapidFire Tools portal and click Global Settings on the top menu.

- Click IT Complete > Settings on the left navigation menu.

- Go to the KaseyaOne tab and turn on the Enable Log In with KaseyaOne toggle.
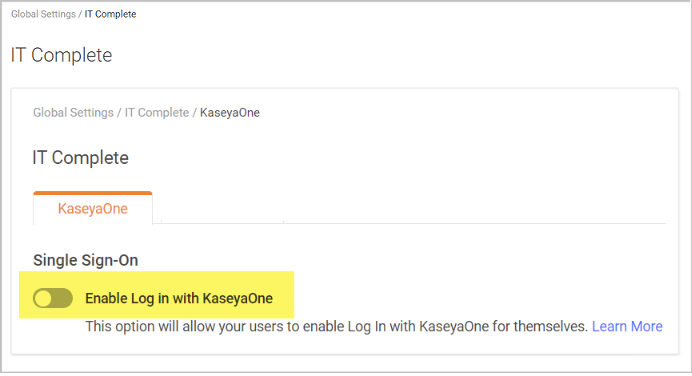
- The KaseyaOne login page opens, prompting you to log in. Enter your KaseyaOne credentials and then the verification code.
- After you have successfully logged in to KaseyaOne, you will be redirected back to the RapidFire portal.
Unified Login for RapidFire is now enabled and all users will automatically gain access to RapidFire Tools through Log In with KaseyaOne. For more information, refer to Rapid Fire Tools Help.
To enable Log In with KaseyaOne for RocketCyber, do the following:
- In RocketCyber, click the Provider drop-down menu and select Provider Settings.

- Turn on the Allow users to authenticate with KaseyaOne toggle.
- The KaseyaOne login page opens, prompting you to log in. Enter your KaseyaOne credentials and then the verification code.
- After you have successfully logged in to KaseyaOne, you will be redirected back to the RocketCyber portal (Provider Settings).
Unified Login for RocketCyber is now enabled and all users will automatically gain access to RocketCyber through Log In with KaseyaOne. For more information, refer to Configure Single-Sign-On with KaseyaOne in the RocketCyber Help.
To enable Log In with KaseyaOne for SaaS Alerts, do the following:
- From the left navigation in SaaS Alerts (https://manage.saasalerts.com/sign-in), navigate to Settings > Users.
- Turn on the Allow Users to Login with KaseyaOne toggle.
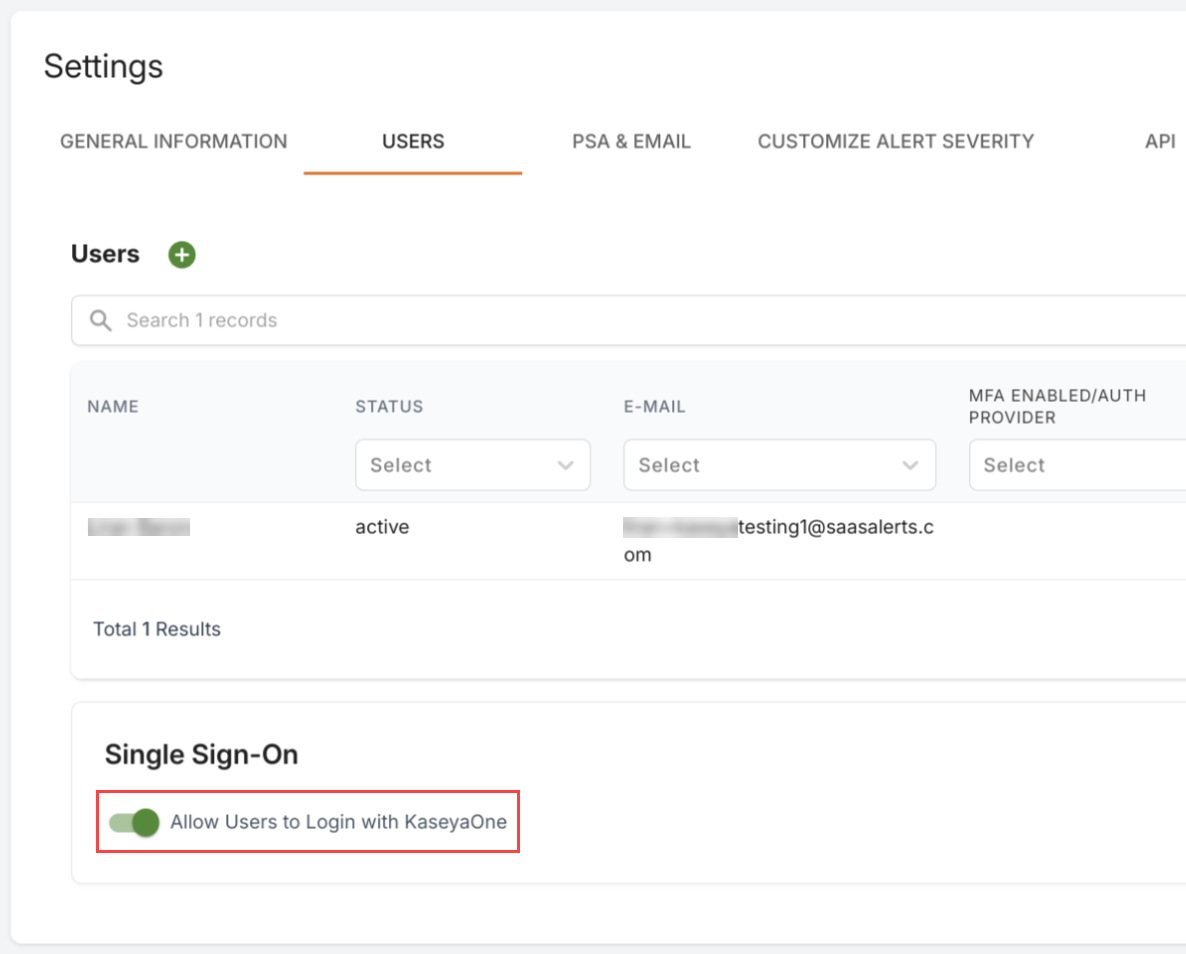
- If you are not already logged in to KaseyaOne, you will be prompted to log in.
Unified Login for SaaS Alerts is now enabled and all users will automatically gain access to SaaS Alerts through Log In with KaseyaOne.
Please refer to your module documentation and module release notes for more information.
NOTE This procedure requires Google Workspace Global Administrator credentials and KaseyaOne Admin role credentials.
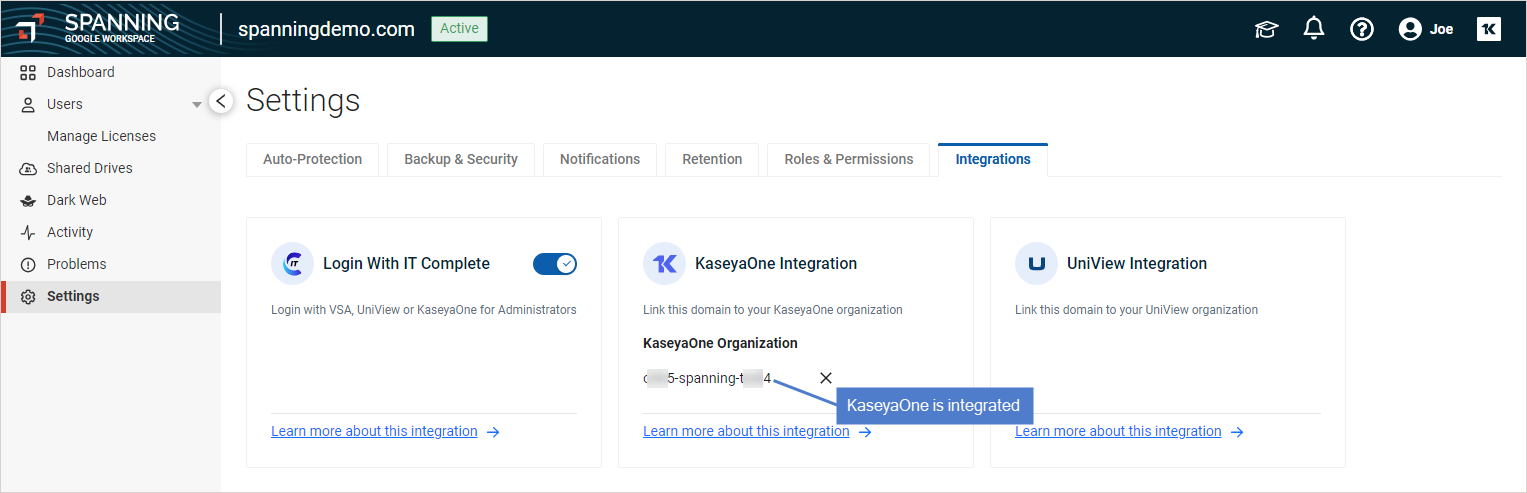
To enable Log In with KaseyaOne for Spanning Backup for Google Workspace, do the following:
- From the left navigation menu in KaseyaOne (one.kaseya.com), navigate to Admin Settings > Groups.
- Add the KaseyaOne users who should have Admin access to the Spanning module to this Spanning system group: Admin Access for Spanning Google Workspace.
- Log in to Spanning Backup for Google Workspace as a Global Administrator.
- On the Settings > Integrations tab, enable the Login with IT Complete toggle.
 indicates the feature is disabled.
 indicates the feature is enabled.
- In the KaseyaOne Integration tile, click Link Organization. You are redirected to the Google Workspace login page.
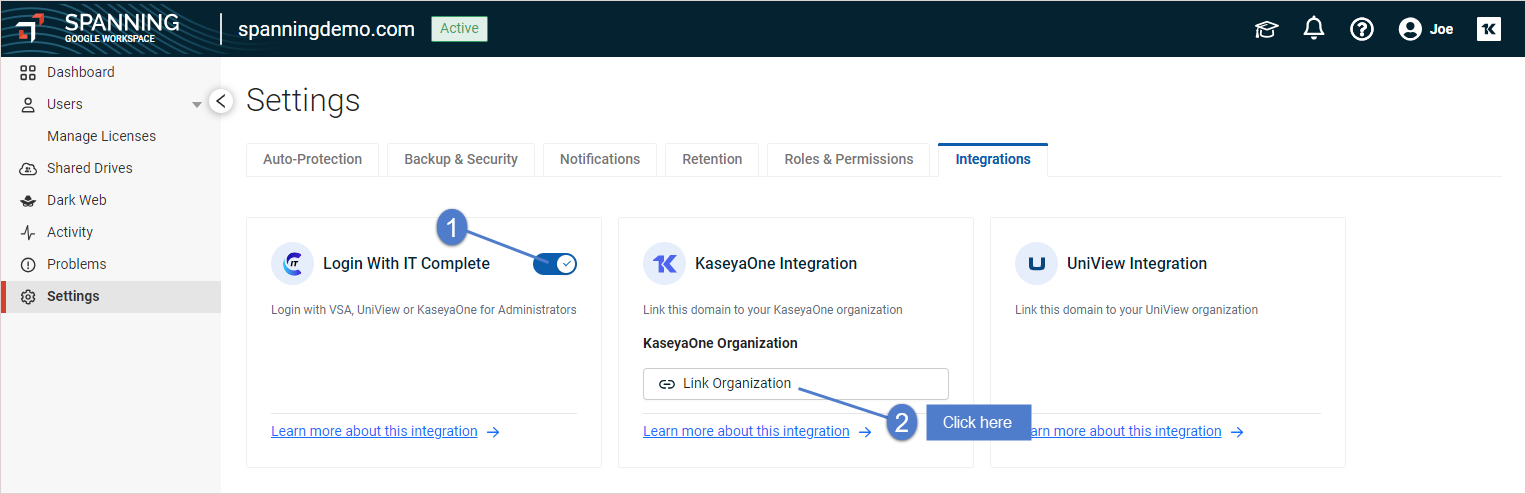
- Log into Google Workspace (with your Global Administrator account.
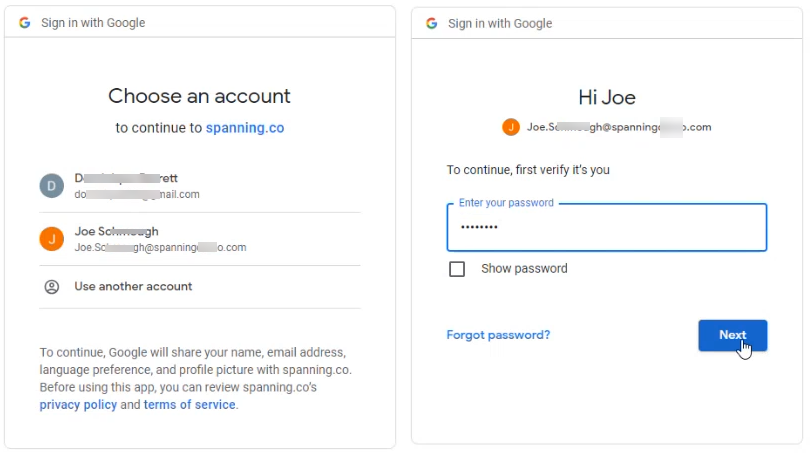
- If you are not already logged in to KaseyaOne, you are redirected to the KaseyaOne and prompted to log in.
- You are redirected to Spanning Backup, where you can see that the integration has been added.
For details, refer to Spanning system groups.
Unified Login for Spanning is now enabled, and all users will automatically gain access to Spanning through Log In with KaseyaOne. For more information, refer to the Spanning Backup for Google Workspace online help.
NOTE This procedure requires Microsoft 365 Global Administrator credentials and KaseyaOne Admin role credentials.
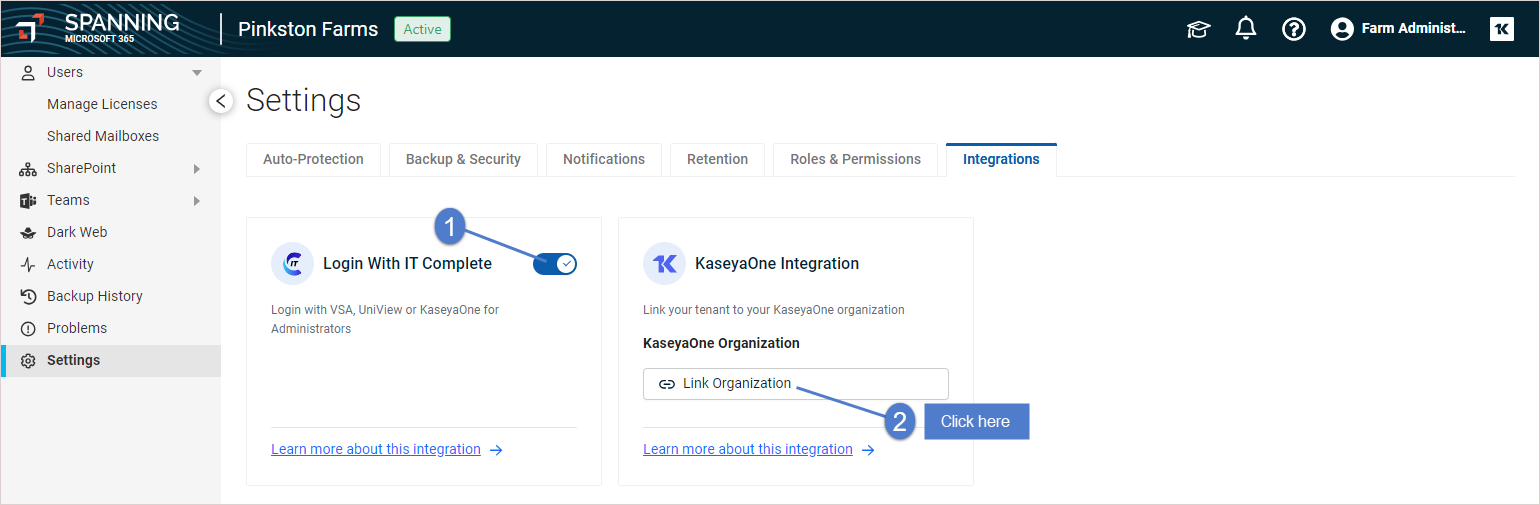
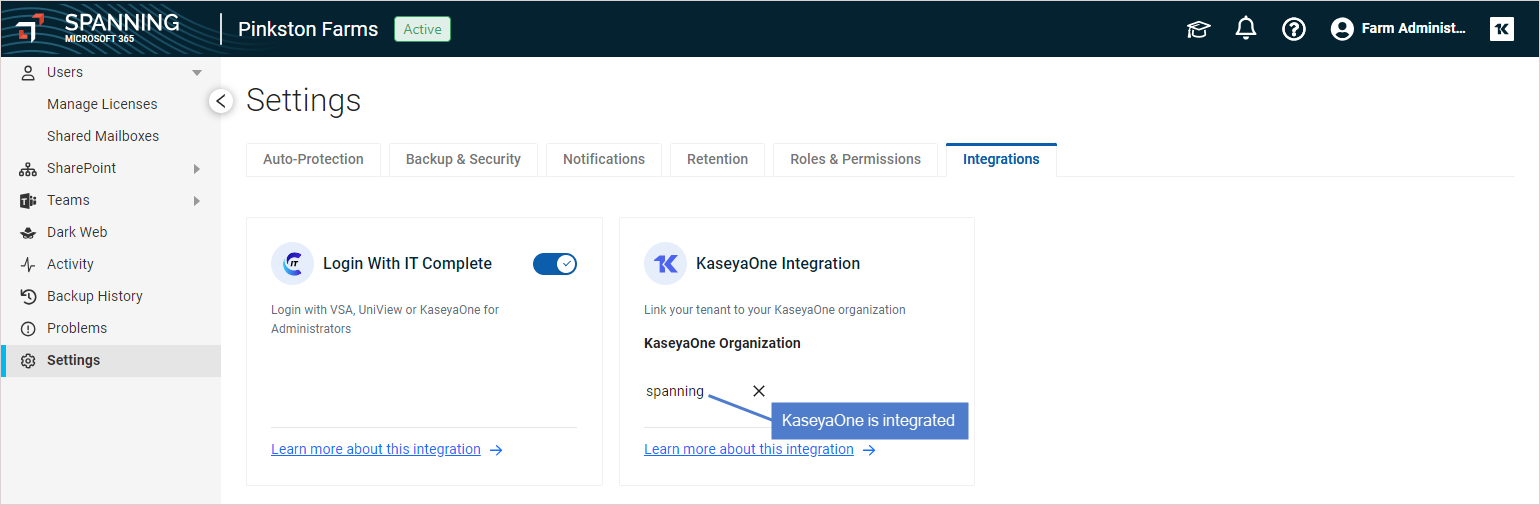
To enable Log In with KaseyaOne for Spanning Backup for Microsoft 365, do the following:
- From the left navigation menu in KaseyaOne (one.kaseya.com), navigate to Admin Settings > Groups.
- Add the KaseyaOne users who should have Admin access to the Spanning module to this Spanning system group: Admin Access for Spanning Microsoft 365.
- Log in to Spanning Backup for Microsoft 365 as a Global Administrator.
- On the Settings > Integrations tab, enable the Login with IT Complete toggle.
- indicates the feature is disabled.
- indicates the feature is enabled.
- In the KaseyaOne Integration tile, click Link Organization. You are redirected to the Microsoft 365 login page.
- Log into Microsoft 365 with your Global Administrator account.
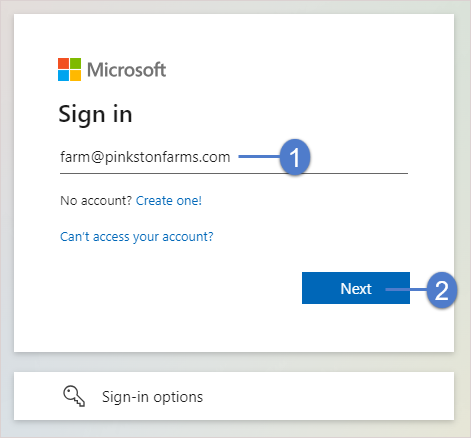
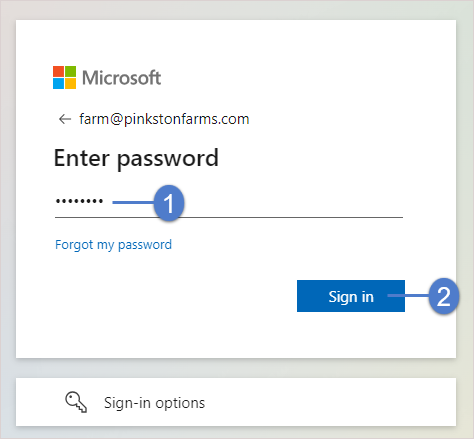
- If you are not already logged in to KaseyaOne, you are redirected to the KaseyaOne and prompted to log in.
- You are redirected to Spanning Backup, where you can see that the integration has been added.
For details, refer to Spanning system groups.
Unified Login for Spanning is now enabled, and all users will automatically gain access to Spanning through Log In with KaseyaOne. For more information, refer to the Spanning Backup for Microsoft 365 online help.
UniView Portal manages the following backup products: Datto Backup for Microsoft Entra ID, Endpoint Backup v2, Spanning, and Unitrends.
Log In with KaseyaOne is on by default in UniView Portal, but may be disabled if you were an early user or a Superuser turned it off. Follow the steps below to check its status or enable it.
Spanning Backup: To enable access to the Spanning Backup UI from UniView via single sign-on (SSO), you must also enable Log In with KaseyaOne in Spanning Backup. For details, see the following:
- Spanning Backup for Microsoft 365: Enable Log In with KaseyaOne for Spanning Backup for Microsoft 365
- Spanning Backup for Google Workspace: Enable Log In with KaseyaOne for Spanning Backup for Google Workspace
- Spanning Backup for Salesforce: To enable IT Complete login for UniView
To enable Log In with KaseyaOne, add the KaseyaOne integration to UniView Portal:
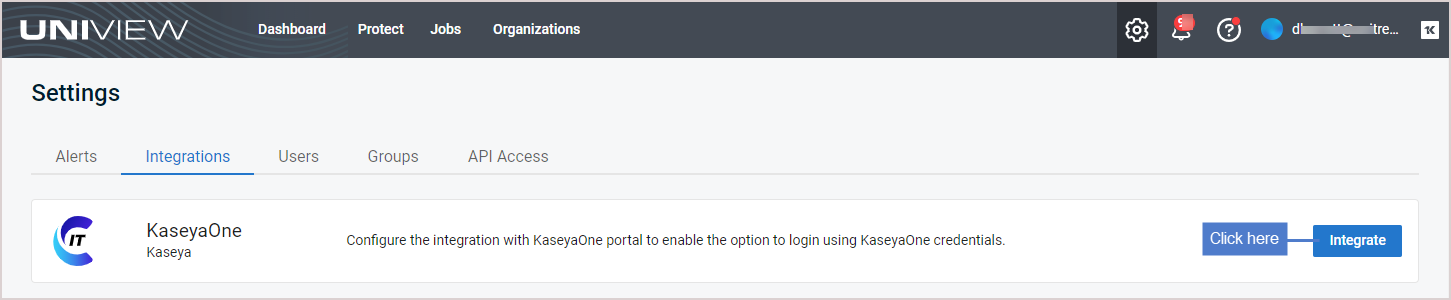
NOTE To perform this procedure, you must log in to the UniView Portal as a Superuser and log in to KaseyaOne as a Admin role user.
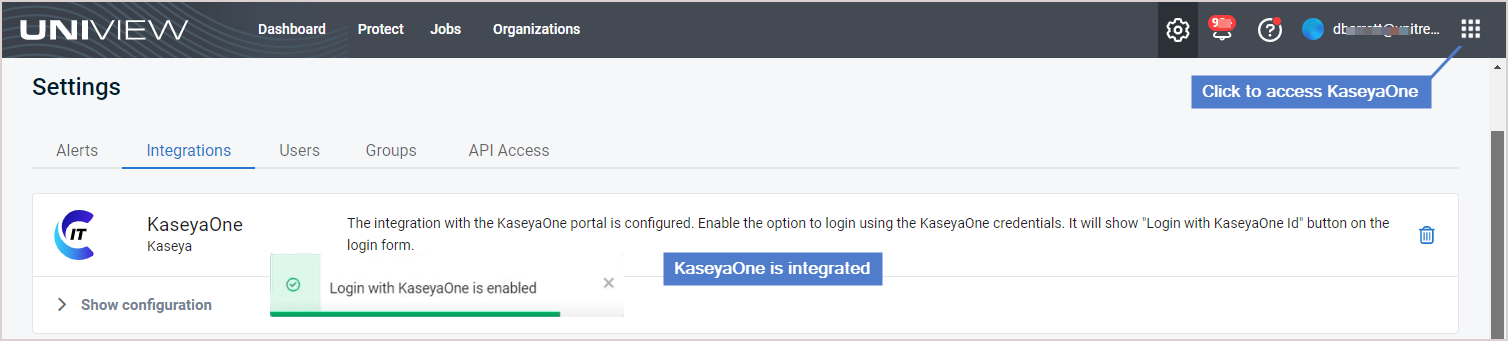
- Log in to the UniView Portal (https://login.backup.net/) as a Superuser.
- Click
 :
:
- Select the Integrations view.
- Locate the KaseyaOne integration and click Integrate.
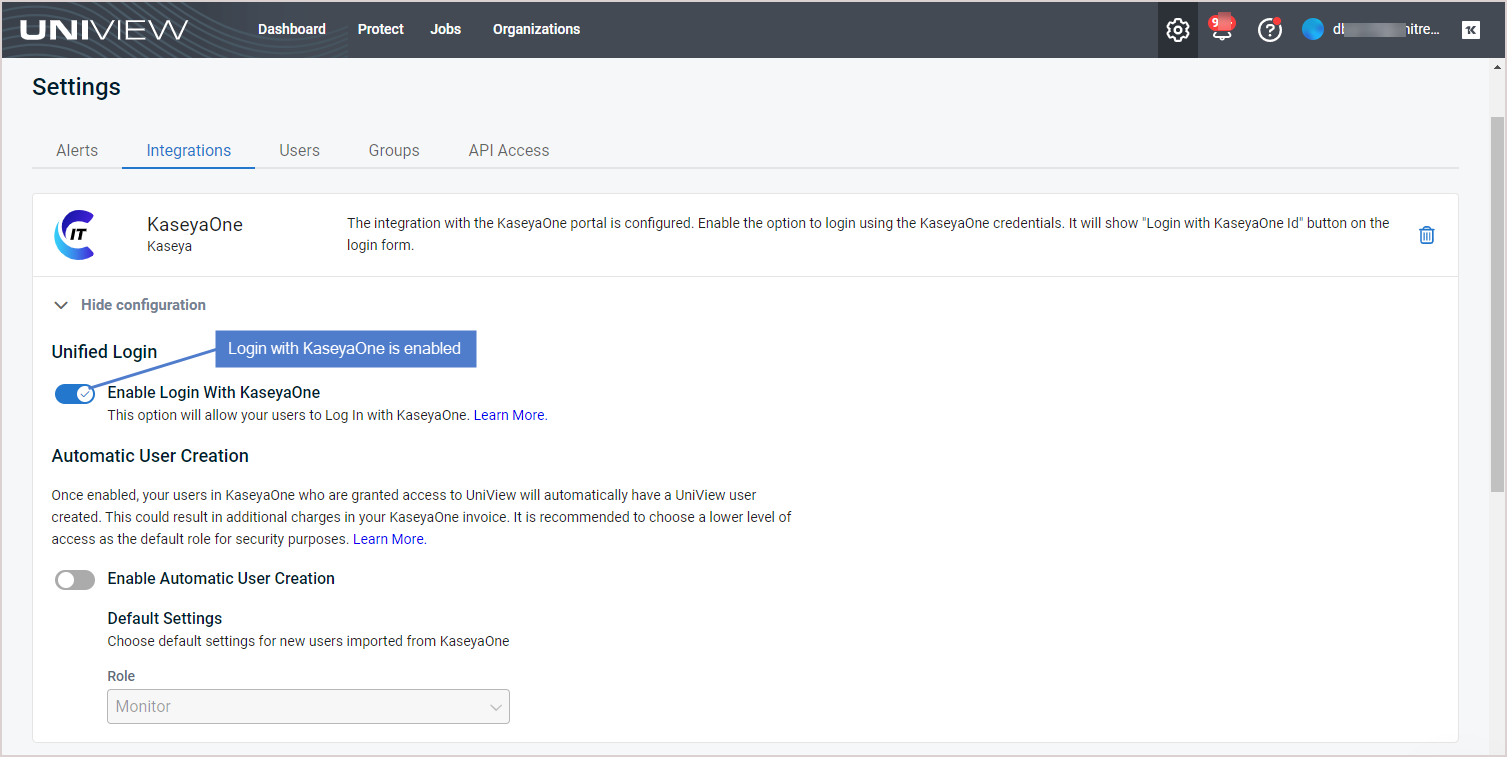
NOTE The KaseyaOne integration may already be enabled. If you do not see the Integrate button, the integration has already been added. Click Show Configuration to view the integration settings. Ensure that the Enable Login with KaseyaOne toggle is enabled. 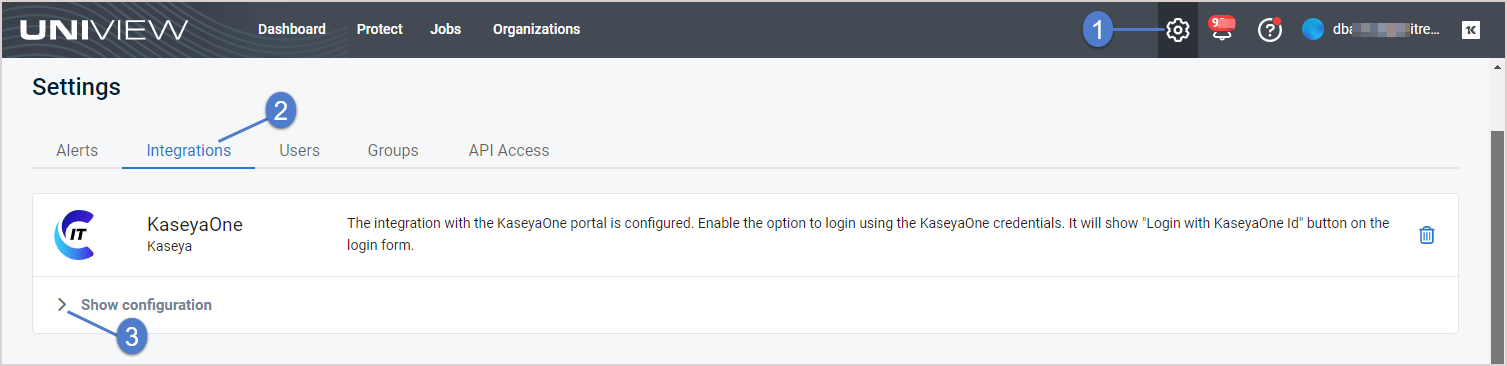

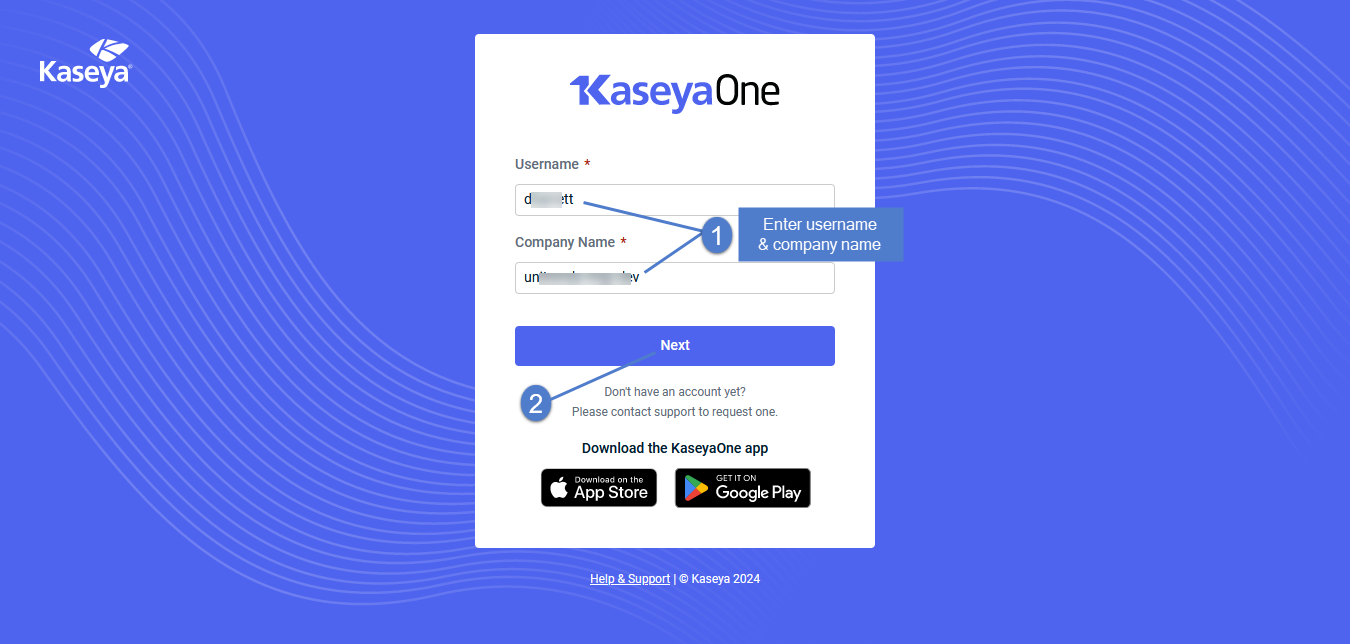
- Log in to the KaseyaOne portal as a Admin role user. (If your KaseyaOne account does not have the Admin role, you receive an "Access denied" message.)
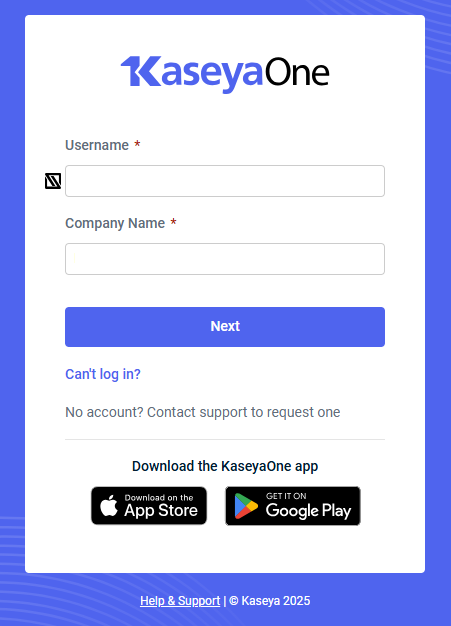
- Enter your username and company name. Click Next.
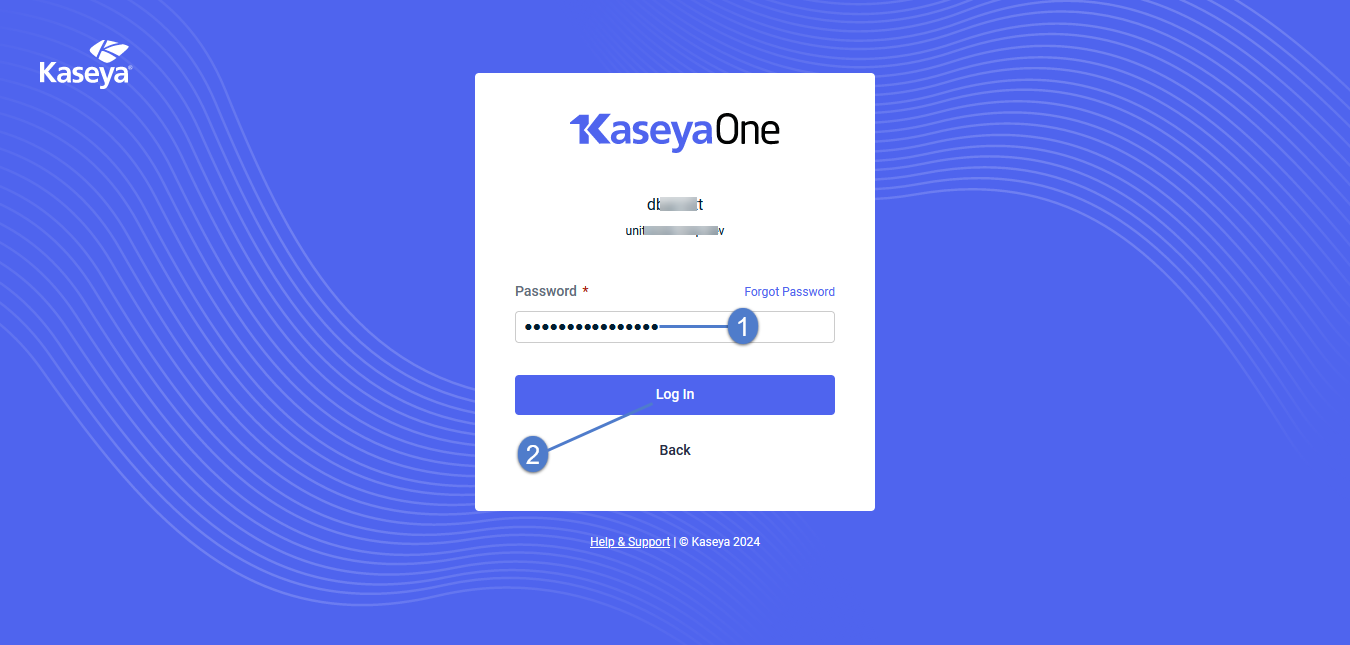
- Enter your password. Click Log In.
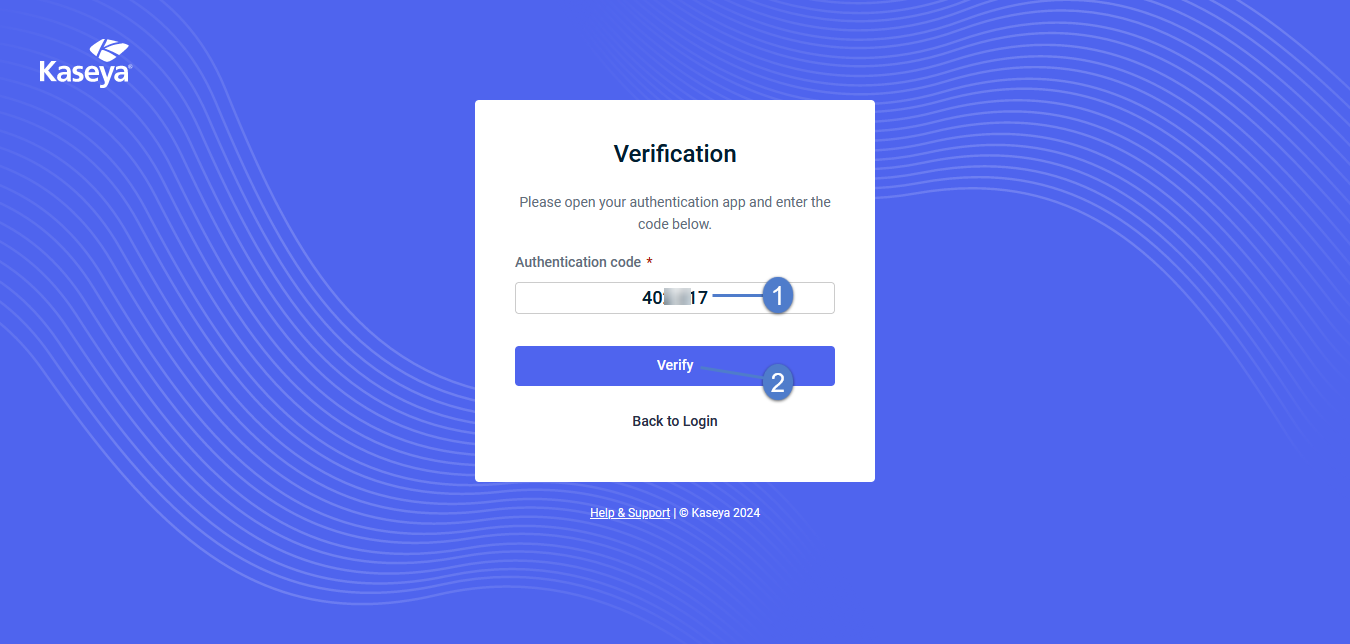
- Enter your two-factor authentication (2FA) code, then click Verify. (You can obtain the code from your authenticator app.)
- The integration is configured and Login with KaseyaOne is enabled.
- To access KaseyaOne, click
 .
. 
- You can see that the UniView module has been added to KaseyaOne. To connect to UniView from KaseyaOne, click the UniView module:

- The UniView Portal Dashboard displays.
- (Optional) View the Login with KaseyaOne setting on the Integrations tab by clicking Show Configuration:
Unified Login for UniView is now enabled and all users will automatically gain access to UniView through Log In with KaseyaOne. For more information, see Working with your KaseyaOne Integration in the UniView Portal Guide.
To enable Log In with KaseyaOne for vPenTest, do the following:
- Log in to the vPenTest Portal in the usual way and navigate to Dashboard > Global Options.
- Go to the KaseyaOne tab and turn on the Enable Log In with KaseyaOne toggle to enable the feature.

- Click Save.
Unified Login for vPenTest is now enabled and all users will automatically gain access to vPenTest through Log In with KaseyaOne. For more information, refer to Vonahi Help.
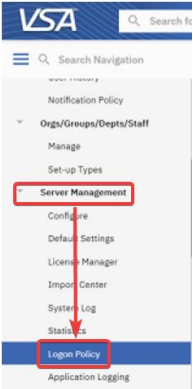
To enable Log In with KaseyaOne for VSA 9, do the following:
- Log in to VSA 9 in the usual way.
- Navigate to System > Server Management > Logon Policy.
- Select the Enable Log In with IT Complete check box and then click Update to enable the feature.
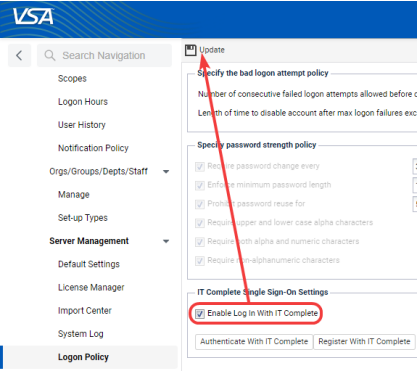
- The KaseyaOne login page opens, prompting you to log in. Enter your KaseyaOne credentials and then the verification code.
NOTE If you are already logged in to KaseyaOne, then you will not be prompted to log in again and your account association will be completed automatically. Wait for the serial redirects to process the load and you will be redirected back to VSA 9.
Unified Login for VSA 9 is now enabled and all users will automatically gain access to VSA 9 through Log In with KaseyaOne. For more information, refer to VSA Logon Policy.
To enable Log In with KaseyaOne for VSA 10, do the following:
- Log in to VSA 10 in the usual way.
NOTE The direct login URL is https://yourCompany.vsax.net, where yourCompany is your company name.
- Navigate to Administration > Configuration > Settings on the left navigation menu and select KaseyaOne Log In Settings.
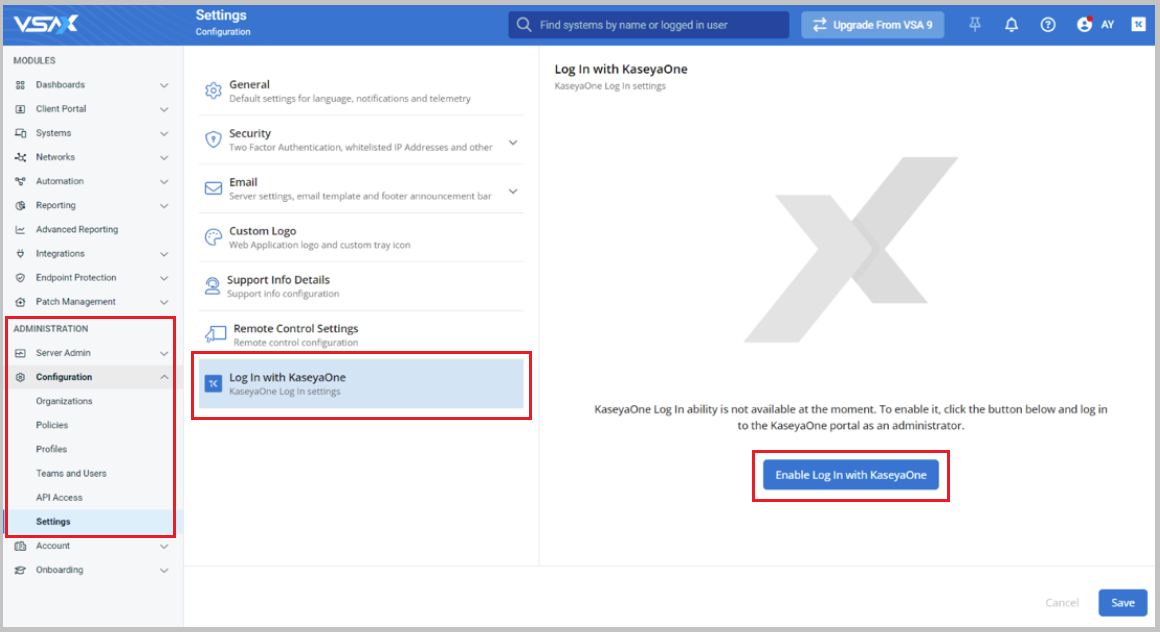
- On the KaseyaOne Log In settings page, click the Enable Log In with KaseyaOne button.
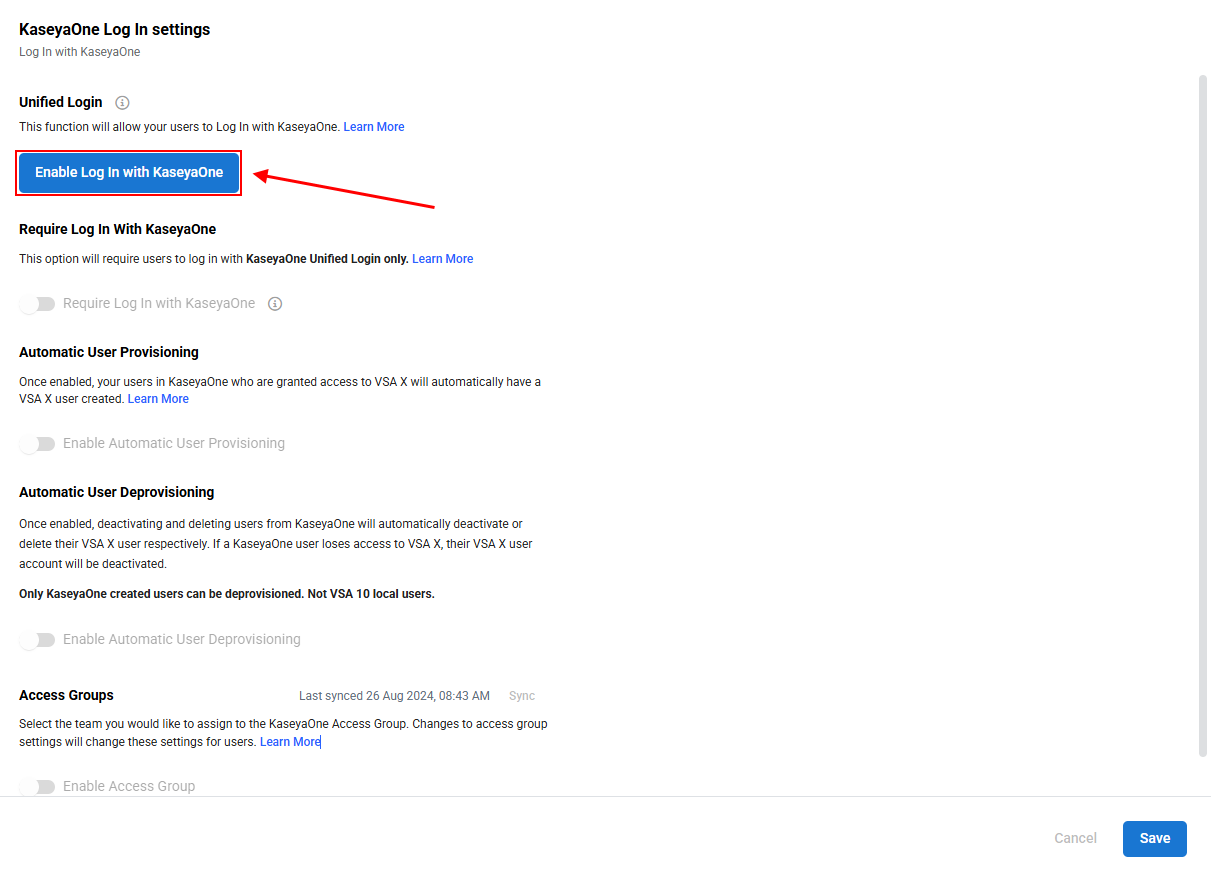
- The KaseyaOne login page opens, prompting you to log in. Enter your KaseyaOne credentials and then the verification code.
NOTE If you are already logged in to KaseyaOne, then you will not be prompted to log in again and your account association will be completed automatically. Wait for the serial redirects to process the load and you will be redirected back to VSA 10.
- After you have successfully logged into KaseyaOne, you will be redirected back to the VSA X portal. Click
 on the application banner and you will no longer see the Enable Unified Login option, you will see the Disable Unified Login option instead.
Unified Login for VSA 10 is now enabled and all users will automatically gain access to VSA 10 through Log In with KaseyaOne. For more information, refer to Unified Login with KaseyaOne in the VSA 10 Help.


