Third-party IdP SSO integration
 Security and navigation
NAVIGATION Header > Admin Settings > Single Sign-On
PERMISSIONS Admin role
KaseyaOne integrates with third-party identity providers (IdPs) that support Security Assertion Markup Language (SAML) 2.0, enabling you to centrally manage users through providers like Okta or Microsoft Entra ID.
The integration between KaseyaOne and the third-party IdP allows users to log in to KaseyaOne from both the IdP interface and the KaseyaOne login page using their IdP credentials. This reduces the amount of user credentials in use and streamlines the login process. You can also add an extra layer of security by forcing users to log in to KaseyaOne from the IdP only.
To get started, you need to configure the SSO integration between KaseyaOne and your third-party IdP. First you will configure the KaseyaOne SSO application in your third-party IdP (refer to Setting up a third-party IdP SSO integration for KaseyaOne). Next, you will configure SSO for your IdP in KaseyaOne (refer to Configure SSO in KaseyaOne for a third-party IdP integration). After completing these procedures, the integration is enabled and you can implement these optional SSO-related features as needed:
- Enforce Log In with SSO. This forces users to log in with their SSO application.
- Enable Automatic User Creation. This allows just-in-time provisioning for the third-party IdP SSO application so that user accounts are automatically created with a specified default role when new users authenticate for the first time.
- IdP Groups Access Control. This allows you to control user access for third-party IdP SSO users.
SSO authentication behavior
When a user logs in to KaseyaOne via third-party IdP SSO, the KaseyaOne login page initiates the sign-in flow and hands authentication off to your configured IdP. From that point, the IdP takes over: it ingests the credentials and passes the user's verified identity directly to KaseyaOne via a SAML assertion. KaseyaOne does not independently authenticate the username entered on its login page.
NOTE If an active IdP session already exists (e.g., in another browser tab), login page credentials are not evaluated because the existing IdP session is used to access KaseyaOne.
How to...
Configure SSO in KaseyaOne for a third-party IdP integration
To configure SSO in KaseyaOne for a third-party IdP:
- Navigate to the Single Sign-On page. Refer to Security and navigation.
- In the Single Sign-On with Identity Providers section, click Add configuration.
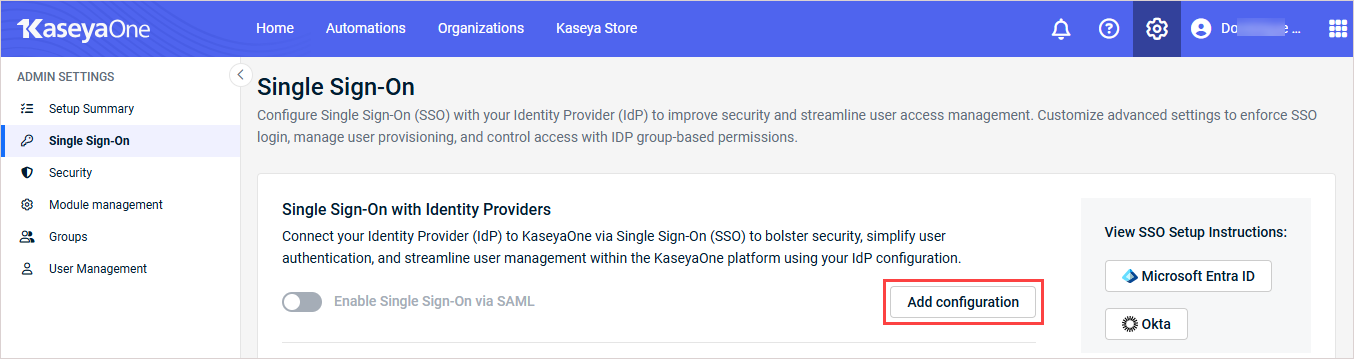
- Enter the following information:
- Identity Provider Single Sign-On URL: Enter the third-party IdP SSO URL in this field.
- Identify Provider Issuer: Enter the third-party IdP issuer in this field.
- Click Upload Certificate to upload the third-party IdP certificate. Enter the Certificate Information.
- Click Save.
- In the Single Sign-On with Identify Providers section, turn on the Enable Single Sign-On via SAML toggle to enable SSO via SAML for the IdP.
- Click Save. You will see a check mark and the word Configured after successfully configuring SSO.
NOTE Secure Assertion Markup Language (SAML) provides a way to authenticate users once and then communicate that authentication to multiple other applications.
-
Configure one or more of the following Advanced Single Sign-On Settings as required:
- Enforce Log In with SSO to force users to log in with their SSO application. Refer to Configure Enforce Log In with SSO in KaseyaOne.
- Enable Automatic User Creation to allow just-in-time (JIT) user provisioning for the SSO application. Refer to Configure Enable Automatic User Creation for a third-party IdP SSO in KaseyaOne.
- IdP Groups Access Control to control access to KaseyaOne using your IdP group user assignments. Refer to Configure third-party IdP Groups Access Control in KaseyaOne.
IMPORTANT Advanced Single Sign-On Settings cannot be enabled until Enable Single Sign-On via SAML is configured and enabled.
NOTE Currently, only one third-party IdP integration can be active in KaseyaOne.
Upload a new certificate in KaseyaOne for a third-party IdP integration
A valid certificate is needed for SSO functionality between KaseyaOne and your third-party IdP. SSO certificates typically expire in two years. To prevent login disruptions, you must upload a new certificate before your existing certificate expires.
When will my certificate expire?
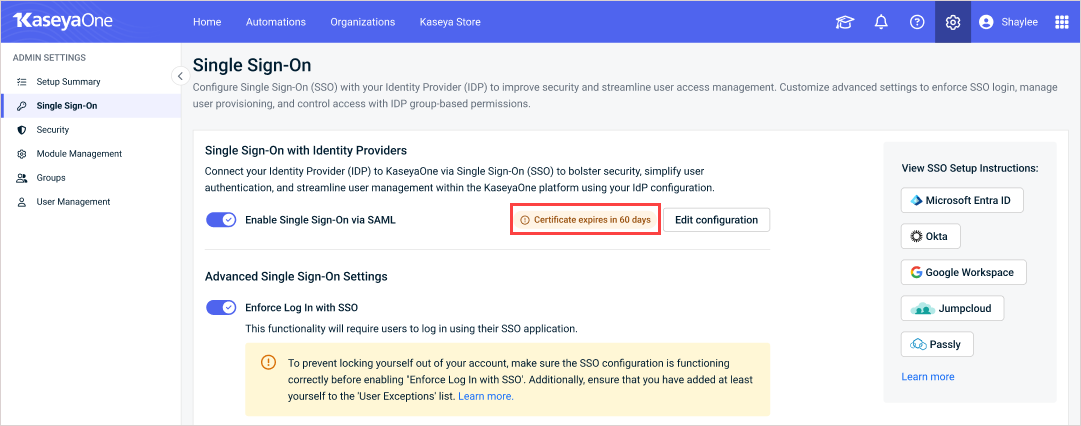
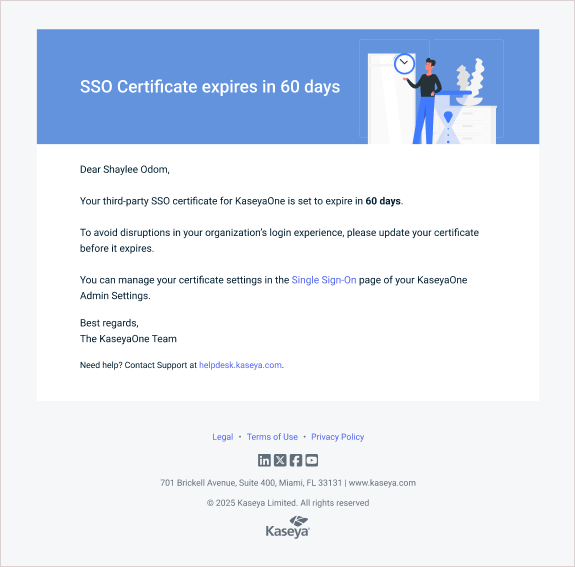
KaseyaOne notifies all Admin users when an SSO certificate is nearing expiration: at 60 days before expiration, 30 days before expiration, seven days before expiration, on expiration day, and one day after expiration. These notifications display in the KaseyaOne UI and are also emailed to Admin users. Notifications cease once a new, valid certificate has been uploaded. Example notifications are shown here:
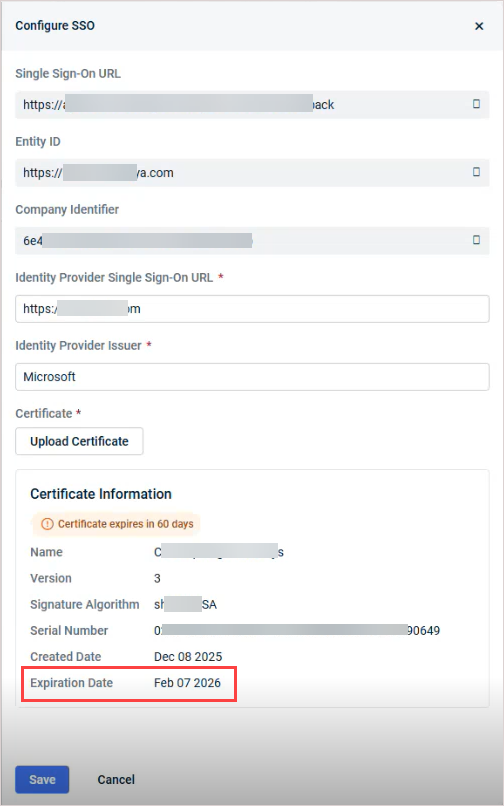
You can also check the certificate's expiration date by viewing your third-party IdP's configuration from the Single Sign-On page.
To upload a new certificate
- Navigate to the Single Sign-On page. Refer to Security and navigation.
- In the Single Sign-On with Identity Providers section, click Edit configuration.
- In the Configure SSO pane, click Upload Certificate, browse to select the new certificate, then click Open to upload.
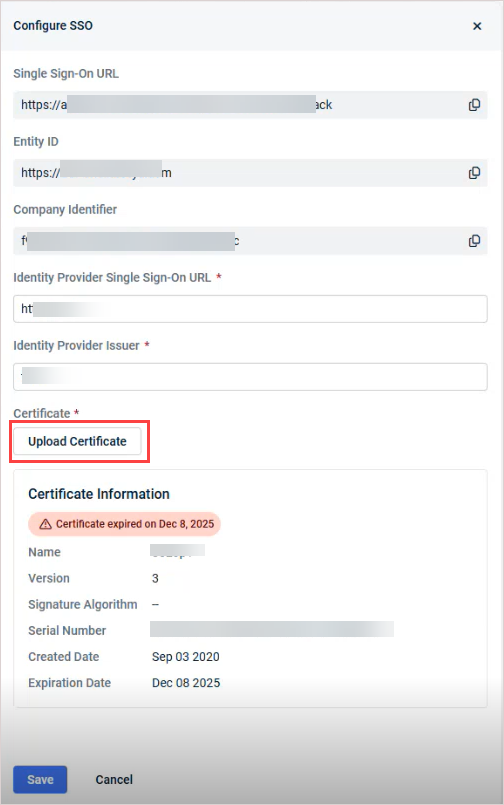
- You see a Certificate uploaded successfully message and details of the new certificate display in the Configure SSO pane. All certificate expiration notifications are removed from the KaseyaOne UI.
Configure Enforce Log In with SSO in KaseyaOne
You can configure Enforce Log In with SSO functionality as shown in the following procedure to require users to log in to KaseyaOne with their SSO application.
-
Navigate to the Single Sign-On page. Refer to Security and navigation.
-
In the Advanced Single Sign-On Settings section, turn on the Enforce Log In with SSO toggle to enable the feature.
- If enabled, users are forced to log in to KaseyaOne with their SSO application (and prompted to do so).
- If disabled, users are allowed to log in to KaseyaOne using either their SSO application or local authentication.
-
From the User Exceptions drop-down menu, select one or more users who will be exempt from the Enforce Log In with SSO condition, if enabled.
-
To prevent locking yourself out of your account, make sure the IdP SSO configuration is functioning correctly before enabling Enforce Log In with SSO. Additionally, ensure that you have added at least yourself to the User Exceptions list.
-
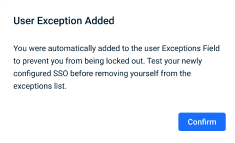
Users enabling Enforce Log In with SSO in KaseyaOne, if not an Admin Root user, are notified that they have been added to the User Exceptions list, with the option to remove themselves.
-
To disable Enforce Log In with SSO, turn off the toggle.
Configure Enable Automatic User Creation for a third-party IdP SSO in KaseyaOneYou can configure Enable Automatic User Creation as shown in the following procedure to enable just-in-time provisioning (JIT) for the SSO application. IdP SSO users will then be provisioned on a just-in-time basis with a specified default role when they authenticate for the first time.
JIT provisioning increases efficiency and productivity, saves time and resources, and reduces administrative costs. It allows new users to access a web application in real-time, eliminating the need for manual account setup.
The prerequisites to using JIT provisioning for third-party IdP SSO are:
- You must have IdP SSO to enable this function. Configure the SSO connection and settings for the IdP and toggle on Enable Single Sign-On via SAML in KaseyaOne. Refer to Setting up a third-party IdP SSO integration for KaseyaOne.
-
Preconfigure the user role and groups before turning on this feature.
- While configuring Enable Automatic User Creation, you will select a default role and one or more groups to assign to auto-provisioned users. Preconfigure the KaseyaOne user role and groups you will use before you configure this feature. Refer to Managing user roles and Managing KaseyaOne groups.
To configure Enable Automatic User Creation for third-party IdP SSO in KaseyaOne:
- Navigate to the Single Sign-On page. Refer to Security and navigation.
- In the Advanced Single Sign-On Settings section, turn on the Enable Automatic User Creation toggle to enable the feature.
- If enabled, user accounts are automatically created with the specified default role when users authenticate for the first time.
- If disabled, users must ask their administrator to create a user account for them with the required role after they authenticate.
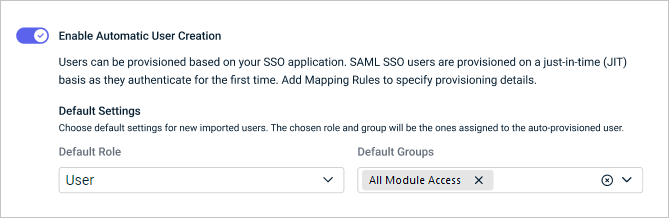
- In the Default Role field, click the drop-down arrow and select one role to assign to auto-provisioned users. You can select Admin, Billing and Purchasing, User, Co-Managed User, or any active customized role that has been added to your organization.
-
A customized role that is assigned as the default cannot be locked or deleted.
-
If IdP Groups Access Control is enabled, those mapping rules override the default role specified here. Refer to Configure third-party IdP Groups Access Control in KaseyaOne.
- In the Default Groups field, click the drop-down arrow and select one or more group(s) where auto-provisioned users will be assigned.
- Changes are automatically saved.
-
To disable Enable Automatic User Creation, turn off the toggle.
-
To edit the Enable Automatic User Creation, simply select a different Default Role or different Default Groups from the lists.
Configure third-party IdP Groups Access Control in KaseyaOne
IdP Groups Access Control lets you control access to KaseyaOne based on your IdP group memberships. When enabled, KaseyaOne evaluates your mapping rules each time an IdP SSO user authenticates and assigns the appropriate role and groups automatically.
You configure this feature by defining mapping rules that pair each IdP group with a KaseyaOne role and one or more KaseyaOne groups, then enabling the IdP Groups Access Control toggle.
The prerequisites and considerations for configuring IdP Groups Access Control are:
- You must have IdP SSO configured and Enable Single Sign-On via SAML enabled in KaseyaOne before you can use this feature. Refer to Setting up a third-party IdP SSO integration for KaseyaOne.
- While configuring IdP Groups Access Control, you will map each IdP group to a KaseyaOne user role and group(s). Preconfigure the KaseyaOne user roles and groups you plan to use in your mapping rules before configuring this feature. This includes any customized roles you want to map to IdP groups. Refer to Managing user roles and Managing KaseyaOne groups.
- Ensure that all existing KaseyaOne users are assigned to an IdP group, and that each of those groups is covered by a mapping rule. Once you enable this feature, any KaseyaOne account that does not belong to a mapped IdP group is deactivated and loses access to KaseyaOne when the user attempts to log in.
- Any mapping rules you define override the default role specified in Configure Enable Automatic User Creation for a third-party IdP SSO in KaseyaOne.
To configure IdP Groups Access Control for third-party IdP SSO in KaseyaOne:
-
Navigate to the Single Sign-On page. Refer to Security and navigation.
-
In the Mapping Rules section, select a processing logic mode to control how KaseyaOne evaluates rules when a user belongs to more than one mapped IdP group:
- Stop at first match: KaseyaOne evaluates rules in priority order and stops at the first rule whose IdP group matches the user. That rule's KaseyaOne role and groups are assigned. Rules below the match are ignored.
- Assign all Groups: KaseyaOne evaluates all rules. The user is assigned the KaseyaOne role from the topmost matching rule. KaseyaOne groups are assigned from every matching rule (the user is assigned all matched groups).
In both modes, rule order determines priority. Drag and drop rules to set the order before enabling the feature.
NOTE To support customized roles, the KaseyaOne role is now assigned from the topmost matching rule when more than one rule matches a user. If you previously used Process all rules, your existing rules have been automatically assigned a priority order based on their previous row order. Refer to How KaseyaOne assigns roles using IdP mapping rules has changed.
-
Add a mapping rule:
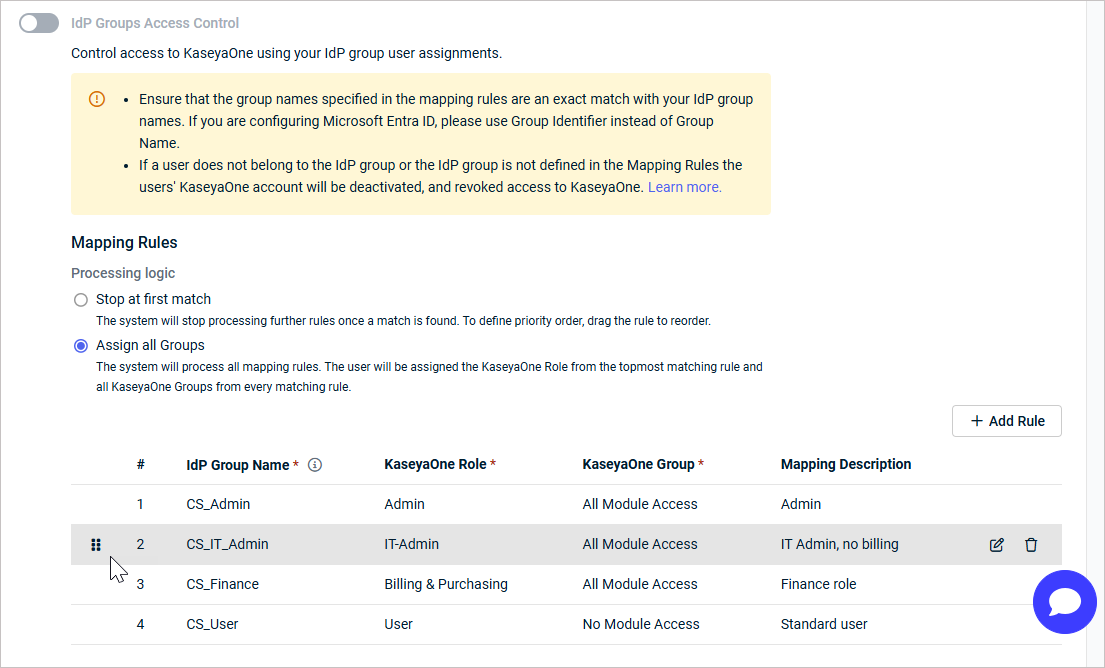
Click + Add Rule.
In the IdP Group Name field, type the exact name of the IdP group. Group names are case-sensitive.
NOTE If you are configuring Microsoft Entra ID, use the Group Identifier instead of the Group Name. For example, a2e68765-f908-453c-a31b-************.
In the KaseyaOne Role column, select one role from the dropdown list. You can select any active system role or customized role. Each mapping rule assigns exactly one role.
NOTE Customized roles referenced in mapping rules cannot be locked or deleted. To lock or delete a customized role, remove it from all mapping rules first.
In the KaseyaOne Group column, select one or more groups from the dropdown list to assign to users who match this rule.
(Optional) In the Mapping Description field, type a description for the mapping rule.
Click the check mark to save the rule.
Repeat this procedure for each IdP group you want to map.
IMPORTANT Ensure that all existing KaseyaOne users are assigned to an IdP group, and that each of those groups is covered by a mapping rule. If a user does not belong to a mapped IdP group, their KaseyaOne account is deactivated and loses access to KaseyaOne when they attempt to log in.
-
If you have more than one rule, drag and drop the rules into priority order. In Stop at first match mode, the highest-priority matching rule determines the user's role and groups. In Assign all Groups mode, the highest-priority matching rule determines the user's role, and groups from all matching rules are assigned.
-
Turn on the IdP Groups Access Control toggle to enable the feature for SSO users.
-
To disable IdP Groups Access Control, turn off the toggle. When disabled, the default role specified in Configure Enable Automatic User Creation for a third-party IdP SSO in KaseyaOne applies to new SSO users.
-
To delete or edit a rule, hover over the rule and click its edit or delete icon.
Setting up a third-party IdP SSO integration for KaseyaOne
The prerequisites to set up a third-party IdP integration with KaseyaOne are:
- A KaseyaOne user account with the Admin role and an administrator account in the third-party IdP.
- Users must have the same email address in KaseyaOne and the third-party IdP.
- Users and user groups must be set up in the third-party IdP.
The overall process to set up a third-party IdP integration using SAML 2.0 for KaseyaOne is similar across all IdPs and involves the following tasks:
- Create and configure the KaseyaOne SSO application in the third-party IdP.
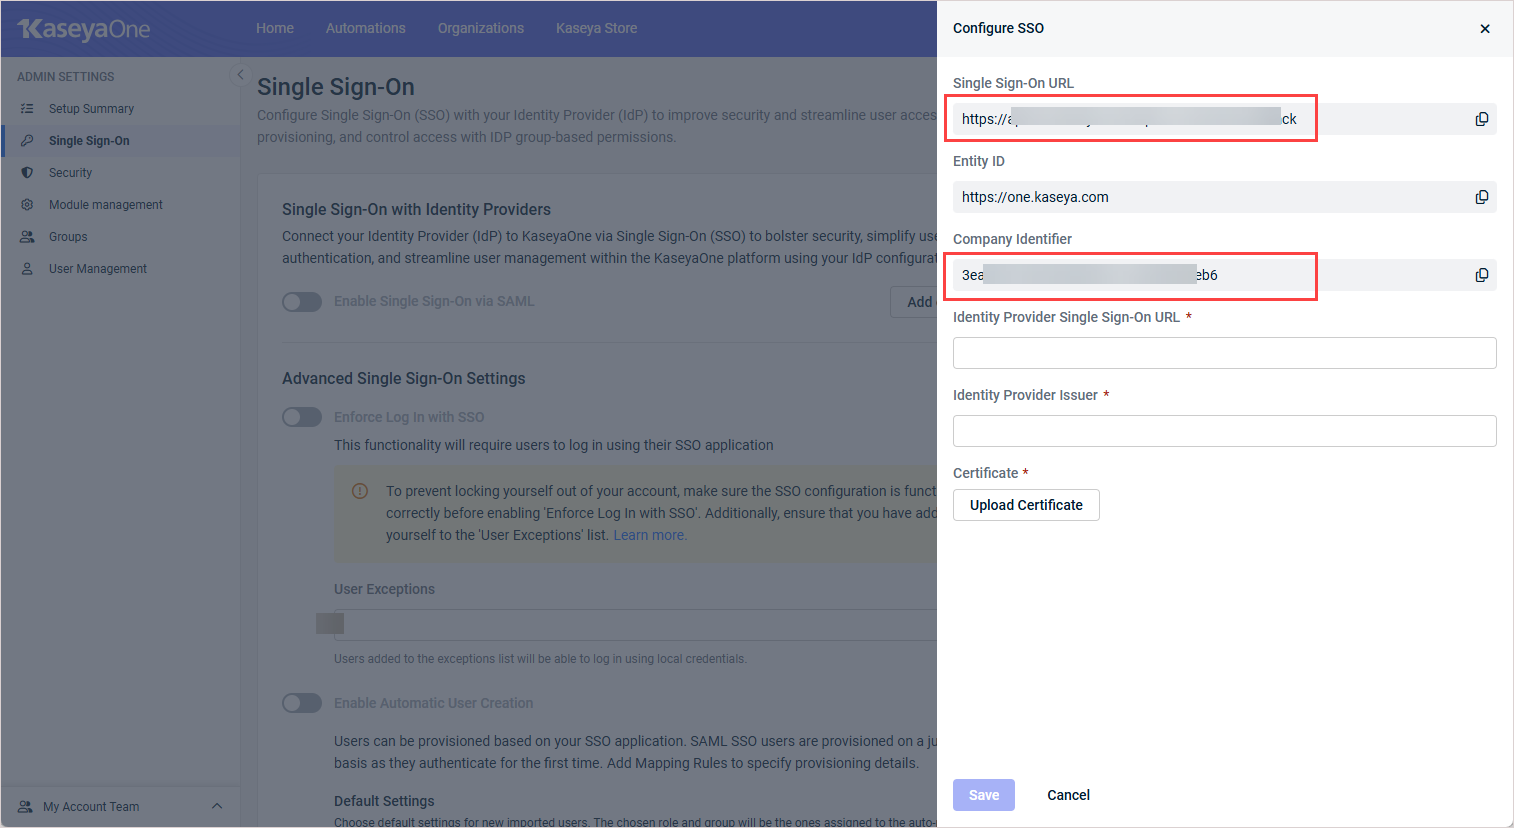
For this task, you will need the Single Sign-On URL and Company Identifier of your KaseyaOne instance. To obtain these values:
Navigate to the Single Sign-On page.
In the Single Sign-On with Identity Providers section, click Add Configuration.
From the Configure SSO pane that opens, copy and save the values in the Single Sign-On URL and Company Identifier fields.
Once you've obtained your KaseyaOne Single Sign-On URL and Company Identifier, you can configure KaseyaOne SSO in your third-party IdP. (See Third-party IdP SSO integrations using SAML 2.0 with KaseyaOne for links to detailed instructions for commonly used third-party IdPs.)
- Configure the SSO settings in KaseyaOne for the third-party IdP integration. For this task, you will need the third-party IdP's Single Sign-On URL and SSO certificate. Once you've obtained the third-party IdP's Single Sign-On URL and SSO certificate, use this procedure to configure SSO settings in KaseyaOne: Configure SSO in KaseyaOne for a third-party IdP integration.
- Assign users to the KaseyaOne application in your third-party IdP so that they will be able to use it.
- Test the third-party IdP SSO integration for KaseyaOne.
After you set up the third-party IdP integration, the next time you log in to KaseyaOne you will be prompted to select your preferred method to log in — sign in with Single Sign-On or with your KaseyaOne credentials (unless Enforce Log In with SSO is enabled). We recommend referring to your IdP's documentation when configuring this feature as they will provide the most up-to-date documentation for their platform.
Third-party IdP SSO integrations using SAML 2.0 with KaseyaOne
Set up third-party IdP SSO integrations with KaseyaOne:


