Microsoft Entra ID IdP SSO setup instructions
NAVIGATION Header > Admin Settings > Single Sign-On
PERMISSIONS Master role
Microsoft Entra ID (formerly Azure AD) is a cloud-based identity management service that allows you to access applications with single sign-on. This article guides you through how to integrate KaseyaOne with Microsoft Entra ID IdP. After successful integration, users will be able to access KaseyaOne from Azure or from the KaseyaOne login page using Azure credentials.
Supported features
-
IdP-initiated SSO
-
SP-initiated SSO
-
Just-in-time user provisioning (refer to Configure Enable Automatic User Creation for a third-party IdP SSO in KaseyaOne)
Prerequisites
-
Master user account in KaseyaOne and Administrator account in Microsoft Entra ID
-
Users must have the same email address in KaseyaOne and Microsoft Entra ID
Before starting, it is recommended that you open two tabs in your browser — one for KaseyaOne and one for the Entra ID portal.
- Open a browser and log in to KaseyaOne.
-
In a separate browser tab, log in to Azure (https://portal.azure.com) as a system administrator.
-
Click Microsoft Entra ID on the left navigation menu, then select Enterprise applications.
-
Click New application on the next screen, then click Create your own application.
-
On the Create your own application screen that opens:
-
Enter a name (for example: KaseyaOne) for the new application and then click Add.
-
Select Integrate any other application you don't find in the gallery (Non-gallery).
-
Click Create.
-
-
On the Overview page, click Set up single sign-on.
-
On the Single sign-On screen, select SAML.
-
Edit the Basic SAML Configuration settings as follows:
-
Identifier (Entity ID): Enter the URL:
https://one.kaseya.com -
Reply URL (Assertion Consumer Service URL): Enter the URL:
https://api-one.kaseya.com/api/v1/sso/saml-callback
-
-
Modify the Attributes & Claims settings as follows:
-
Delete all default additional claims from the list.
-
Click Add new claim and add the following claims (leave Namespace blank when adding claims):
- Email: user.userprincipalname
- Username: user.userprincipalname
- FirstName: user.givenname
- LastName: user.surname
- CompanyIdentifier: Enter the KaseyaOne Company Identifier here. To obtain this identifier:
-
Go to the KaseyaOne tab in your browser, navigate to the Admin Settings > Single Sign-On view and copy the Company Identifier field value.
Example 1:
<8000000-00000-0000-00000000-00000000-0000-0000-0000-000000000000>
Example 2:<Organization-8000000-00000-0000-00000000-00000000-0000-0000-0000-000000000000> -
Go back to the Entra ID tab in your browser and paste the identifier value in the Source attribute field. Simply paste the copied value to the input field.
-
-
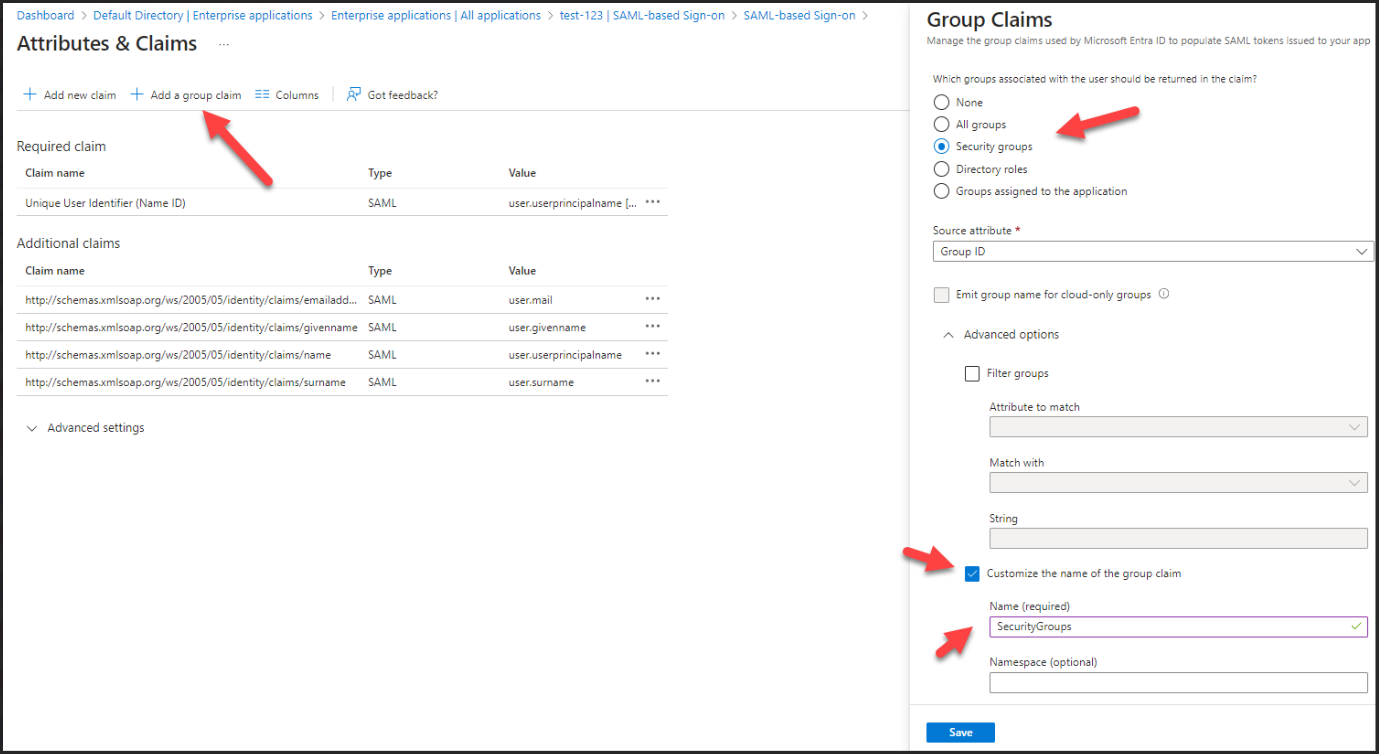
Click Add a group claim and add the following group claim:
- Expand Advanced Options.
- Select the Security groups option.
- Select the Customize the name of the group claim check box,
- Enter SecurityGroups in the Name field.
- Click Save.
-
-
In the SAML Signing Certificate section, click Edit. In the pane that opens on the right side of the page, change the Signing Option to Sign SAML response and assertion and click Save.
-
-
In the SAML Certificates section, download the Microsoft Entra ID certificate to your local drive:
-
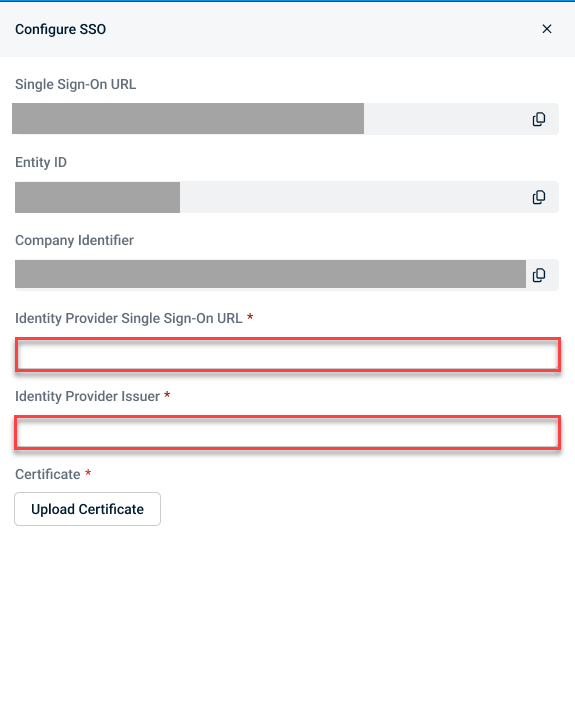
Copy the Login URL field value and do the following:
-
Copy the Microsoft Entra Identifier field value and do the following:
-
Go to the KaseyaOne tab in your browser.
-
Navigate to the Admin Settings > Single Sign-On view.
-
Paste the value in the Identity Provider Issuer field.
-
-
-
Download the following logo for use in the Enterprise Application in Entra ID.

-
Go to the KaseyaOne tab in your browser.
-
Navigate to the Admin Settings > Single Sign-On view.
-
Upload the Entra ID certificate that you downloaded in Step 1, #11 of the previous task.
-
Turn on the Enable Single Sign-On via SAML toggle to enable SSO integration.
You can test your Microsoft Entra ID SSO integration by logging in from either Azure (IdP-initiated login) or the KaseyaOne login page (SP-initiated login).
-
Log out of KaseyaOne.
-
Go back to the Entra ID tab in your browser.
-
Navigate to Microsoft Entra ID > Enterprise applications and click the KaseyaOne SSO application.
-
Verify that you are redirected to and logged in to KaseyaOne.
-
Log out of KaseaOne.
-
Log back in to KaseyaOne as follows:
-
Enter the Username and Company Name for your account and click Next.
-
Click Log In with Single Sign-On.
-
-
If already logged in to Azure, verify that you are redirected to and logged in to KaseyaOne.
-
If not already logged in to Azure:
-
You will be redirected to the Azure login page — enter your credentials and complete the user login process.
-
Verify that you are redirected to and logged in to KaseyaOne.
-


