Integrating Autotask, Datto RMM, and IT Glue
Autotask, Datto RMM, and IT Glue are all powerful tools that offer distinct capabilities. When linked together, this trio can help maximize and streamline your workflows.
This guide provides instructions for successfully connecting the three systems, which will prevent issues that require manual fixes, and example use cases for this three-way integration.
NOTE For the integrations to work as expected, it is recommended to follow the steps in this guide in the order the sections are presented. If you have already configured an integration between two of the systems, review the relevant sections and compare your current settings to the recommended best practices.
Autotask is the first component of this integration that needs to be configured. If you've already set up an integration between Autotask and Datto RMM, review the following sections to ensure proper configuration.
Autotask allows you to create API-only access user types for the purpose of OAuth integrations with other applications. An Autotask security level with Admin permission to configure Resources/Users (HR) can complete the following steps to create credentials for an API user in Autotask, which will not have access to the Autotask user interface. The API user credentials configured in the following steps will be used for connecting this integration:
- Navigate to Admin > Organization Settings & Users > Resources/Users (HR) > Resources/Users.
- From the New drop-down menu, select New API User.
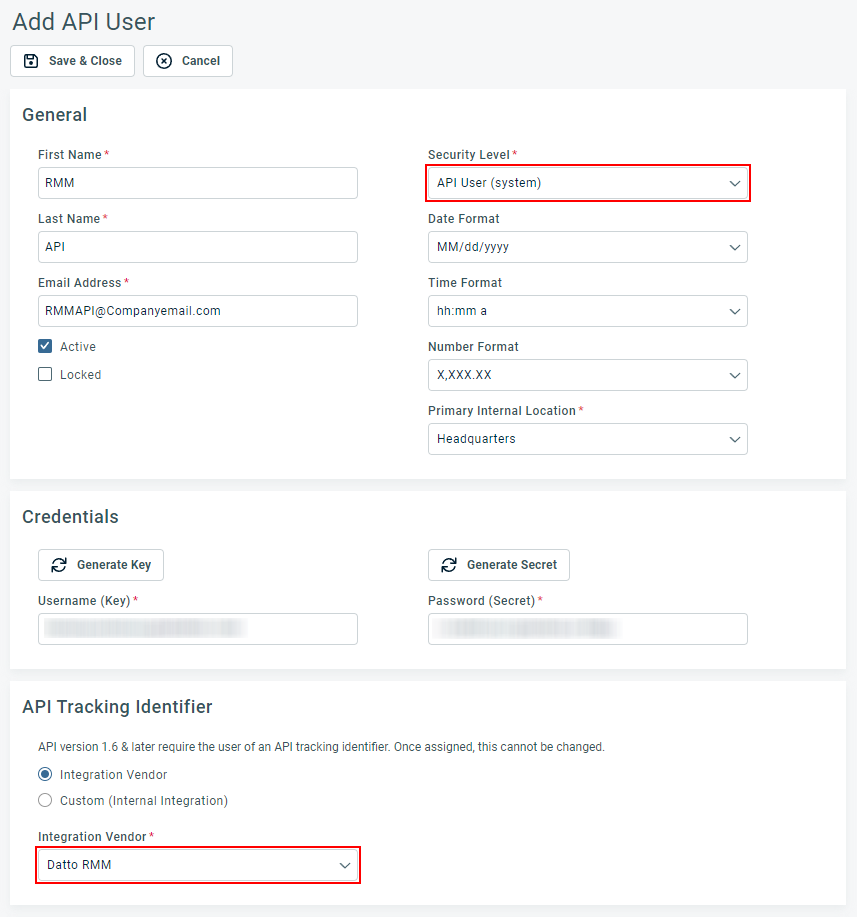
- In the General section, fill in the required fields. From the Security Level drop-down menu, select API User (system) or the custom security level you set up in Integrating Autotask, Datto RMM, and IT Glue.
- When configuring the new API user, select the API User (system) security level and Datto RMM as the integration vendor for the API tracking identifier.
NOTE When creating the API user, it's important to take note of the credentials you create, as you cannot recover the Password (Secret) value from the user record in Autotask once it has been saved.
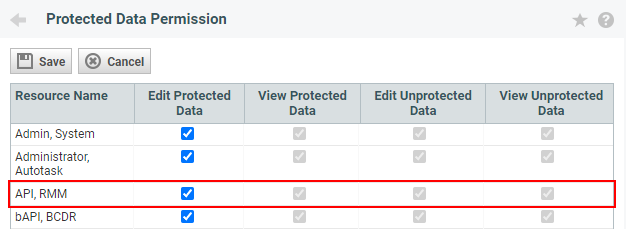
- Before this API user can link Autotask to Datto RMM, you will need to grant the user certain permissions via Admin > Organization Settings & Users > Resources/Users > Security > Protected Data Permission. Select the Edit Protected Data check box for the user. Without this access, you will not be able to properly sync your data from Datto RMM to Autotask.
Learn more about API users in the Autotask Help system.
Now, with the API user created and properly configured, log in to Datto RMM and enable the integration with Autotask by following the enablement steps in the Datto RMM Help system. As follows is a summary of these steps:
- In Datto RMM, navigate to Setup > Integrations > Autotask.
- In the API Credentials tab selected by default, click Turn On.

- Enter your Autotask Username (Key) and Password (Secret) from the API user you created in the previous step to enable the integration between Datto RMM and Autotask.
- Select which account types from Autotask you wish to map to Datto RMM in the Account Types to Map field. To start, it is recommended to only select the Customer account type, as typically only full customers should be synced with Datto RMM.
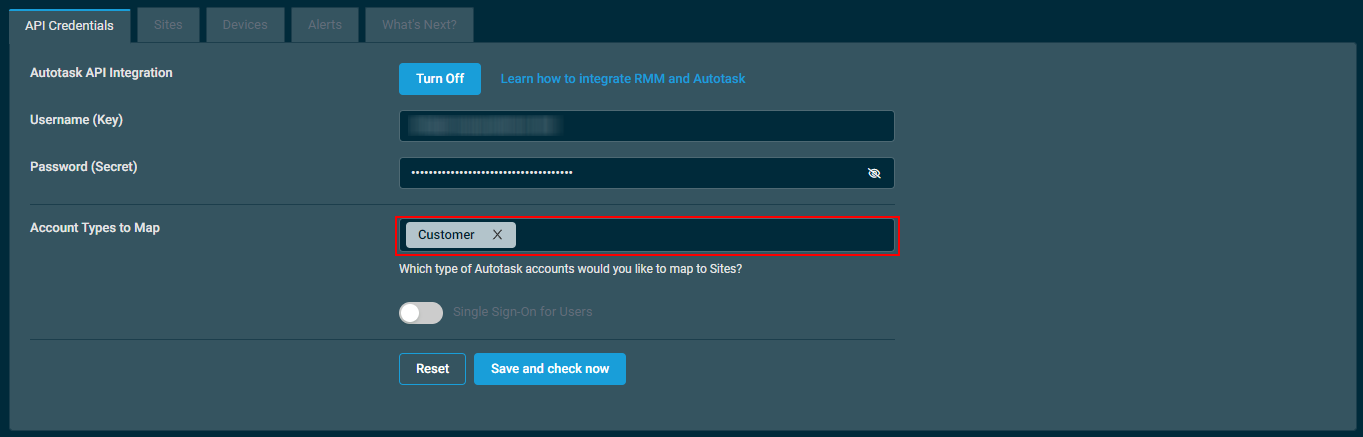
- Click Save and check now.
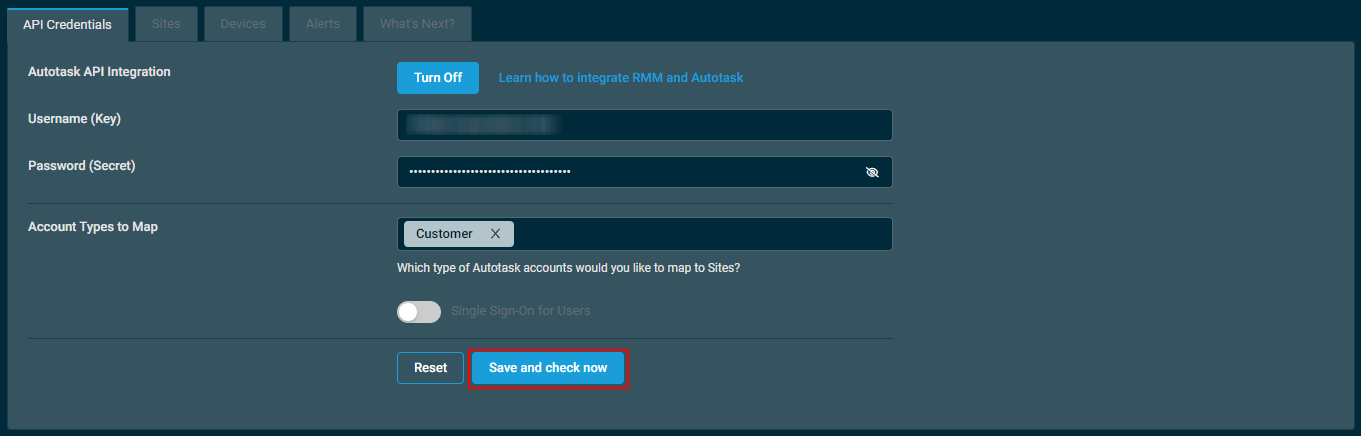
NOTE Once you click Save and check now, the other tabs will be disabled until the initial sync finishes.
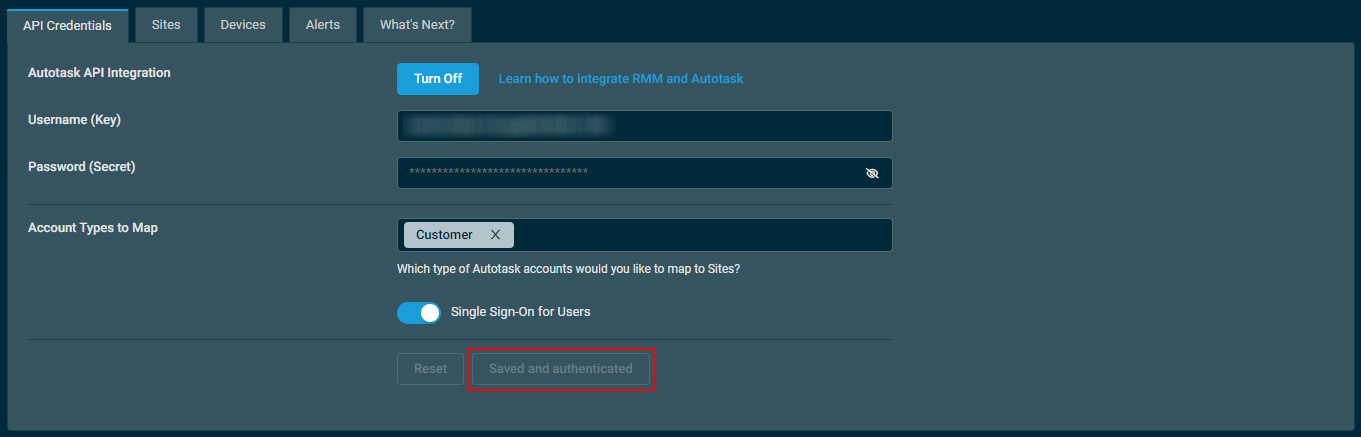
- Upon successful connection, the authentication button will be disabled and will display Saved and authenticated.
At this point, you will configure device synchronization. Because you are also integrating with IT Glue, you should leave the Map Devices toggle turned off for now and configure the sync as follows:
- In Datto RMM, navigate to Setup > Integrations > Autotask.
- Click the Devices tab.
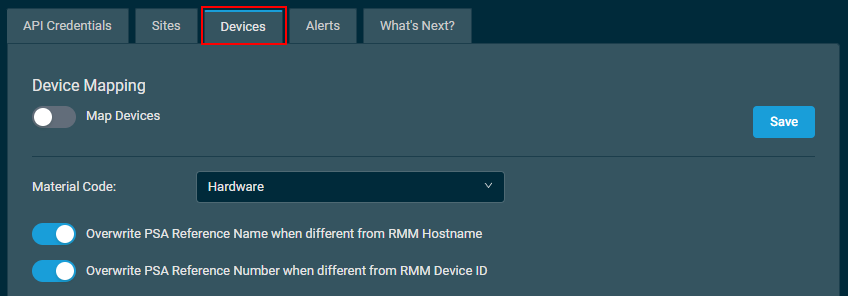
- Ensure the Map Devices toggle is turned off.

- In the Material Code drop-down menu, select the Autotask material code that will be used for all devices mapped from Datto RMM to Autotask. If you are not sure what to use, Hardware is typically the default option. You can always change the material code of the product in Autotask if needed.

- Specify how Datto RMM should sync device information to Autotask configuration items. The two options, Overwrite PSA Reference Name when different from RMM Hostname and Overwrite PSA Reference Number when different from RMM Device ID are both enabled by default. It is recommended you leave them both enabled.

- Next, map the Datto RMM device types to Autotask products and configuration item types (device types). When using IT Glue with Autotask and Datto RMM, it is important that both the Autotask Product and Autotask Configuration Item Type mappings are configured. You can choose to let Datto RMM create new products in Autotask if you don't want to use any of the existing products, but configuration item types must exist in Autotask to be selected.
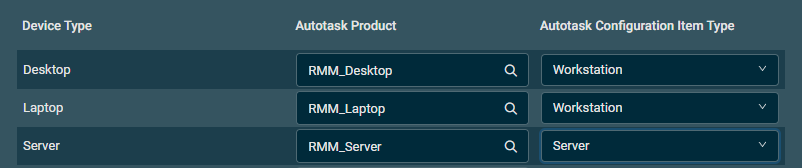
IMPORTANT If you are planning to integrate Autotask with IT Glue, you must ensure that devices synced from Datto RMM to Autotask have an assigned configuration item type. Devices in Autotask with a blank configuration item type will be pulled into IT Glue only if the Sync Configuration Items without Configuration Item Types option is selected. These items will display a generic Autotask Default configuration item type, which will require a manual fix. Learn more in the IT Glue Help system.
NOTE Adding configuration item types in Autotask may be required to complete the mapping. Learn more in the Autotask Help system.
- Once you’ve configured the device type mapping, click Save. This will establish the mapping of the different device types to the products you selected in the previous step and change their Autotask product from Create New to an automatically generated product name, such as RMM_Desktop.
NOTE You may have to wait about a minute and refresh the page to see this change.
- Log in to Autotask to make sure that any device types you synced with the Create New option under Autotask Product in Datto RMM have had their corresponding product created. Navigate to Admin > Features & Settings > Products, Services, and Inventory > Products and confirm the following for each product that is now linked to Datto RMM:
- Confirm that any new products that were listed in the Devices tab of the Autotask integration setup page in Datto RMM have been created.
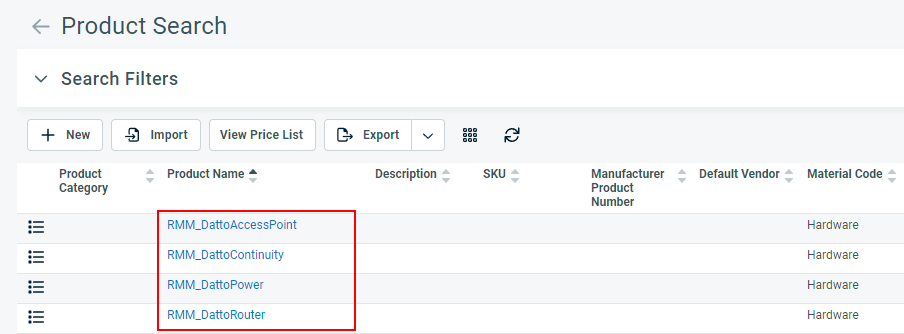
NOTE Autotask does not indicate which device type the products are linked to. You can confirm which device type is linked to a product via Integrations > Autotask in Datto RMM.
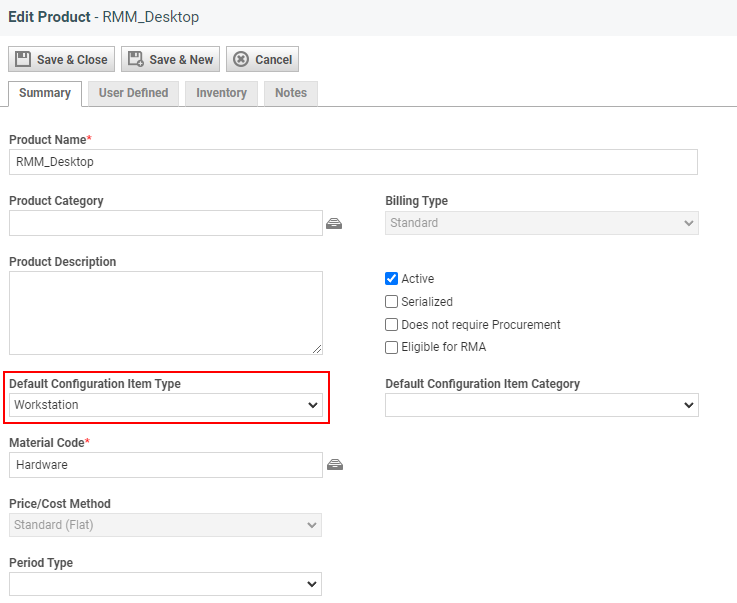
- Ensure that all products that are linked to device types in Datto RMM have a Default Configuration Item Type assigned to them by clicking the product name in the list of products on the Edit Product page.
- Confirm that any new products that were listed in the Devices tab of the Autotask integration setup page in Datto RMM have been created.
- Once you’ve confirmed that all Autotask products linked to Datto RMM device types are properly configured with a default configuration item type, you can start syncing your Datto RMM devices to Autotask. In Datto RMM, turn on the Map Devices toggle in the Devices tab of the Autotask integration setup page, and click Save.

For full instructions on configuring the integration with Autotask in Datto RMM, refer to Autotask Integration in the Datto RMM Help system.
IMPORTANT If you have been using IT Glue with a different PSA, be aware that when you disconnect that PSA, existing configurations will become orphaned in IT Glue.
When integrating Autotask, IT Glue will attempt to match existing configurations to devices in Autotask before creating new items. Learn about Autotask field mappings in the IT Glue Help system.
You will want to review your device data in Autotask before connecting to IT Glue to ensure all relevant fields are populated and match the existing configuration in IT Glue before connecting.
With Autotask and Datto RMM now connected, you can now link Autotask to IT Glue. Recommended best practice steps for setting up this integration are as follows:
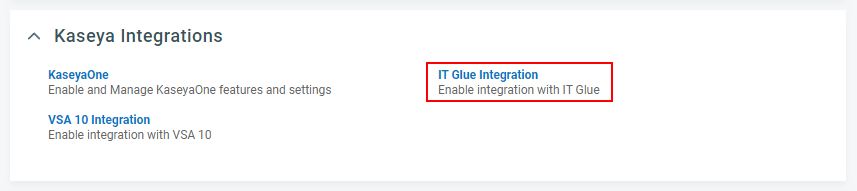
- In Autotask, navigate to Admin > Extensions & Integrations > Kaseya Integrations.
- Click IT Glue Integration.
- Select the Enable IT Glue Integration check box.
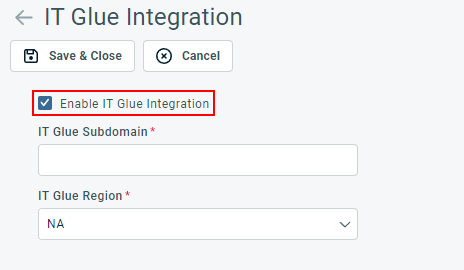
- Enter your IT Glue Subdomain.
- From the Region drop-down menu, select your region: AU (Australia), EU (Europe), or NA (North America).
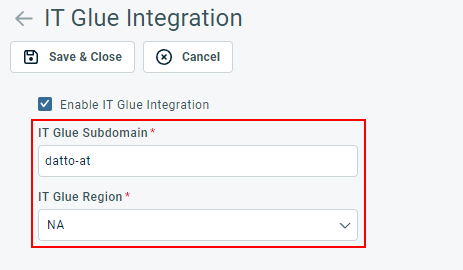
EXAMPLE Your IT Glue subdomain and region appear in the URL you use to log in to IT Glue. In the following example, the subdomain is highlighted in red (datto-at) and the region is highlighted in yellow (na).

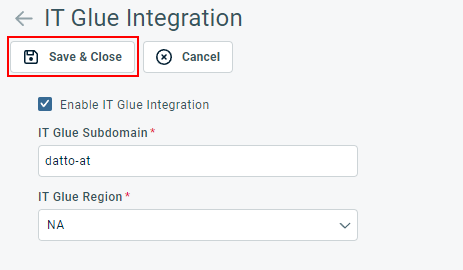
- Click Save and Close. This will activate the IT Glue tab in Autotask user profiles, allowing users to link their IT Glue user accounts to their Autotask user accounts. Learn about the IT Glue tab in the Autotask Help system. If any users don't have IT Glue user accounts yet, you can import their Autotask user accounts into IT Glue in a later step. User accounts do not need to be linked before you continue the integration setup.
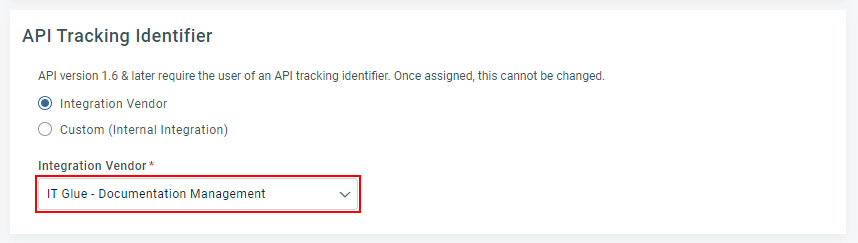
- Next, you will create an Autotask API user to use for the integration with IT Glue. Follow the same steps you completed to create the Autotask API user for Datto RMM in Create an API User in Autotask, but instead of selecting Datto RMM as the integration vendor for the API tracking identifier, select IT Glue – Documentation Management. Like before, make sure to save the Password (Secret) value for the next steps.
- In IT Glue, click Admin in the top navigation menu.
- From the left navigation menu, click Integrations.
- In the upper-right corner of the page, click New.
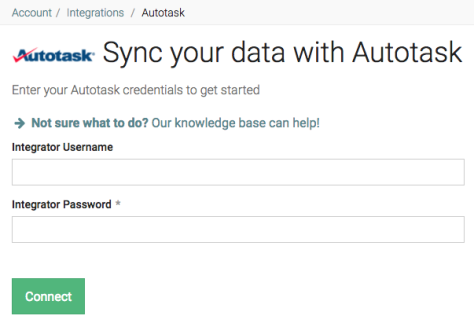
- In the Business Management & Ticketing section, click the Autotask tile.

- Enter the Autotask API user credentials you configured, and click Connect.
- In the Sync Settings tab, it is recommended you select only the account types, classifications, configuration item types, and ticket queues that you actively manage. Also ensure that Enable Locations Sync is selected.
- In the Two-Way Sync Settings tab, make sure Enable two-way sync is not selected.
IMPORTANT This is especially important if you have existing organizations, configurations, contacts, or locations populated in Autotask that also exist in IT Glue. With this enabled, you will need to edit and save each asset individually to trigger the two-way sync.
- Click Save to automatically queue the sync.
NOTE If you want to prioritize the sync to start sooner, you can manually sync by navigating to Admin > Integrations and selecting Start Manual Sync from the integration connector menu.
From the Active Integrations page, you can see the overall sync status. When the sync is complete, the status column changes from Syncing... to OK.
NOTE When you initially set up the integration and upon saving your sync settings, you will be shown a list of all licensed user accounts in Autotask. You can mass invite users from Autotask to IT Glue from this page, but it is not necessary to do so at this time. By default, all Autotask users are selected. If you don’t yet want to send invitations to everyone, clear the check boxes for any users you plan to invite later or not at all. Next, click Invite Users to invite any remaining selected users to join. If you don’t want to invite anyone, you can also skip this step entirely by clicking Skip.
For full instructions on configuring the integration between Autotask and IT Glue, refer to Integration with IT Glue in the Autotask Help system.
Now that Autotask has been linked with both Datto RMM and IT Glue, the final step is to integrate Datto RMM and IT Glue.
As follows are the recommended best practice configuration settings for this integration scenario:
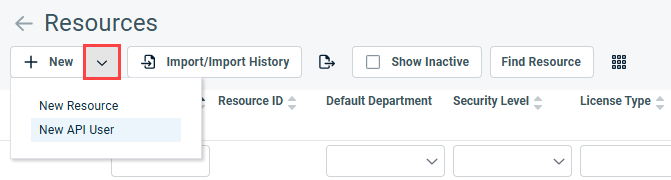
- In Datto RMM, navigate to Setup > Users and click Create User.

- Create a user that will be used for the API integration between Datto RMM and IT Glue.
NOTE The security level does not matter for API access in Datto RMM, but you must select a security level to create the user. Make sure it is clear that you are using this user for the integration with IT Glue (for example, first name IT Glue and last name API).
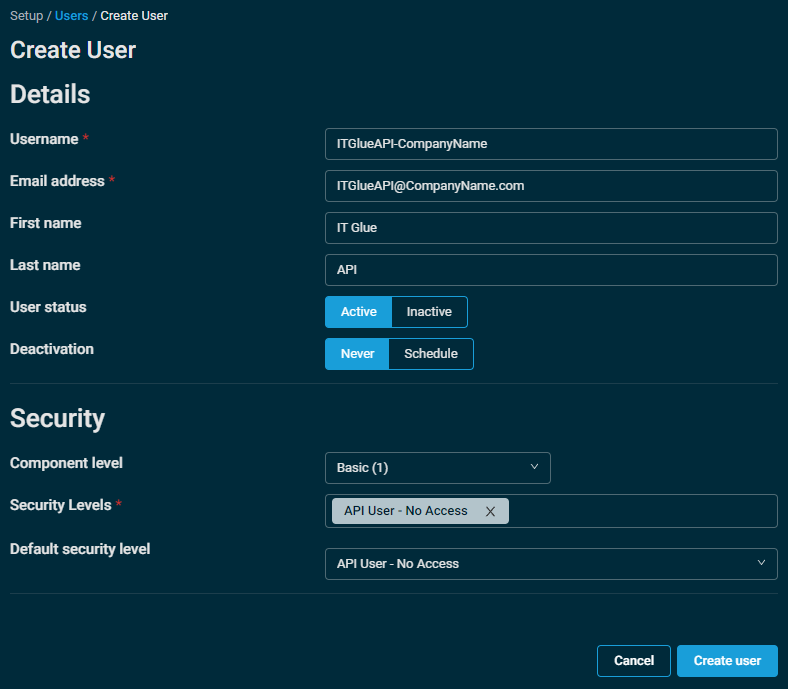
- Click Create User.
- On the Users page, click the username you just created, and in the API section, click Generate API Keys.

NOTE If the API section is missing, ensure that Enable API Access is turned on in Global Settings > Access Control. For more information, refer to Global Settings – Enable API Access in the Datto RMM Help system.
- After clicking Generate API Keys, copy the API URL, API Key and API Secret Key, as you will need these for the next steps. You can click Copy allto copy all the values to your clipboard.
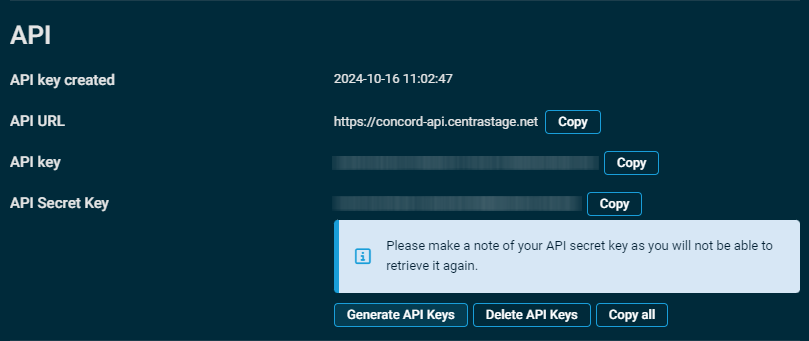
- Click Save User.
- In IT Glue, click Admin in the top navigation menu.
- From the left navigation menu, click Integrations.
- In the upper-right corner of the page, click New.
- In the RMM Tools section, click Datto RMM.
- On the Sync your data with Datto RMM page, select your Datto RMM platform, enter the API Key and API Secret Key that you just created for the user in Datto RMM, and click Connect.
NOTE The platform is found in the Datto RMM API URL. For example, if your API URL is https://concord-api.centrastage.net, your platform is Concord.
- Upon successful connection, you will be asked if you want to match organizations to Autotask companies or Datto RMM sites. Select the Autotask Companies option, and click Save.
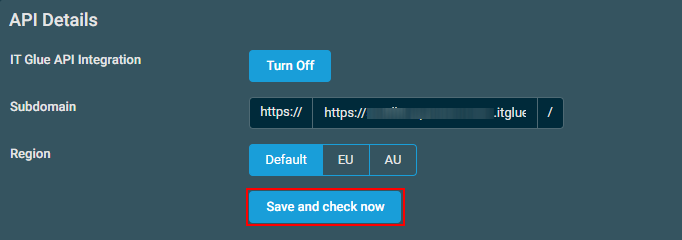
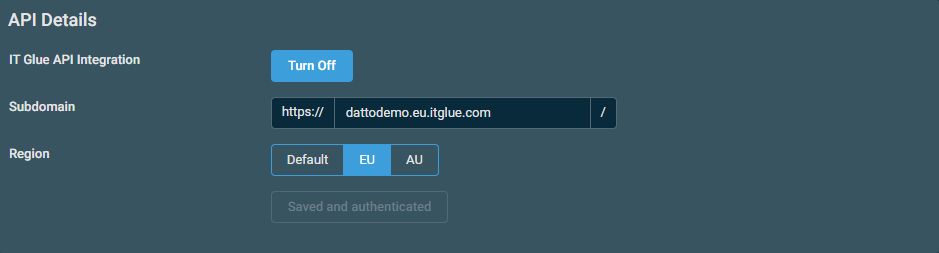
- In Datto RMM, navigate to Setup > Integrations > IT Glue.
- In the API Details card, click Turn On.

- In the Subdomain field, enter the full URL for your instance of IT Glue.
- Select the data center region associated with your IT Glue account .
- Click Save and Check Now.
- If you are still logged in to IT Glue, it should then connect successfully. Otherwise, you will be prompted to log in to IT Glue. Click Authenticate.
- Upon successful connection, the authentication button will be disabled and will display Saved and authenticated. As long as the integration is not turned off, the Subdomain and Region values will be saved and the integration will remain connected per user account.
For full instructions on configuring the integration between Datto RMM and IT Glue, refer to IT Glue Integration in the Datto RMM Help system.
Some additional configuration is required to get the most out of each integration. Review the following sections for suggestions on what to do next.
If you want alerts in Datto RMM to raise tickets in Autotask, review the following guides:
The easiest way to do this is to go to a device's summary page. In the upper-right corner of the device summary page, click IT Glue to open the IT Glue pane. Click Authenticate to log in to IT Glue and complete the user authentication. Each user will have to complete this step themselves to properly link their accounts.
For more information, refer to IT Glue passwords in Web Remote.
The IT Glue Checklists tab appears on the accessory tabs of the organization page. On this tab, you can establish the connection between your Autotask and IT Glue user accounts. For more information on how to configure and use this, refer to The IT Glue Checklists tab.
Datto RMM and Autotask have been working together for a long time, and you can explore the more advanced workflows:
- Using Datto RMM and BCDR tools from Autotask: Access Datto RMM alerts and devices from Autotask.
- Datto RMM and BCDR Device Insights: Customize your Autotask tickets to show more information on associated Datto RMM devices.
- Integration workflows: Learn more ways to easily navigate between Datto RMM and Autotask.
As an IT Glue Administrator or Manager, you can set up ticket settings that will allow for the suggestion of any IT Glue documentation – documents and passwords for the time being – related to the Autotask ticket that your technician is working on. For more information, refer to Suggested IT Glue documentation in Autotask tickets.
When comparing information that syncs from Autotask to IT Glue, the fields that correspond to each other do not always match in name. To better understand this relationship, refer to Autotask field mappings.
Integration workflow examples
In this section, we'll explore the needs of example MSP, BonTech, and how Bontech can use this trio of integrations to fulfill its needs.
With Datto RMM connected to Autotask, a variety of information is synced over and kept up to date automatically. Using UDFs, you can enrich Datto RMM records with even more data, which will then sync to the device record in Autotask.
A UDF is a custom field with a customizable label that is used to store data at the device level in Datto RMM. For information on how to set up UDFs, refer to User-defined fields in the Datto RMM Help system.
In our example, BonTech's CEO, Bria, needs to be able to know from device records in Autotask whether or not those devices are protected with BitLocker, information on their installed disks, and whether or not these devices could be upgraded to Windows 11. She knows this information is present on device records in Datto RMM by using components to track this data and fill in the UDF values.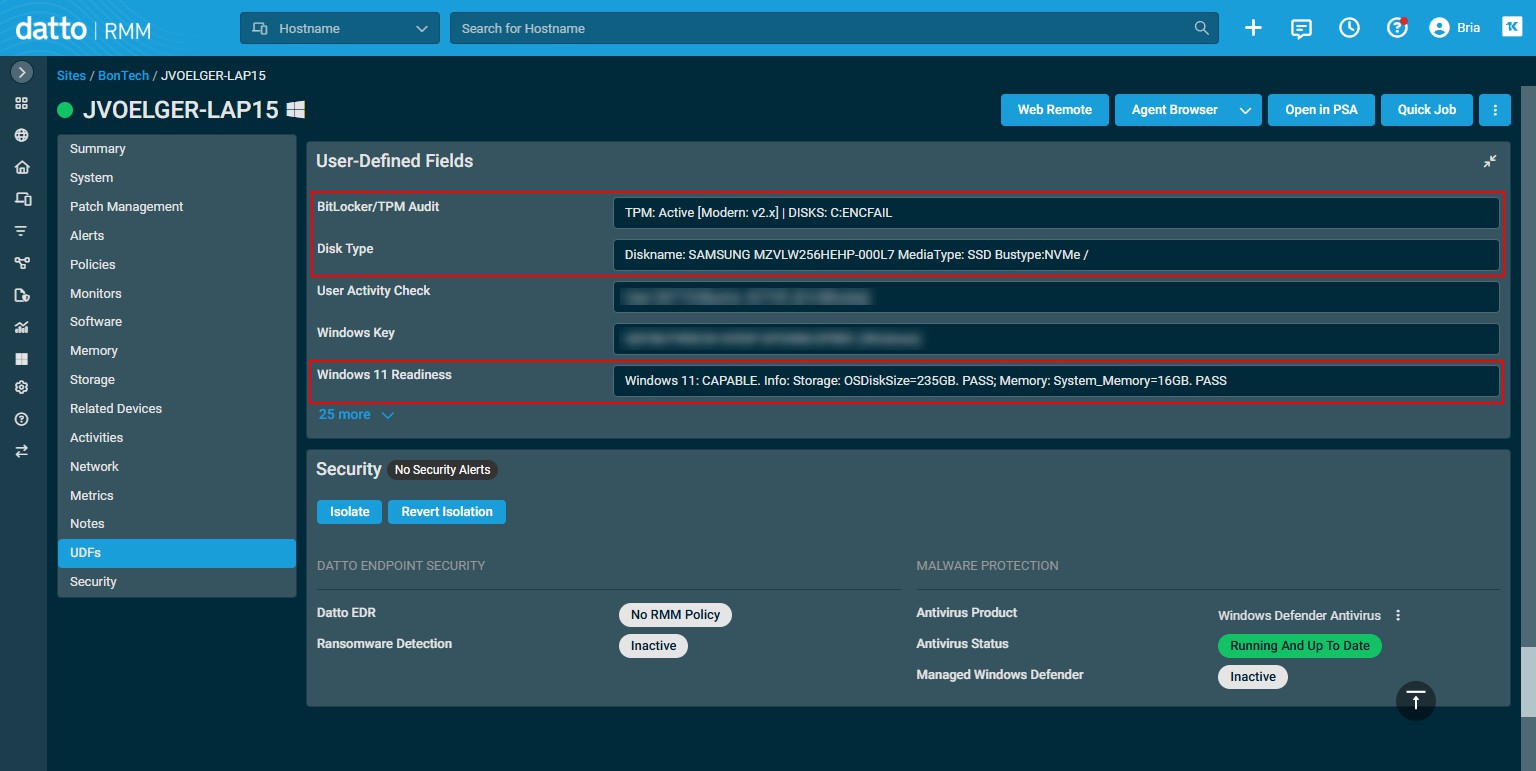
To ensure this data also appears in Autotask, Bria takes the following steps:
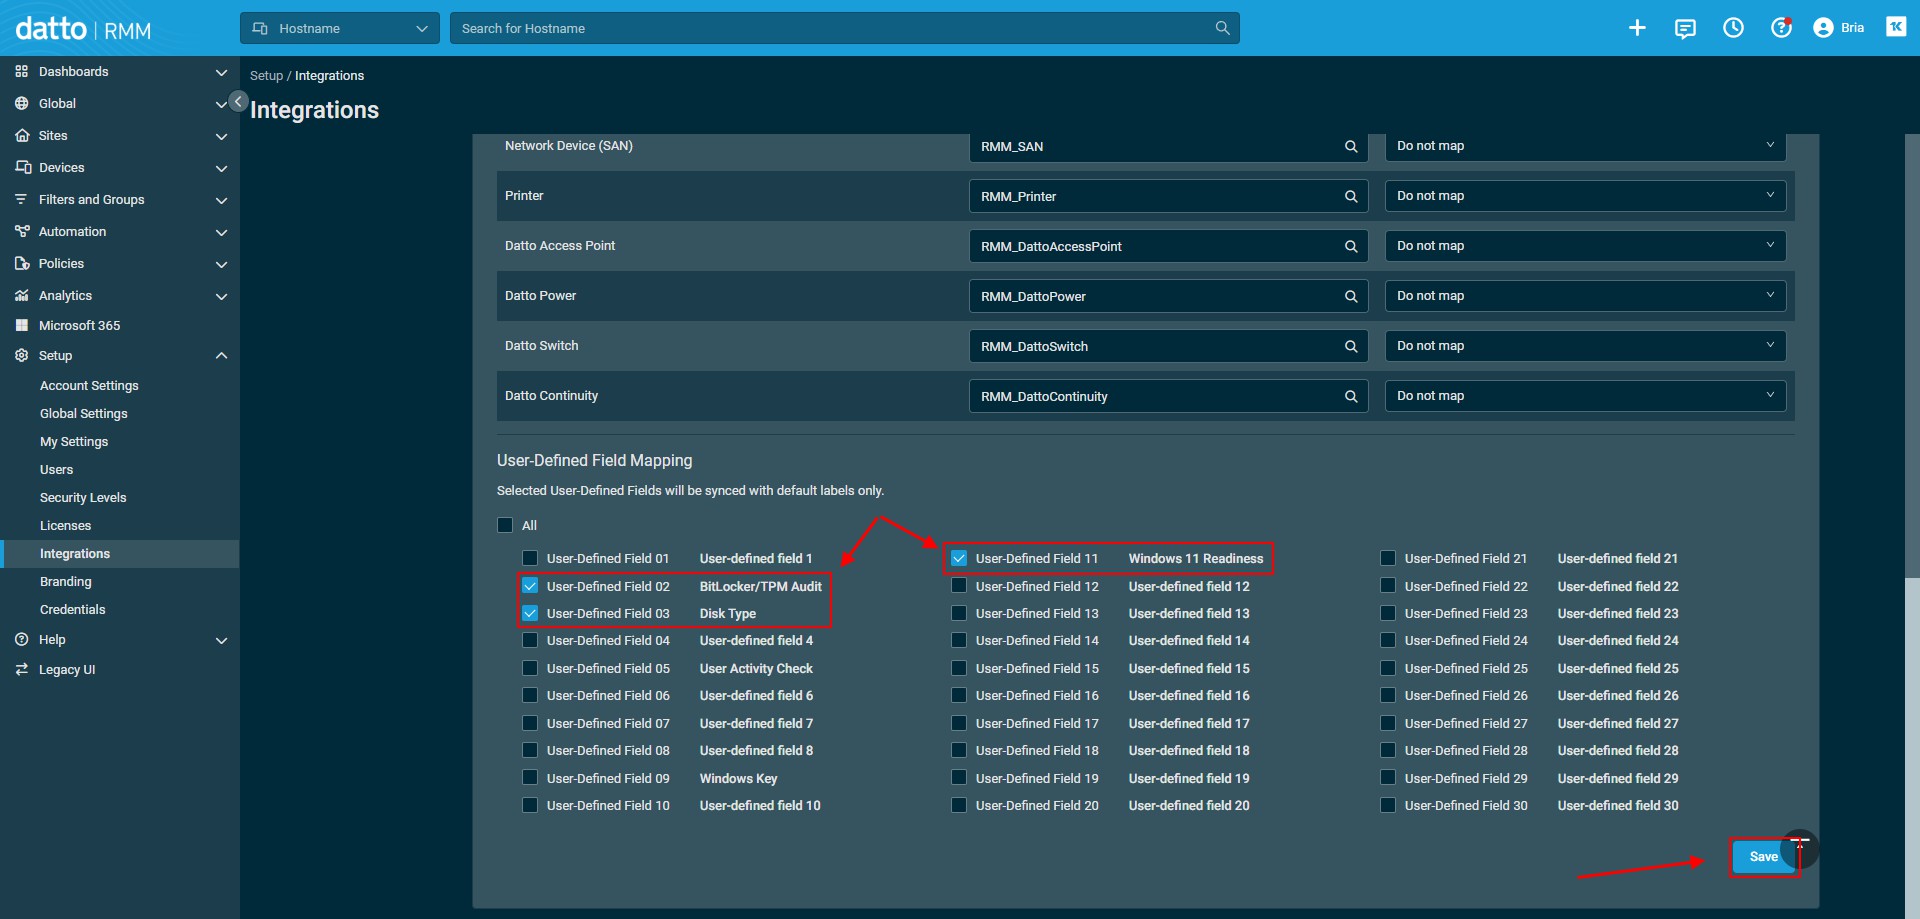
- In Datto RMM, navigate to Setup > Integrations > Autotask.
- Click the Devices tab.
- In the User-Defined Field Mapping section, select all UDFs that should be synced to device records in Autotask, and click Save.
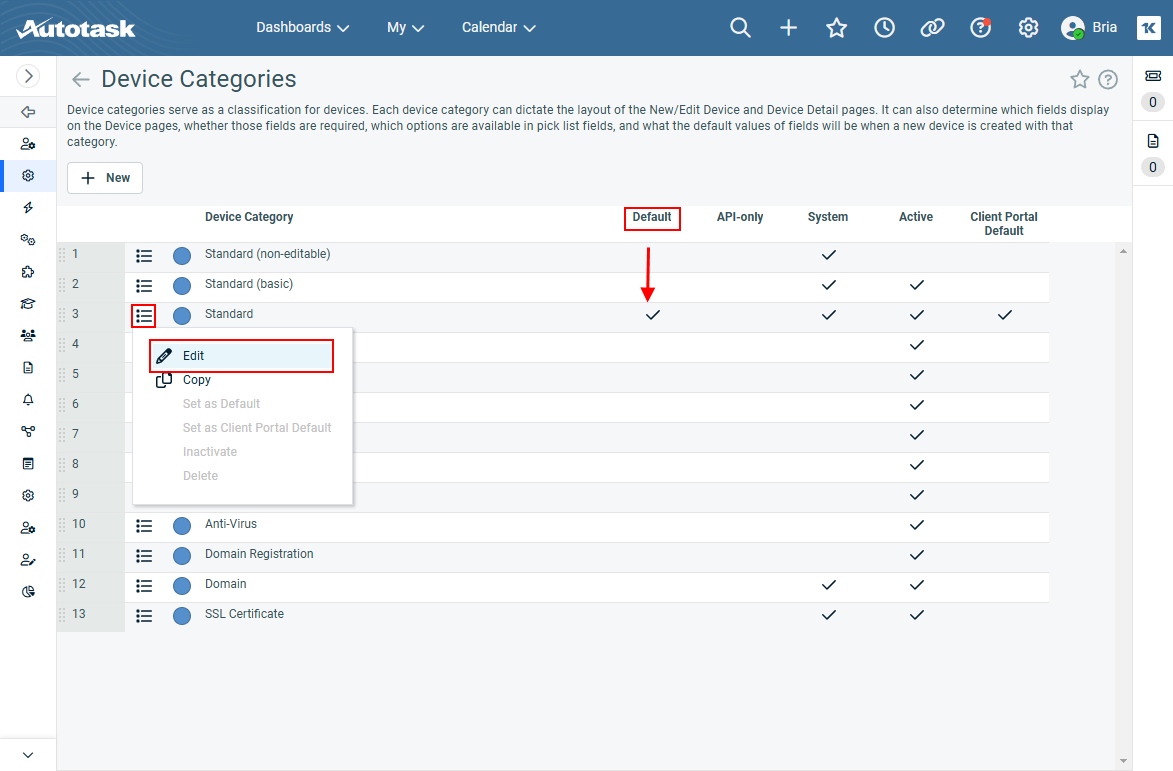
- After the changes to the integration have been saved, Bria logs in to Autotask with her admin account and navigates to Admin > Features & Settings > Devices > Device Categories.
- She edits her default device category. In her case, it's the one labeled Standard.
- In the device category, she clicks the Details tab and locates the Sections & Fields section, where she can pick the fields created for the newly synced UDFs and make them visible on device records.
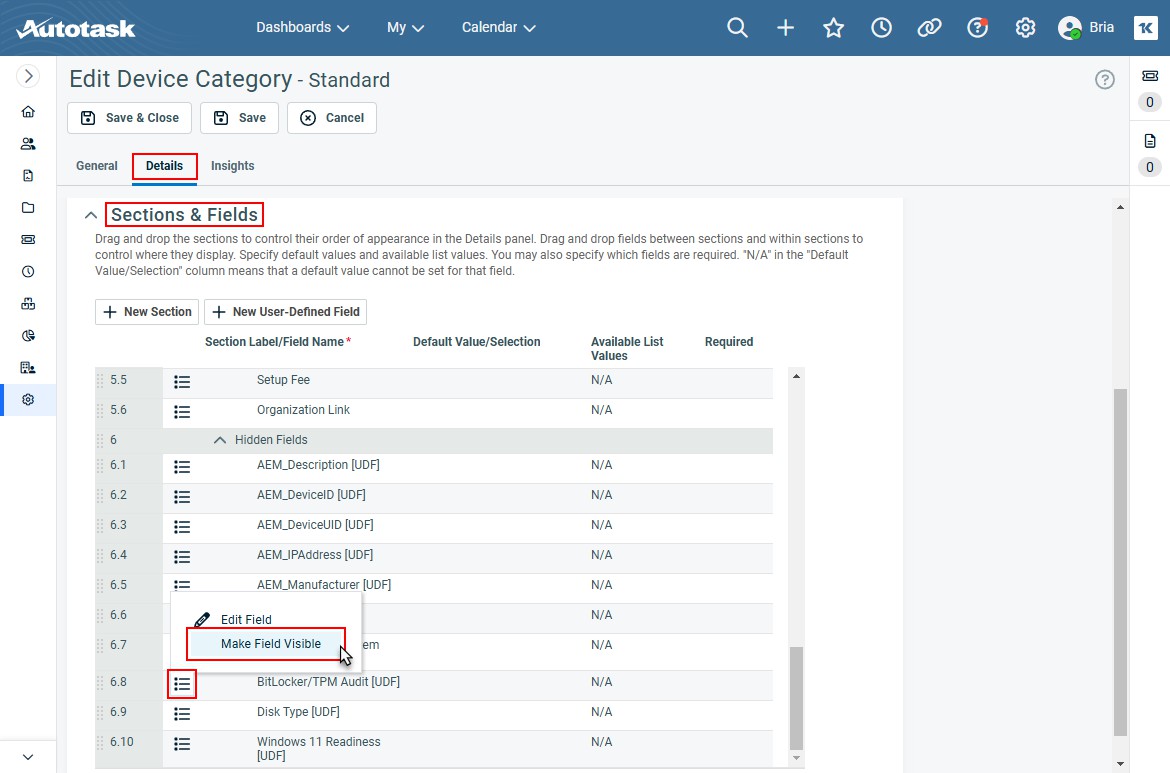
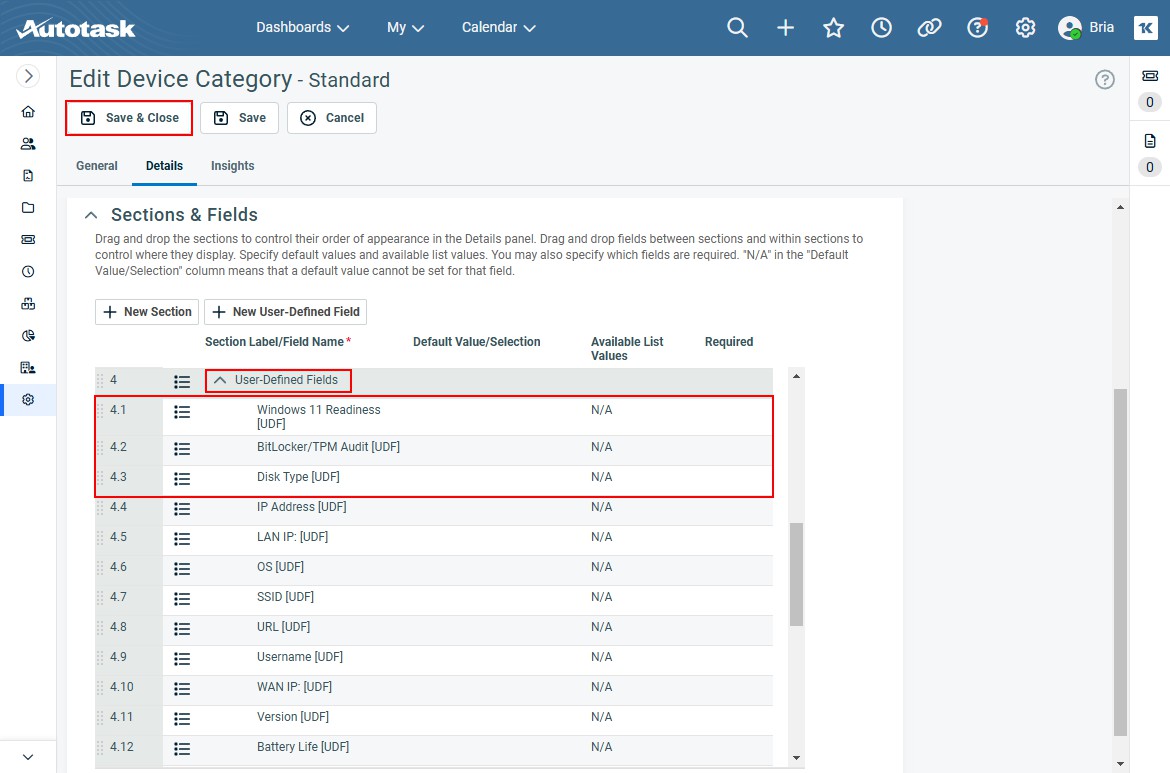
- This makes the fields visible on devices, but at the bottom of the page, she also clicks and drags them up to the User-Defined Fields section so they are easier to find.
- Bria clicks Save & Close to save her changes.
With this done, Bria knows that all the devices in Autotask will now sync over the data from the selected UDFs from Datto RMM so that users will not have to switch to Datto RMM to retrieve that information.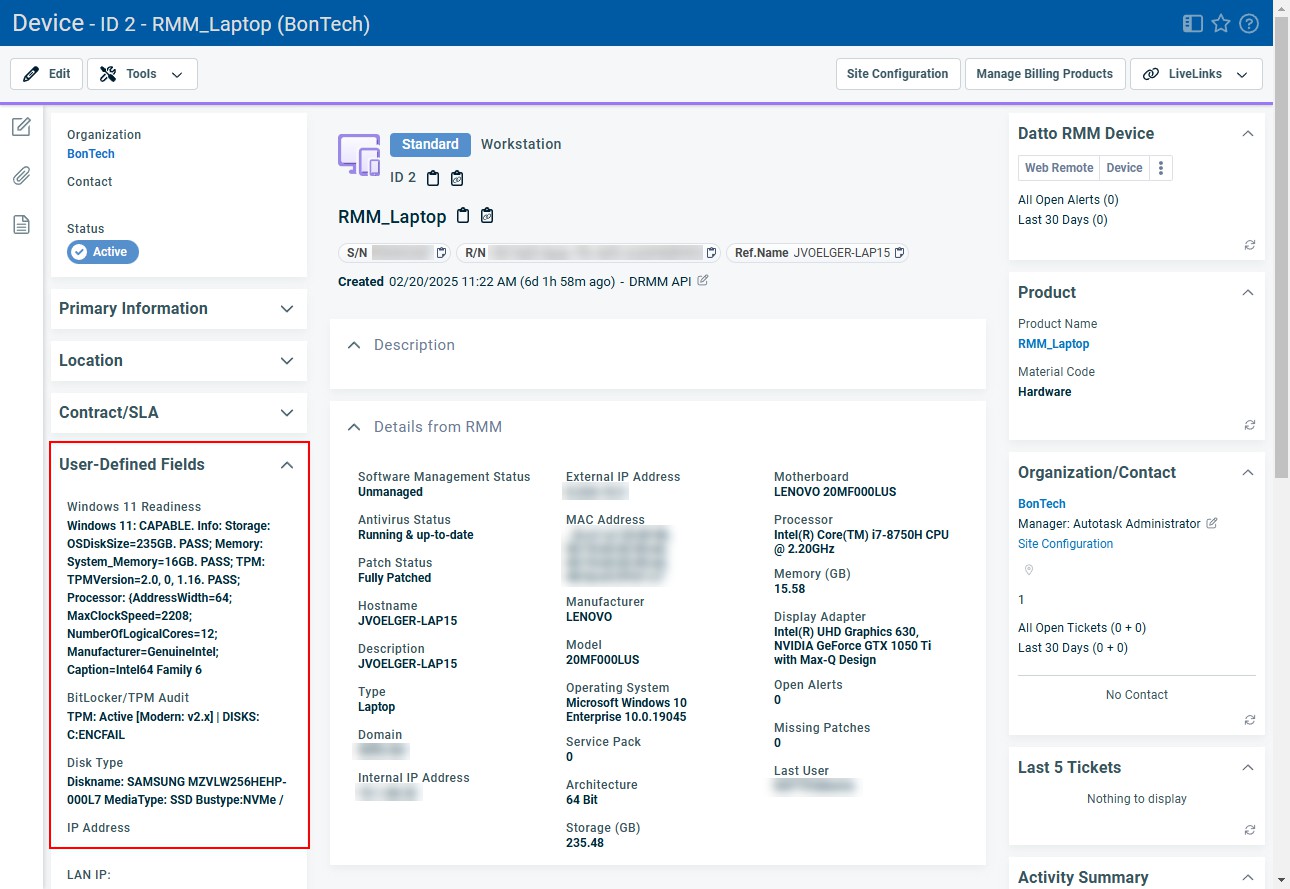
When working on tickets in Autotask, Bria and her team have noticed that as long as a Datto RMM device is added to a ticket, they can click the device name under the device insight and remote into the device using Datto RMM. This is great, but Bria found a way to speed up this process and interact with devices using Datto RMM tools directly from the ticket.
For example, here is the device record of a device synced from Datto RMM, where you can see in the upper-right corner the option to launch Web Remote or open the Datto RMM device summary page: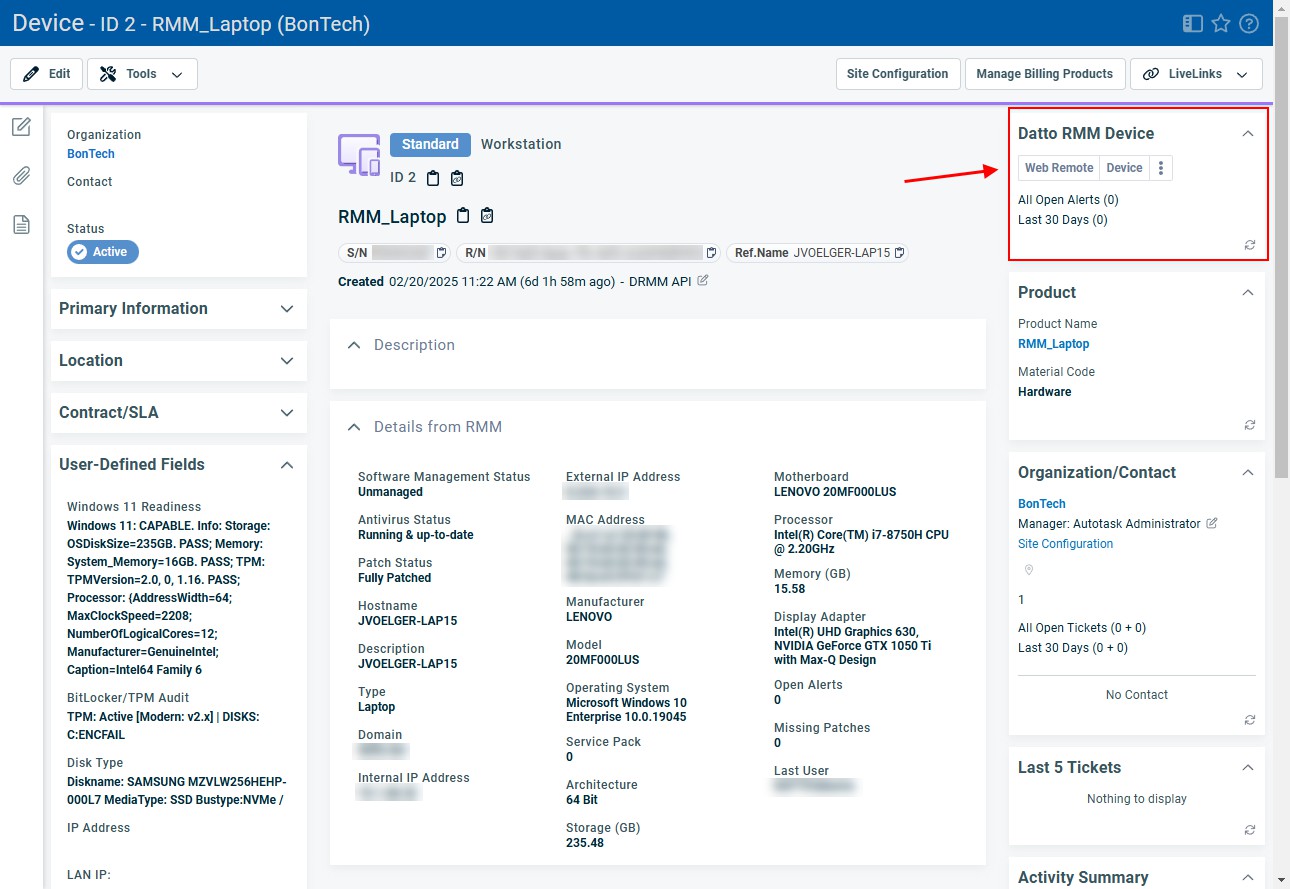
Here is a ticket that is tied to that device. Notice that, while it contains a device insight, it doesn't offer the interactivity that the device record in Autotask does: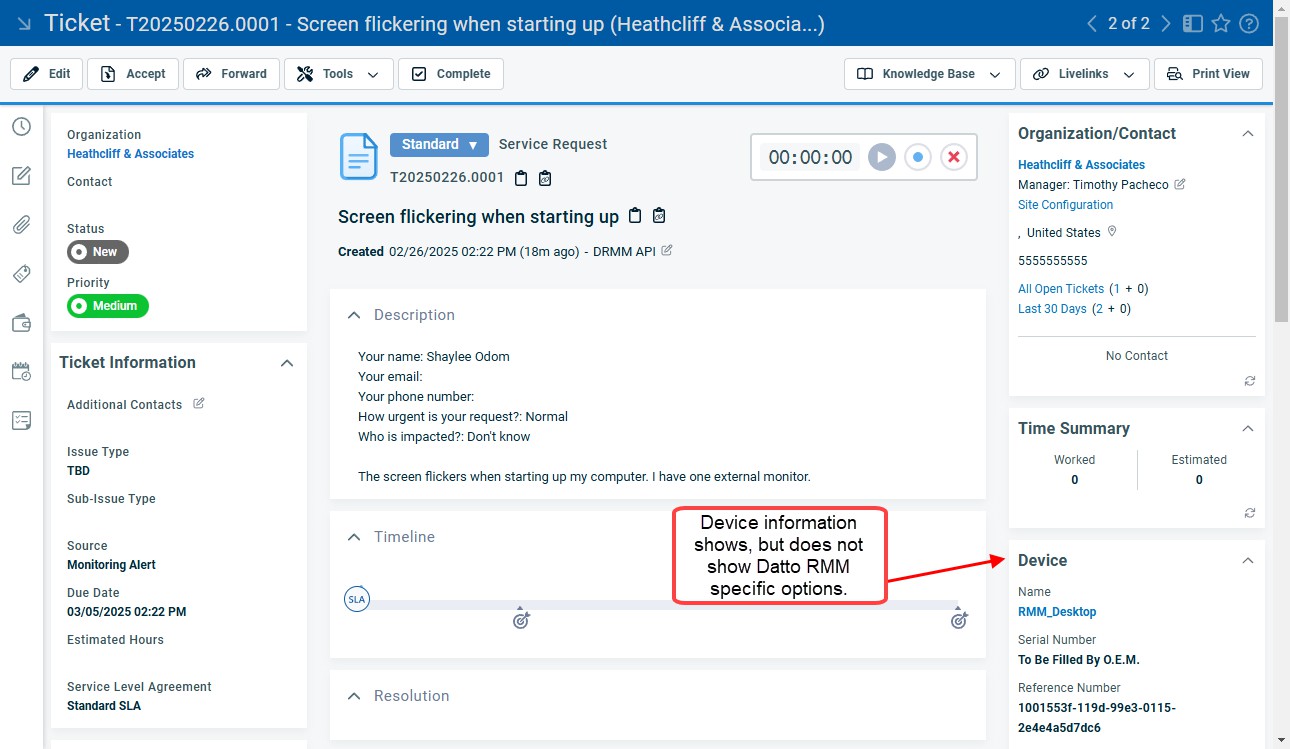
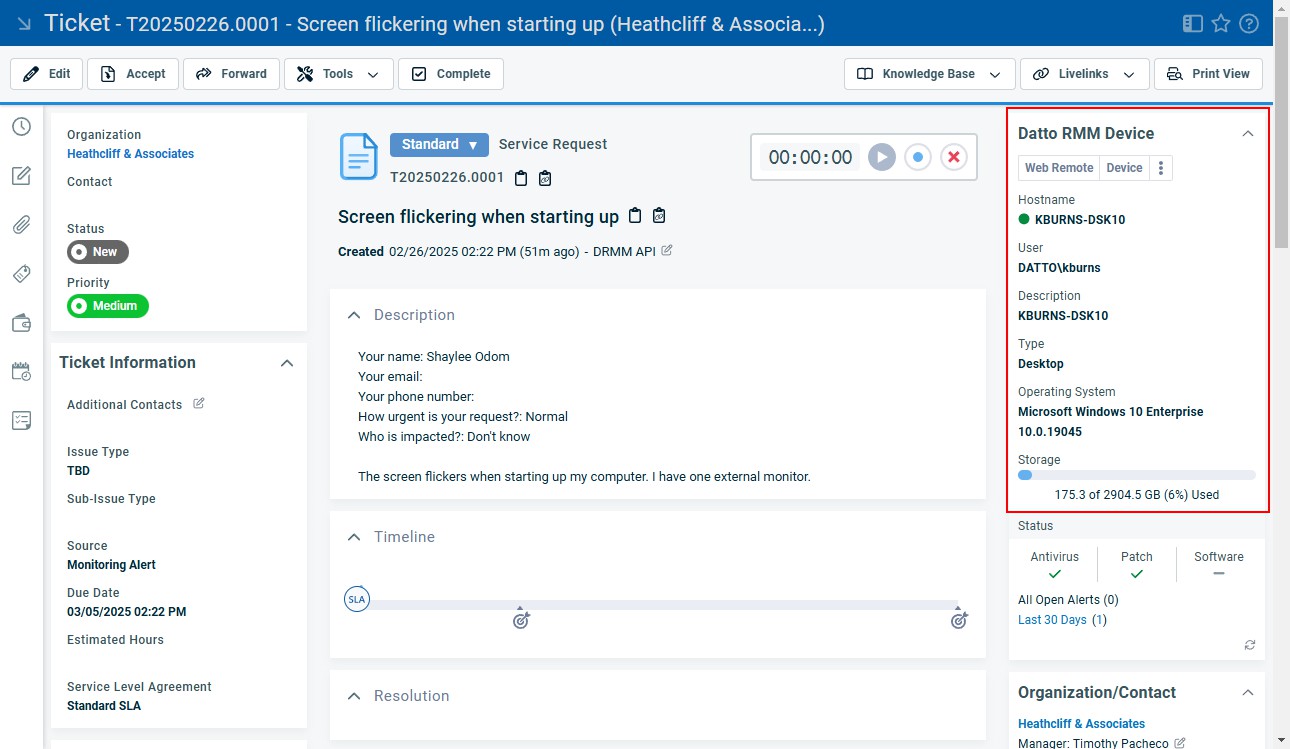
To allow interaction with Datto RMM devices directly from Autotask tickets, Bria took the following steps:
- While logged in to Autotask as an administrator, Bria navigates to Admin > Features & Settings > Service Desk (Tickets) > Ticket Categories and edits her default ticket category. In this case, it's named Standard.
- While editing the ticket category, Bria goes to the Insights tab and finds the Datto RMM device insight under Hidden Insights.
- She clicks and drags the device insight up to the top of the Visible Insights list and clicks Save & Close.

- Bria then checks her work by opening up the same ticket she was looking at earlier to see if her changes took effect. They did, and she now not only has the same functionality she had in the device record, but she has visibility of additional information, such as if the device is online for the logged-in user and available storage at a glance.
Timothy, who is working with Bria on setting up the integrations, has been adding all of the team's documentation to IT Glue. He's already added the IT Glue Documents insight to the Standard ticket category, but he has some more work to do before the configuration meets the team's needs.
For example, the following ticket is for one of their clients, a medical office, and the user needs their patient portal password reset. As you can see, that insight is not showing any documents yet:
What Timothy needs to do is set up ticket settings that will allow for the suggestion of any IT Glue documentation related to the Autotask ticket.
To do this, he executes the following steps:
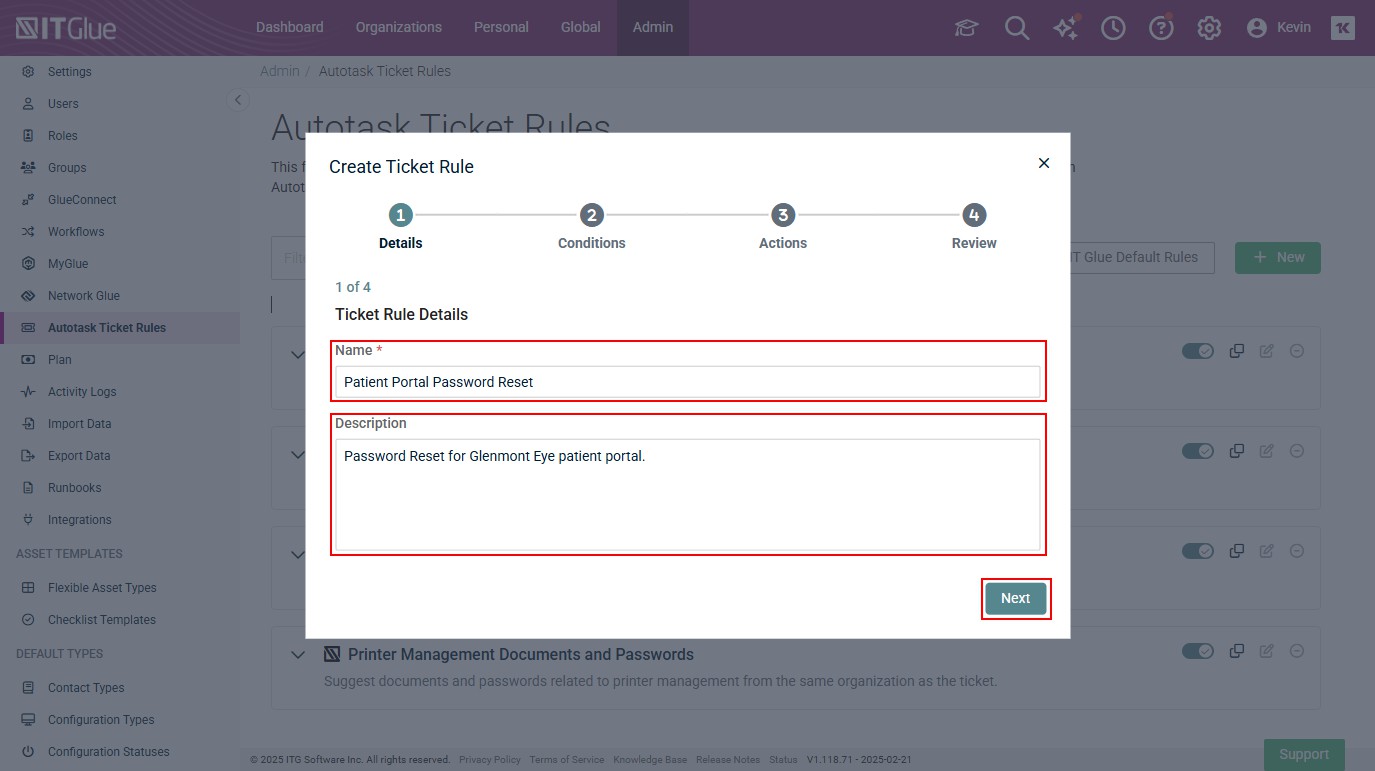
- In IT Glue, Timothy navigates to Admin > Autotask Ticket Rules and clicks New.
- In the Ticket Rule Details, Timothy gives the rule a name and description indicating that this rule is for tickets created when a patient portal password reset may be needed. He clicks Next.
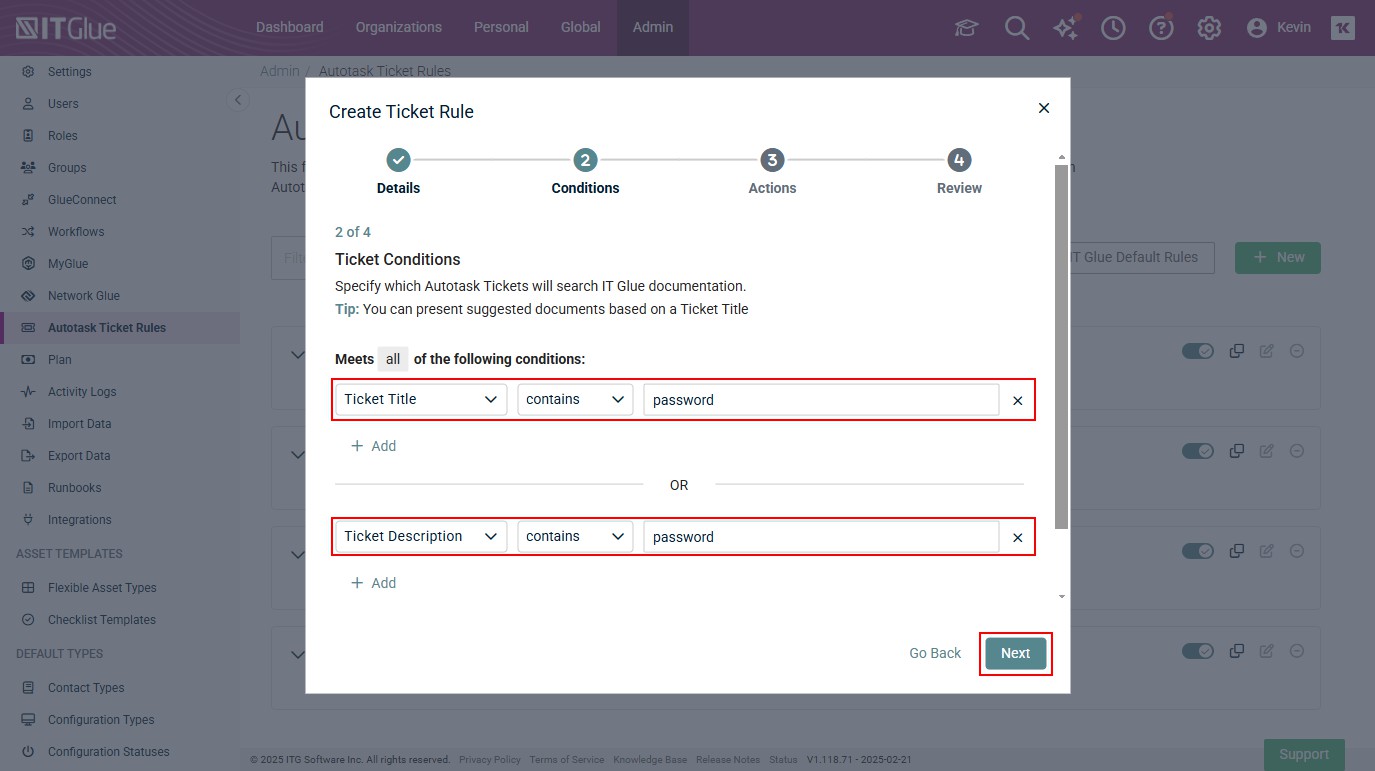
- In the Ticket Conditions section, Timothy specifies the criteria for what Autotask tickets this rule will apply to. When he finishes, he clicks Next again.
- In the next section, Ticket Actions, Timothy has to specify which IT Glue documentation will apply to Autotask tickets that meet the conditions set in step 3, Conditions. Once Timothy is done adding the rules, he clicks Next.
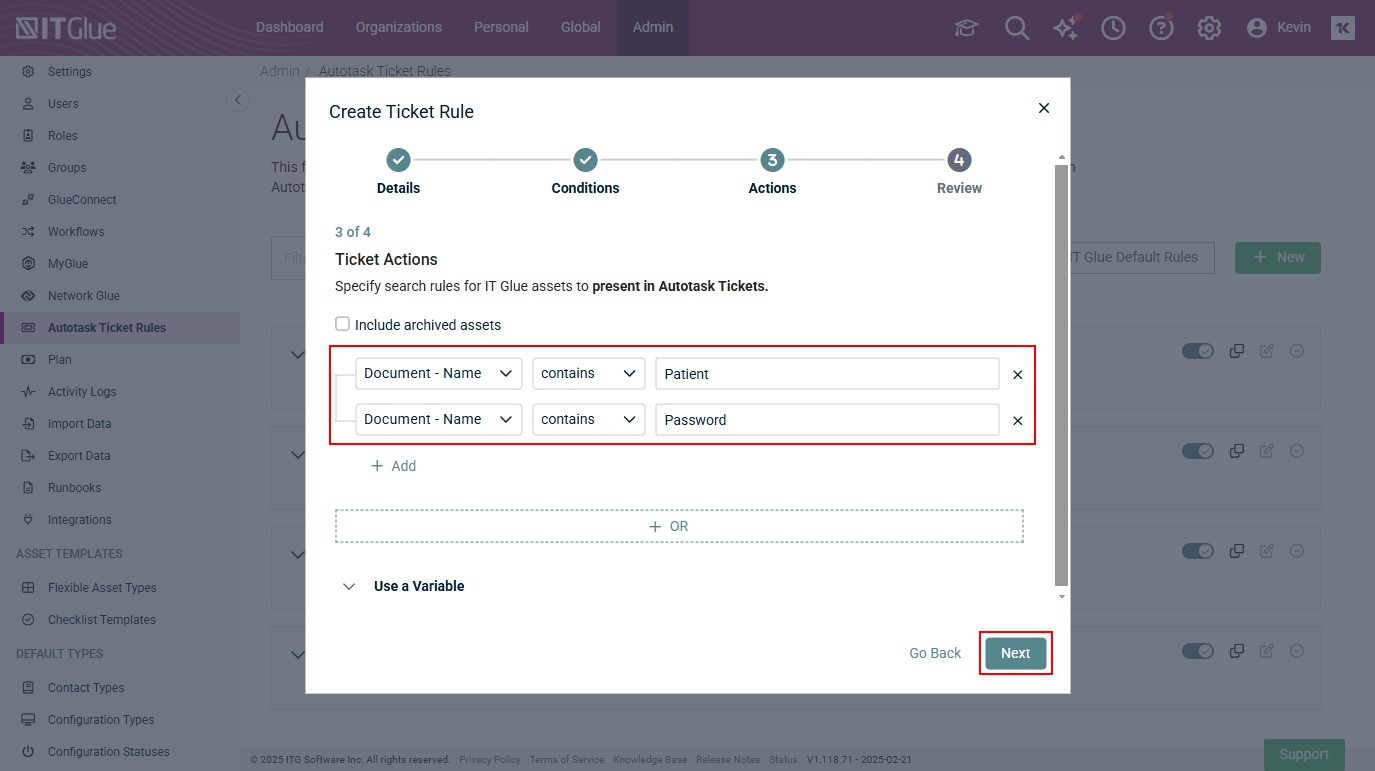
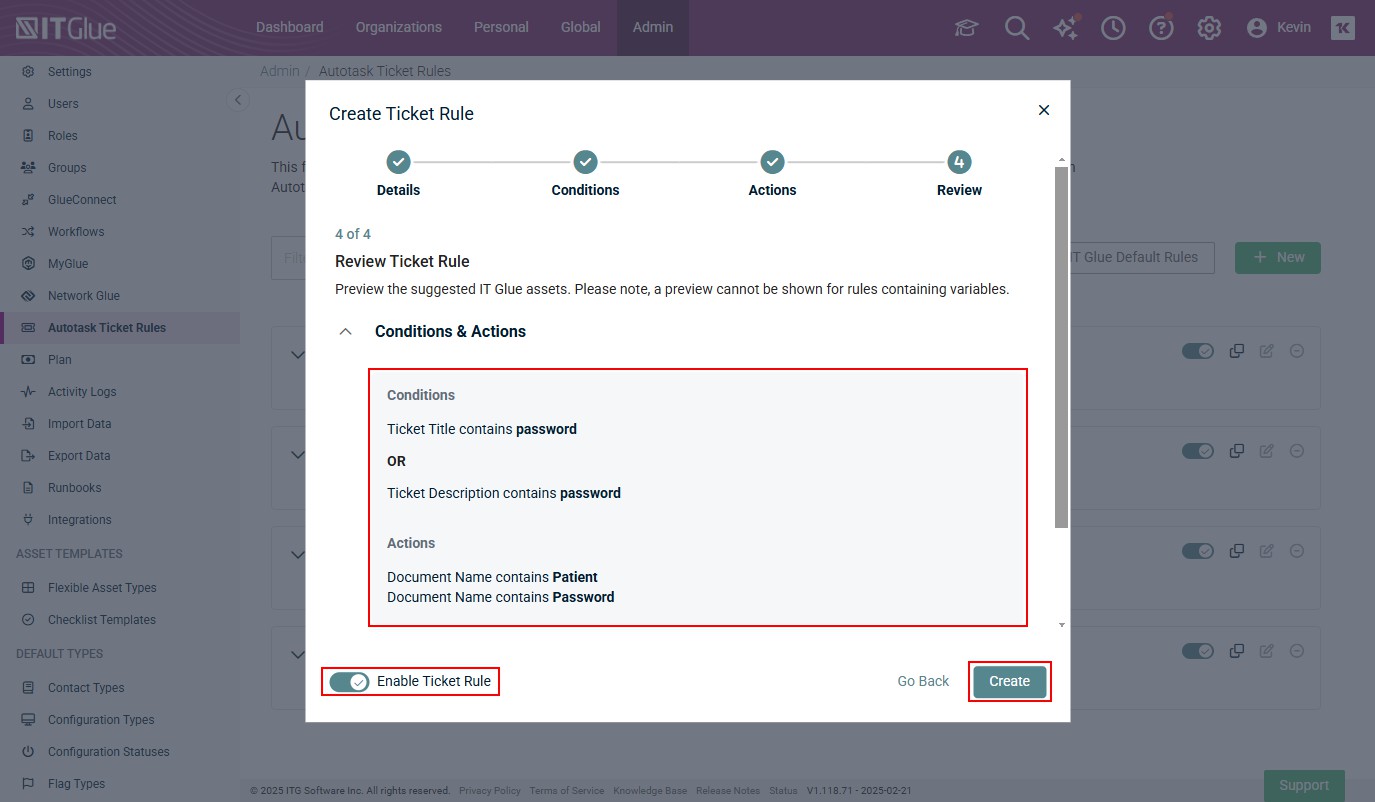
- In the Review Ticket Rule section, Timothy reviews the rules he set up. In this case, he's looking to make sure that any ticket that comes in that contains the word password in the title or description is recommended documents with names containing the words patient and password.
- Once he's confirmed the rule looks correct, he makes sure the Enable Ticket Rule toggle is turned on and clicks Create.
With this rule enabled, now when users load up a ticket with password in the title or description, Autotask will suggest that article:
For more details on this configuration, refer to Suggested IT Glue documentation in Autotask tickets in the IT Glue Help system.
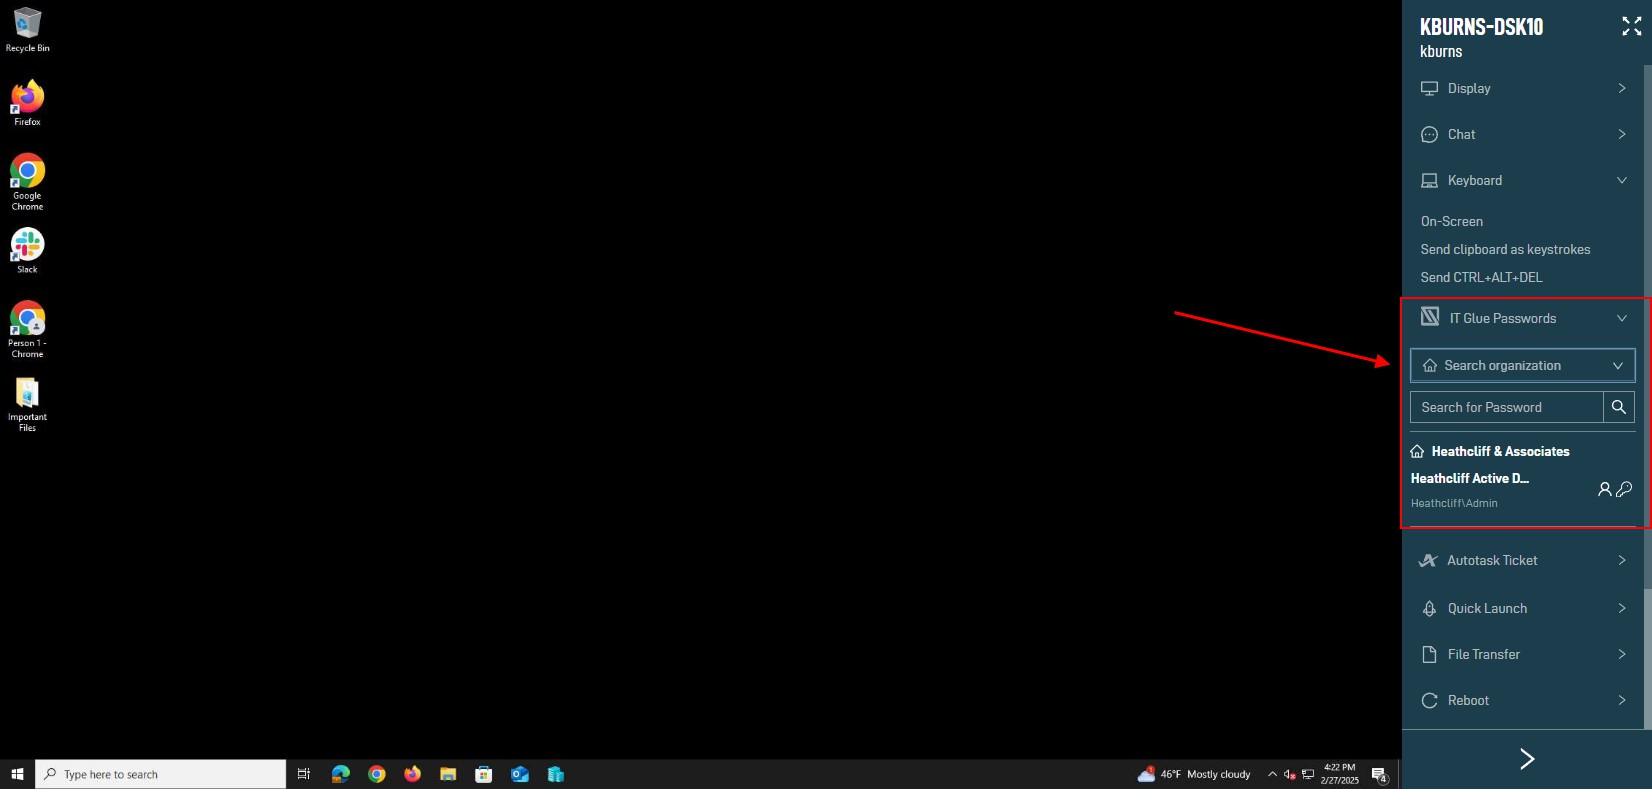
Timothy, while working with IT Glue and Datto RMM, finds himself hopping back and forth between the systems to grab passwords, such as admin passwords. Using the integration of IT Glue and Datto RMM, Timothy learns that he can use the Web Remote toolbar to access IT Glue passwords. Since the integration with IT Glue is already enabled, all he has to do is make sure the passwords are recorded in IT Glue.
To access the passwords stored in IT Glue from Web Remote, Timothy just has to launch a Web Remote connection, and the IT Glue Passwords tool will be available: