Microsoft AD FS IdP SSO setup instructions
NAVIGATION Header > Admin Settings > Single Sign-On
PERMISSIONS Master role
Active Directory Federation Services (AD FS) is a Single Sign-On (SSO) solution developed by Microsoft. It enables secure sharing of authentication credentials and user identity across organizational boundaries, allowing users to access multiple applications or systems with a single set of credentials. After successful integration, you will be able to access KaseyaOne from the Microsoft AD FS or from the KaseyaOne login page using Microsoft AD FS credentials.
Supported features
Supported features of this integration include:
-
SP-initiated SSO
-
Just-in-time user provisioning (refer to Configure Enable Automatic User Creation for a third-party IdP SSO in KaseyaOne)
Prerequisites
-
Master user account in KaseyaOne and Administrator account in AD FS
-
Users must have the same email address in KaseyaOne and AD FS
Adding a new relying party trust
The connection between AD FS and KaseyaOne is defined using a relying party trust.
- Log in to the server where AD FS is installed.
- Launch the AD FS Management application and click Start > AdministrativeTools > AD FS Management.
- Select Trust Relationships > Relying Party Trusts.
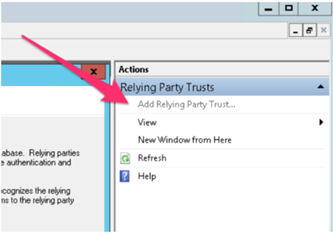
- Click Add Relying Party Trust from the Actions sidebar.
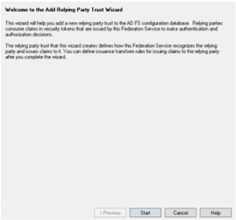
- Click Start on the Add Relying Party Trust Wizard.
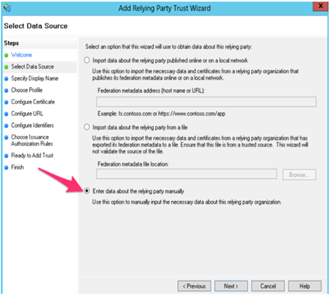
- On the Select Data Source page, click Enter data about the relying party manually. Click Next.
- On the Specify Display Name page, enter a Display name of your choice and any notes (e.g. KaseyaOne). Click Next.
- Skip the Configure Certificate page by clicking Next.
- On the Configure URL page, select the Enable Support for the SAML 2.0 WebSSO protocol checkbox. The URL will be: https://api-one.kaseya.com/api/v1/sso/saml-callback.
- On the Configure Identifiers page, type the Relying party trust identifier. This is the URL of KaseyaOne. The URL will be https://one.kaseya.com. Click Next.
- Skip the Access Control Policy page (unless you want to configure this) Click Next to skip.
- On the Ready to Add Trust page, review your settings. Click Next.
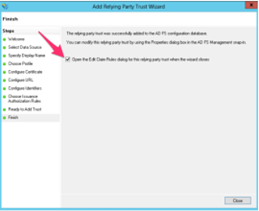
- On the final screen, make sure the Open the Edit Claim Rules dialog for this relying party trust when the wizard closes check box is selected. Click Finish.
Creating claim rules
After you create the Relying Party Trust, you can create the claim rules and make the following changes that aren't set by the wizard:
NOTE All outgoing claims should be the same as shown above (companyIdentifier, securityGroups, username, lastname, firstname and email).
- If the claim rules editor is automatically opened, click Add Rule. Otherwise, in the Relying Party Trusts list, right-click the relying party object that you created, click Edit Claim Issuance Policy, Click Add Rule.
You should add multiple rules as follows: LDAP Attributes Rule to map all the required fields (firstname, lastname, username and email). - On the Select Rule Template page, under Claim rule template, select Send LDAP Attributes as Claims from the list. Click Next.
- Enter Rule name (for example KaseyaOne rules).Select Active Directory in the Attribute Store list.
- Add Rows to the Mapping table with the following information:
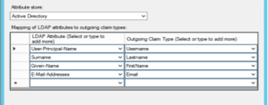
- Click Finish.
Custom rule to add the company name
- Go to the KaseyaOne tab in your browser.
- Navigate to Admin Settings > Single Sign-On view.
- In the Single Sign-On with Identity Providers section, click Add Configuration.
- In the opened drawer, find Company Identifier and copy the value of your Company Identifier.
- Return to the AD FS interface.
- Create the new Rule by clicking Add Rule in the Claim Rules Editor.
- On the Select Rule Template view, under Claim Rule Template, select Send Claims Using a Custom Rule from the list. Click Next.
- Give a name to the Claim Rule (e.g. Company Identifier).
- Enter the following value into Custom rule field:
c:[Type == "http://schemas.microsoft.com/ws/2008/06/identity/claims/windowsaccountname", Issuer == "AD AUTHORITY"] => issue(Type = "companyIdentifier", Value = "{Company Identifier of your KaseyaOne you’ve copied in the step 4}", Issuer = c.Issuer, OriginalIssuer = c.OriginalIssuer, ValueType = c.ValueType); -
Click Finish.
Custom rule for Group claims
- Create the new Rule by clicking the Add Rule button in the Claim Rules Editor.
- On the Select Rule Template view, under Claim rule template, select Send Group Membership as a Claim from the list, then click Next.
- On the Configure Claim Rule view, under Claim rule name, type the display name for this rule.
- Under Outgoing claim type, select the claim type Groups and under Outgoing Claim Value, enter securityGroups.
Signing the Message and Assertion
In PowerShell, enter the following command to make sure that both the message and assertion are signed:
Set-ADFSRelyingPartyTrust -SamlResponseSignature "MessageAndAssertion"
When you have multiple applications, the command must specify the target name. Then, the command would be:
Set-ADFSRelyingPartyTrust -TargetName "{ApplicationName}" -SamlResponseSignature "MessageAndAssertion"
The {ApplicationName} here should be substituted with the application name under Relying party trusts.
Downloading the certificate
To download the certificate, follow the steps below:
- Export the token-signing certificate with the AD FS Microsoft Management Console.
- When using the certificate exporting wizard, ensure you select Base-64 encoded X.509 (.CER) for the encoding format.
- Open the exported file in a text editor to get the certificate value.
- Go to the KaseyaOne tab in your browser.
- Navigate to the Admin Settings > Single Sign-On.
- In the Single Sign-On with Identity Providers tab, click Add Configuration.
- In the opened drawer, paste AD FS Single Sign-On URL (https://{host-name}/adfs/ls/IdpInitiatedSignOn.aspx) into Identity Provider Single Sign-On URL field.
- Paste Identity Provider Issuer URL (http:// {host-name} /adfs/services/trust) into Identity Provider Issuer field.
- Upload the AD FS certificate that you downloaded previously.
- Turn on the Enable Single Sign-On via SAML toggle to enable SSO integration.
- Log out of KaseyaOne.
- On the KaseyaOne login page, enter the Username and Company Name for your account. Click Next.
- Click Log In with Single Sign-On.
- If already logged in to AD FS (if you have an active browser session), verify that you are redirected to and logged in to KaseyaOne.
- If not already logged in to AD FS, you will be redirected to the AD FS login page. Enter your credentials and complete the user login process.
- Verify that you are redirected to and logged in to KaseyaOne.


