Integration: Autotask & myITprocess
Autotask
SECURITY API User
myITprocess
NAVIGATION My Account > Account Settings > Integrations > Connect PSA
SECURITY IT Provider Admin
Overview
Rather than manually create and track implementation of all client-accepted projects in myITprocess inside Autotask, you can leverage this integration to automatically create Autotask opportunities from client-accepted projects inside myITprocess. Every project is seamlessly managed and executed within Autotask with no manual work required.
Once an IT project in myITprocess is approved by a customer, you can automatically turn it into an Autotask opportunity. Easily populate Autotask opportunities with myITprocess project data to ensure that valuable data is not lost in the width of isolated tools.
This integration also allows you to turn myITprocess recommendations into Autotask tickets. Save time and increase productivity by instantly taking action on newly discovered technology risks.
Kaseya 365This integration is included as part of a Kaseya 365 Ops subscription and will be configured for you in a session with an implementation consultant from Kaseya. Refer to Getting started with Kaseya 365 Ops. |
Automation powered by this integration
- QuickAction for Autotask Opportunity: Create Autotask opportunities for myITprocess recommendations
- QuickAction for Autotask Ticket: Create Autotask tickets for myITprocess reviews and Create Autotask tickets for individual questions in myITprocess reviews
How to...
You have the option to set up a custom security level in Autotask with minimum permissions that you can use specifically for managing this integration with myITprocess. Complete the following steps in Autotask to do so:
- Navigate to Admin > Organization Settings & Users > Resources/Users (HR) > Security Levels.
- From the context menu for the API User (system) security level, which is configured with the settings needed for the new security level you will create, select Copy.
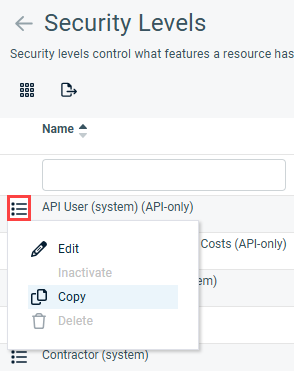
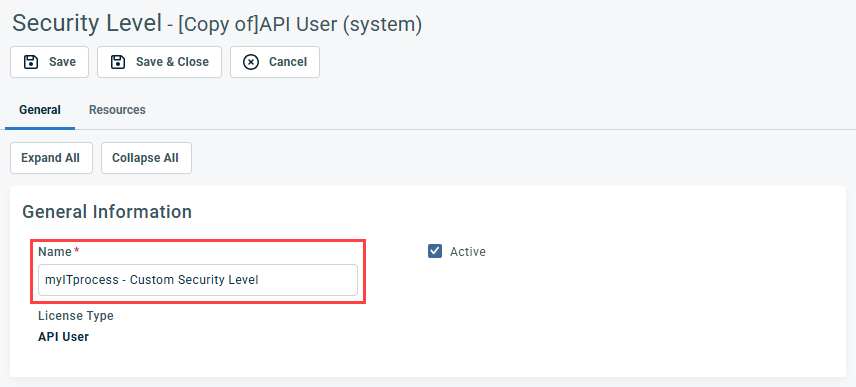
- Enter a name indicating that this security level is used for the integration with myITprocess.
- Click Save & Close.
Autotask allows you to create API-only access user types for the purpose of OAuth integrations with other applications. An Autotask security level with Admin permission to configure Resources/Users (HR) can complete the following steps to create credentials for an API user in Autotask, which will not have access to the Autotask user interface. The API user credentials configured in the following steps will be used for connecting this integration:
- Navigate to Admin > Organization Settings & Users > Resources/Users (HR) > Resources/Users.
- From the New drop-down menu, select New API User.
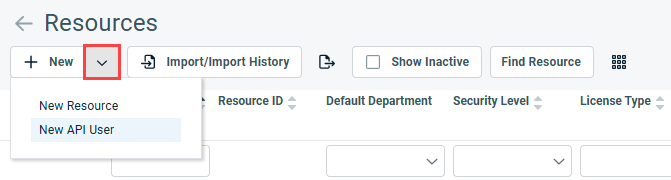
- In the General section, fill in the required fields. From the Security Level drop-down menu, select API User (system) or the custom security level you set up in Create a dedicated security level in Autotask (optional).
- In the Credentials section, click Generate Key and Generate Secret to populate those fields. Copy and securely save these values, which you will later enter in myITprocess.
- In the API Tracking Identifier section, select Custom (Internal Integration).
- In the Internal Integration Name field, enter myITprocess.
- Copy and securely save the Tracking Identifier value, which you will later enter in myITprocess.
- Click Save & Close to create the new user and receive an email with login credentials.
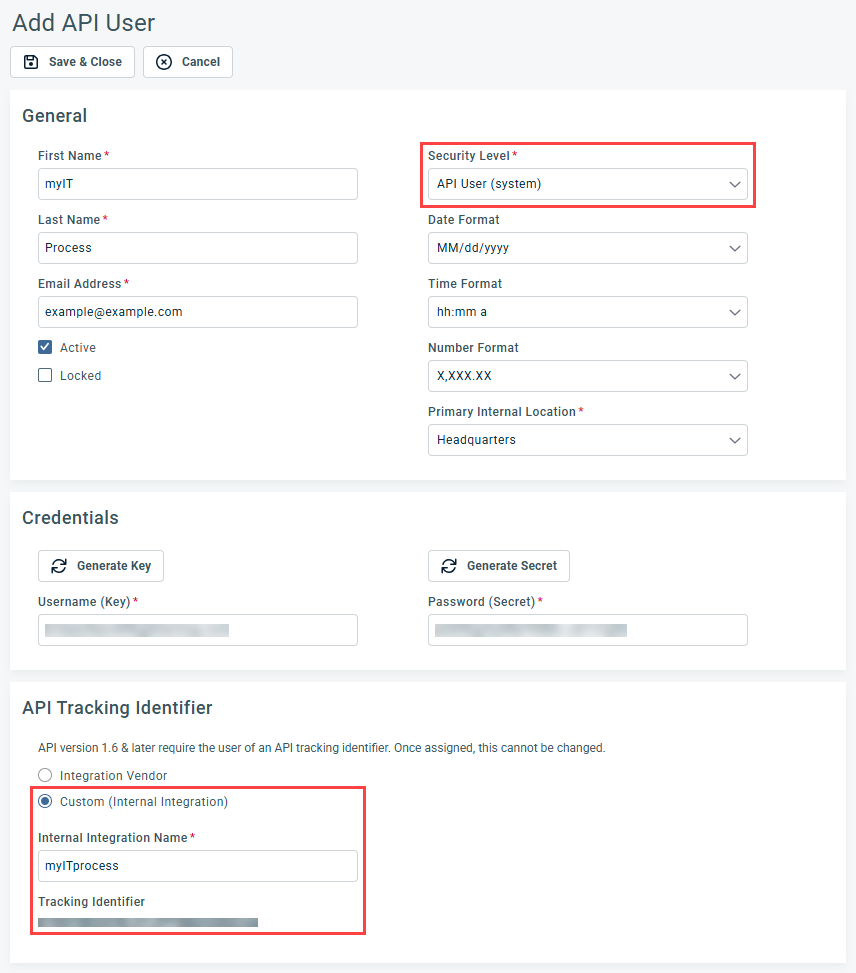
NOTE When creating the API user, it's important to take note of the credentials you create, as you cannot recover the Password (Secret) value from the user record in Autotask once it has been saved.
Learn more about API users in the Autotask Help system.
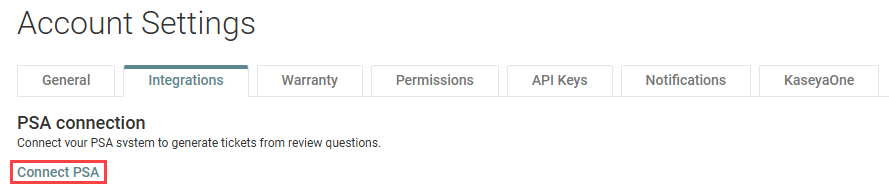
- In the upper-right corner of the header, click your username (My Account) and select Account Settings.
- Click the Integrations tab.
- In the PSA connection section, click Connect PSA.
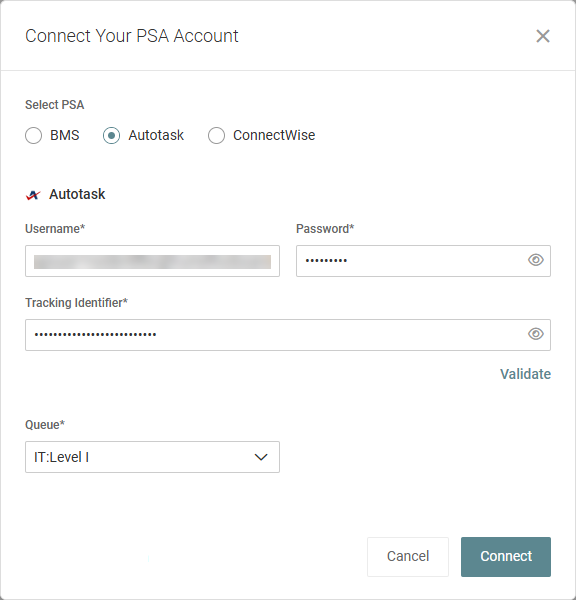
- In the Connect Your PSA Account dialog box, select Autotask.
- In the Username field, paste the Username (Key) value you generated in Create a dedicated API user in Autotask.
- In the Password field, paste the Password (Secret) value you generated in Create a dedicated API user in Autotask.
- In the Tracking Identifier field, paste the Tracking Identifier value you generated in Create a dedicated API user in Autotask.
- Click Validate.
- Once all fields are successfully validated, select an active Autotask queue to which tickets created in myITprocess will be sent. Learn how to create queues in the Autotask Help system.
- Click Connect to connect myITprocess to Autotask.
BEFORE YOU BEGIN You must add your organizations (clients) in myITprocess before you can associate them with your organizations in Autotask. Learn about adding myITprocess organizations in the myITprocess Help system and adding Autotask organizations in the Autotask Help system.
The option to sync myITprocess organizations with their corresponding Autotask organizations is available when creating organizations and for existing organizations.
To map existing myITprocess organizations to their corresponding Autotask organizations, complete the following steps in myITprocess:
- In the upper-right corner of the header, click your username (My Account) and select Account Settings.
- From the left navigation menu, click Setup Organizations.
- In any organization row, click the Autotask (Ticketing) value (either None or the currently mapped Autotask organization) to select or change the Autotask organization to map to the myITprocess organization. To narrow the list, start typing an organization name in the field. To refresh the synced data, click Refresh.
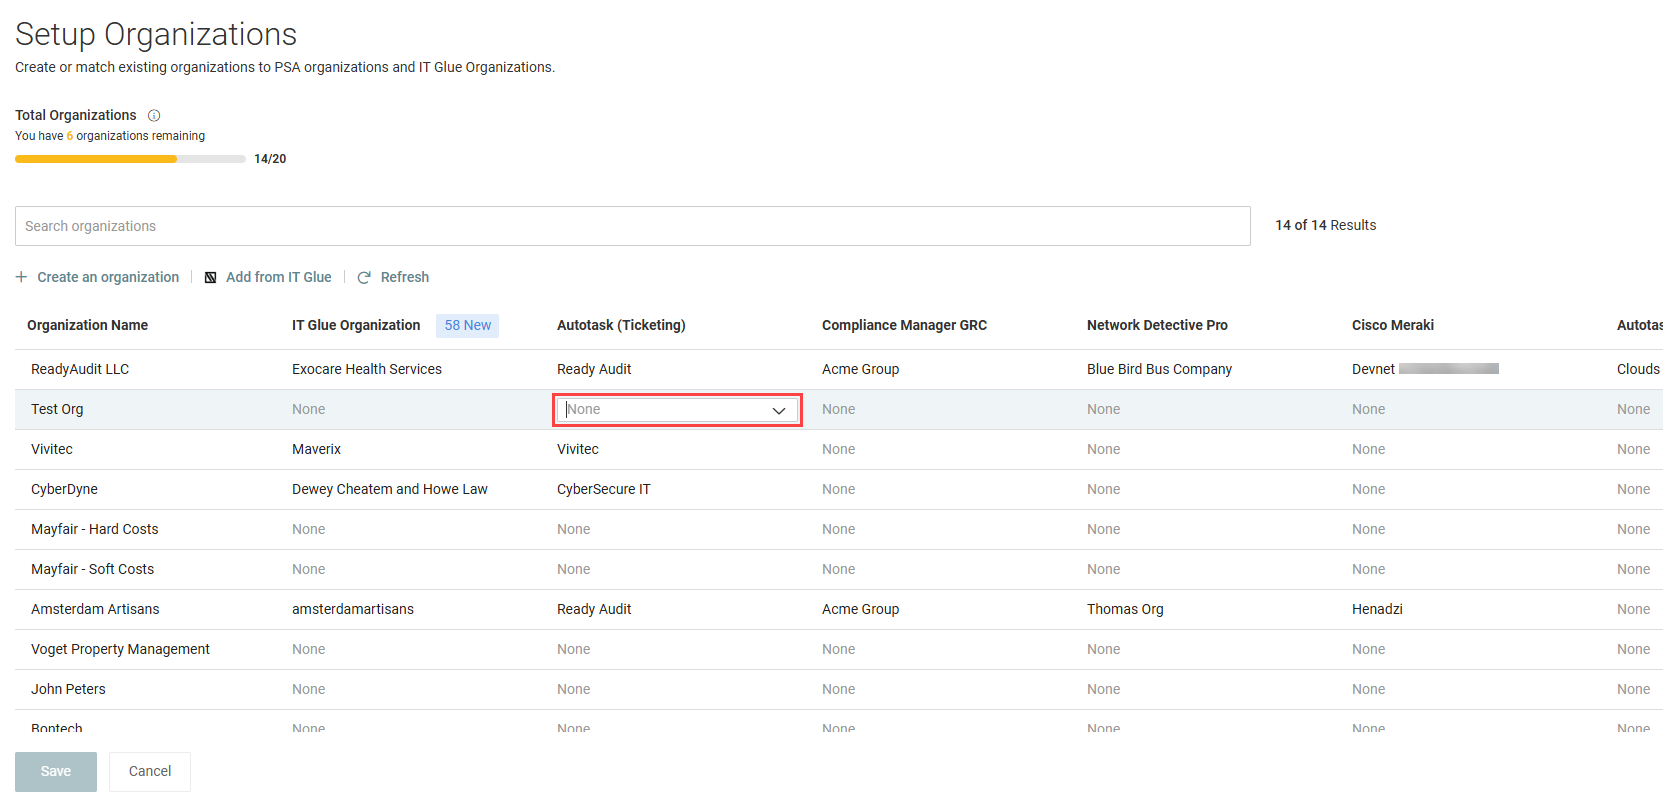
- When finished configuring the mappings, click Save.
This option is also available from the Organizations page in myITprocess. Complete the following steps:
- From the top navigation menu, click Organizations.
- Click an organization in the list.
- From the more menu for the organization, select Edit organization details.

- From the Autotask Organization Name drop-down menu, select the applicable Autotask organization to map this myITprocess organization to.
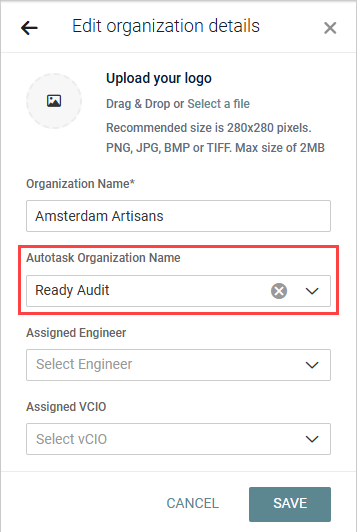
- Click Save.
Syncing a new or existing Autotask opportunity to a myITprocess strategic roadmap recommendation allows you to view and manage their details from either platform.
NOTE Formatting and images from an opportunity will not appear in the recommendation.
To sync an existing Autotask opportunity to a recommendation or create a new Autotask opportunity from within myITprocess to sync to recommendations, complete the following steps in myITprocess:
- From the top navigation menu, click Strategy.
- From the drop-down menu in the upper-left corner of the page, select a myITprocess organization that is mapped to an Autotask organization to populate the strategic roadmap for that organization. Refer to Map myITprocess organizations to Autotask organizations.
- In the quarter you wish to create a myITprocess recommendation for, click the + icon.
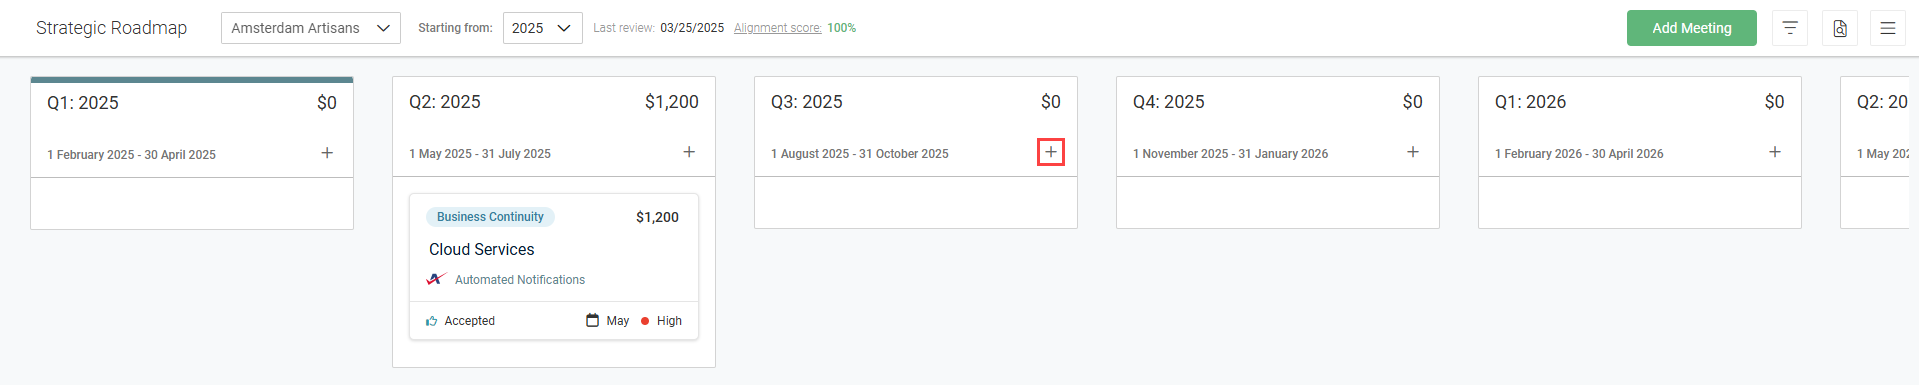
- To create a new recommendation, click Next. To create a recommendation from a template, select a template and click Next. Learn about recommendation templates in the myITprocess Help system.
- Fill in the recommendation details.

- Scroll to the Autotask section, and click the Search or Create an Opportunity drop-down menu.
- You have the option to sync an existing Autotask opportunity from the Standard category to this recommendation or to create a new Autotask opportunity from within myITprocess to sync to this recommendation and future recommendations. If you select an existing opportunity from the Opportunity drop-down menu, the details from Autotask will be automatically populated. Click the opportunity name or View more fields in Autotask to open the opportunity in Autotask.
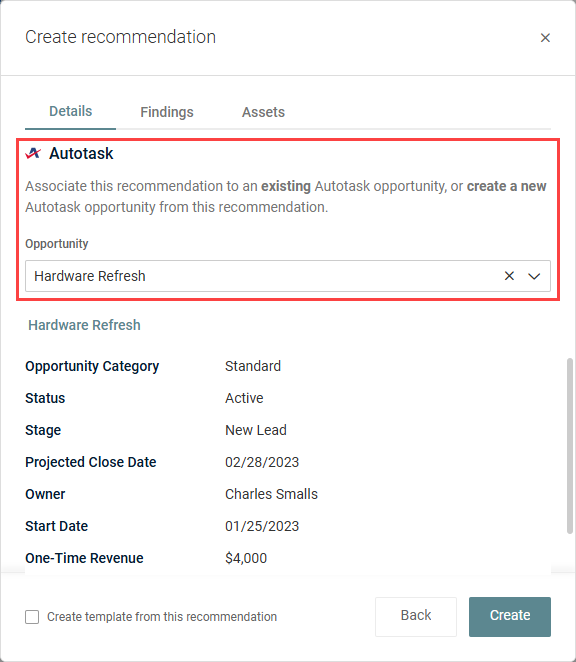
- Once you are finished configuring the recommendation, click Create.
To create a new Autotask opportunity instead, click Create Opportunity from the bottom of the Opportunity drop-down menu.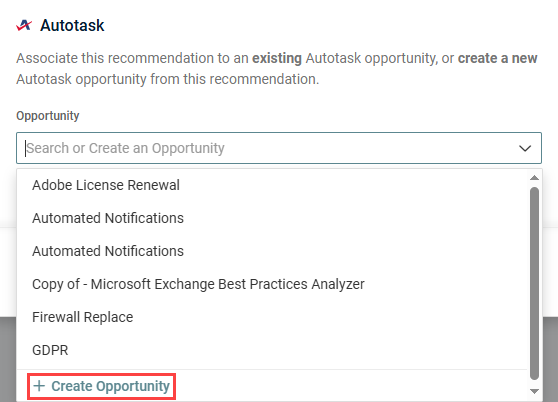
The Name field will be automatically populated as the recommendation name but can be edited. The opportunity will be created in the Standard category by default. Fill in the preliminary fields to configure the opportunity. Once created from myITprocess, additional fields will be available in Autotask to further populate the opportunity. Click Create to create the opportunity in Autotask, automatically associate it with this recommendation, and finish configuring the recommendation.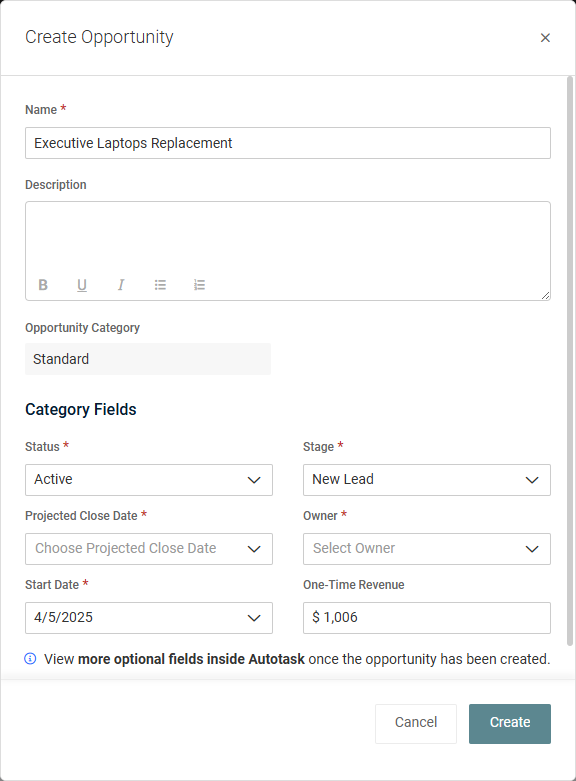
Learn about recommendations in the myITprocess Help system.
The Autotask opportunity will be added to the recommendation in the organization's strategic roadmap and can be opened from myITprocess at any time.
NOTE You have the option to sync an Autotask opportunity to an existing recommendation by opening the recommendation and scrolling to the Autotask section.
BEFORE YOU BEGIN You must add your organizations' client templates in myITprocess before you can configure reviews for those organizations. Learn about adding client templates in the myITprocess Help system.
The option to create Autotask tickets for myITprocess reviews is available when creating reviews and in existing reviews. Enabling this setting automatically creates an Autotask ticket that tracks the total amount of time the review was open.
Creating an Autotask ticket for a new review
To automatically create an Autotask ticket for a review upon creating the review, complete the following steps in myITprocess:
- From the top navigation menu, click Alignment.
- In the upper-right corner of the page, click Create Review.
- Fill in the review details and select the Create Ticket in Autotask check box.
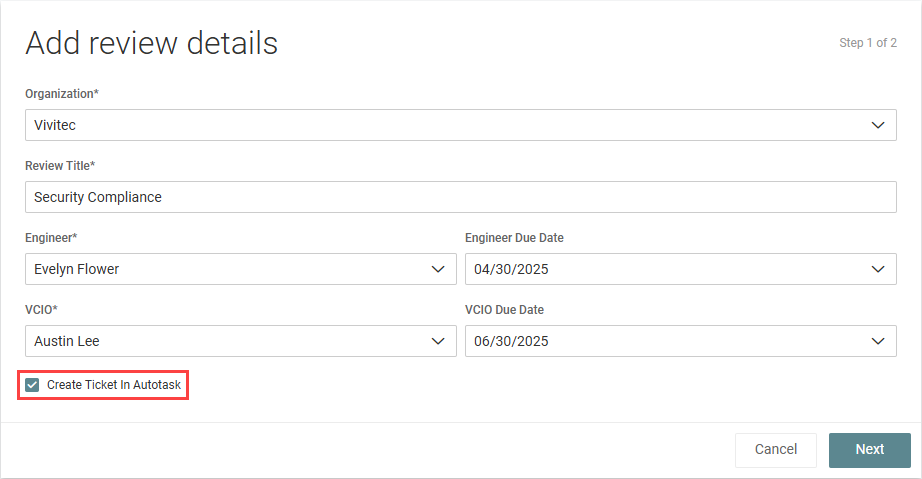
- Click Next.
- Configure the review as desired, and click Create.
NOTE If the selected organization is not already mapped to an Autotask organization, this option is replaced with Setup PSA Organization. Click the link to navigate to the Setup Organizations page to map the organization to an Autotask organization. Refer to Map myITprocess organizations to Autotask organizations.
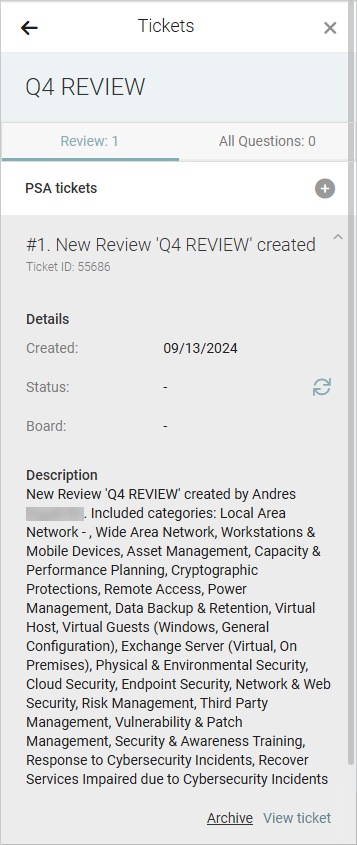
The ticket summary will be automatically populated as New Review ['Review Title'] created and the description as New Review ['Review Title'] created by [creator name]. Included categories: [list of categories included in the review] and can be edited in Autotask.
Learn about reviews in the myITprocess Help system.
Creating an Autotask ticket for an existing review
To create an Autotask ticket for an existing review, complete the following steps in myITprocess:
- From the top navigation menu, click Alignment.
- From the drop-down menu at the top of the list, select either My Reviews to filter the list by reviews you created, or select All Reviews to populate a list of all reviews in the account.
- Search or filter for the review you want to create a ticket for, and click Details.
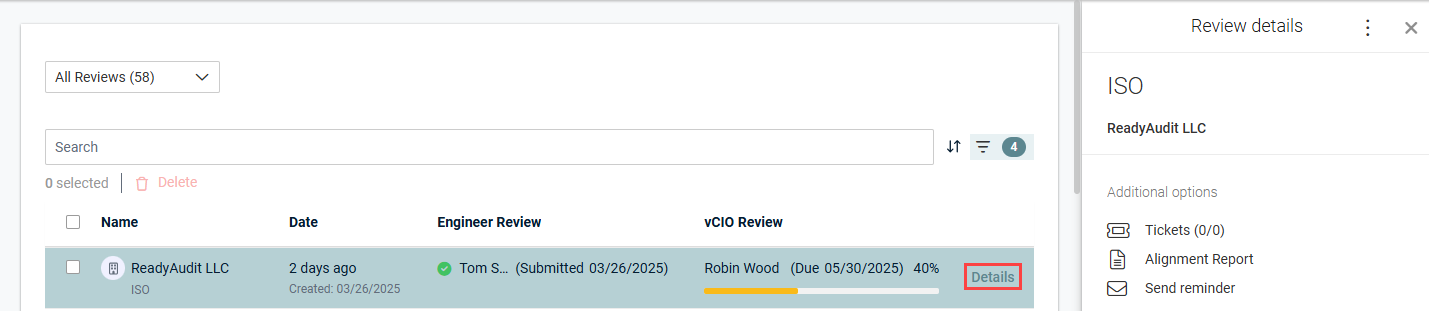
- Click Tickets, which is available only if the organization is mapped to an Autotask organization. Refer to Map myITprocess organizations to Autotask organizations.
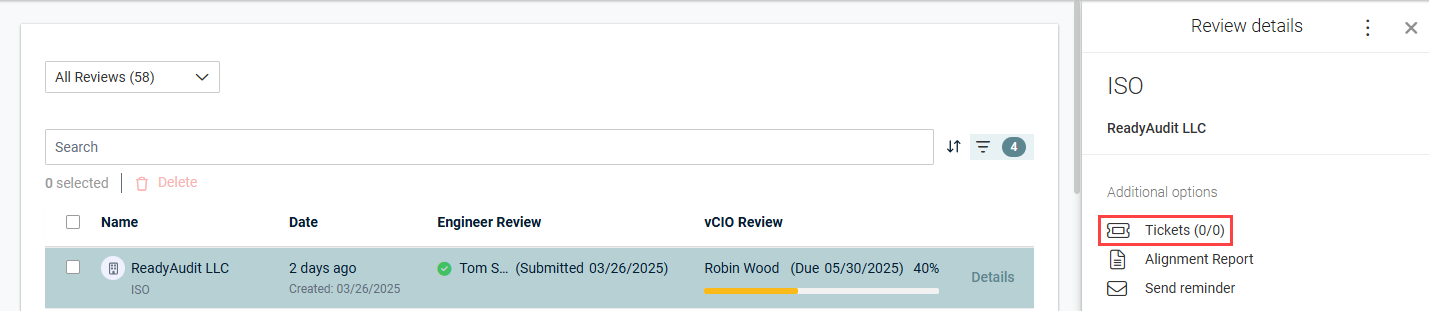
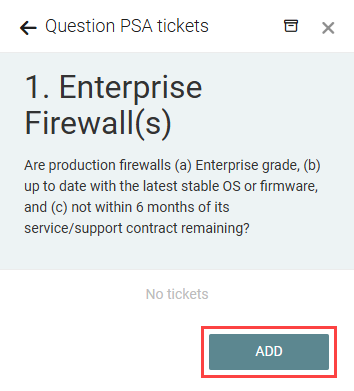
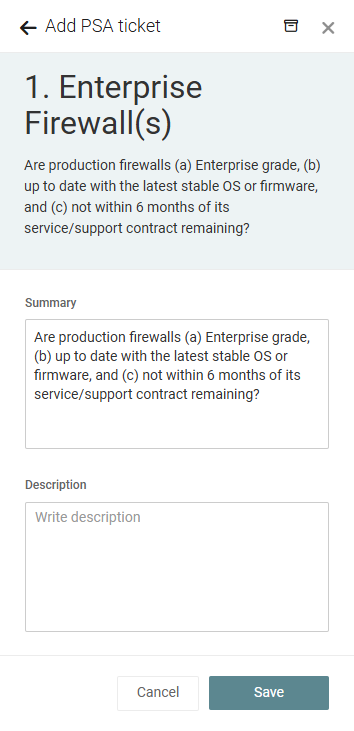
- In the Review tab, which is selected by default, click Add to create a ticket for the review in its entirety.
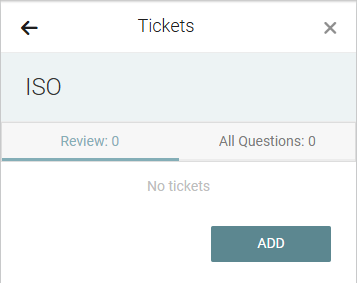
- Enter a custom summary and description that will appear in the ticket.
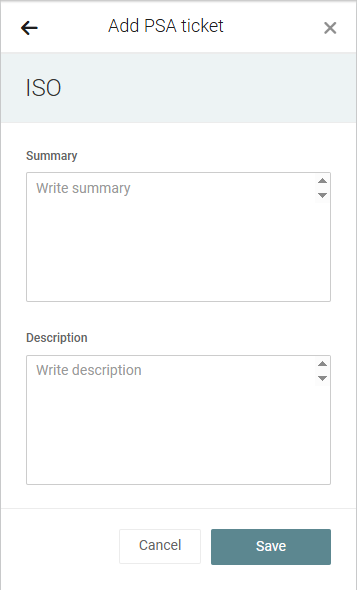
- Click Save to create the ticket.
NOTE This option is also available if you open the review and click the menu in the upper-right corner of the page.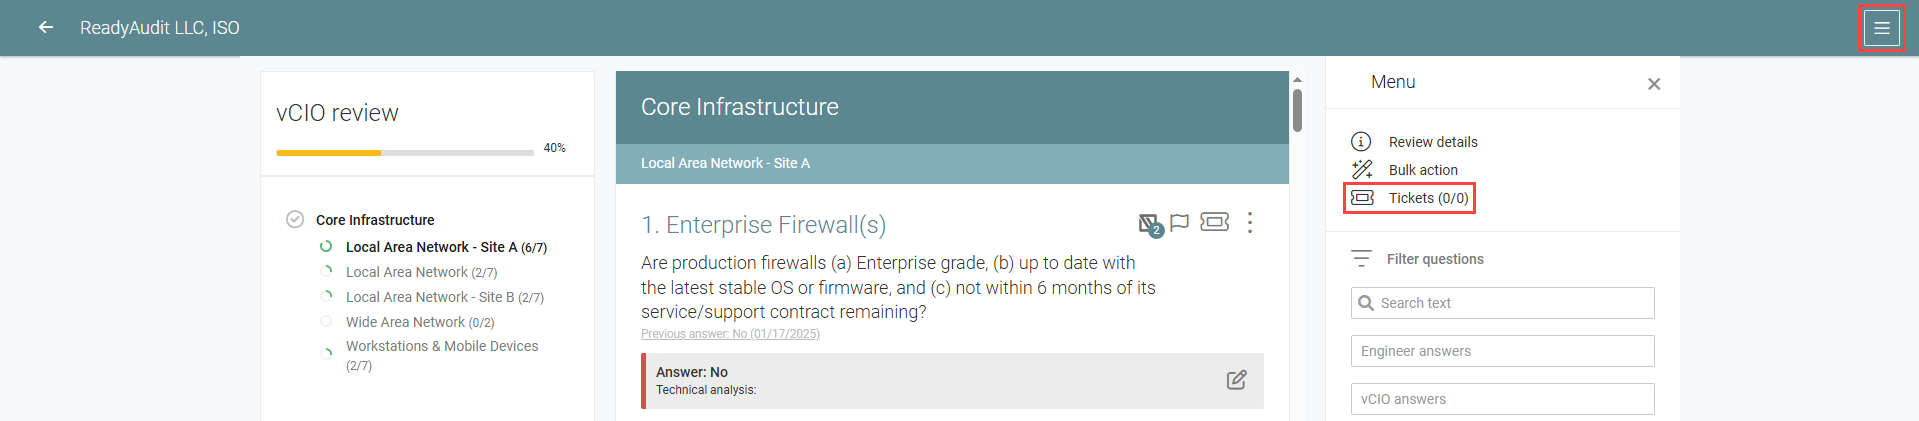
NOTE You have the option to create more than one ticket for a single review. To do so, click + in the Review tab of the Tickets pane.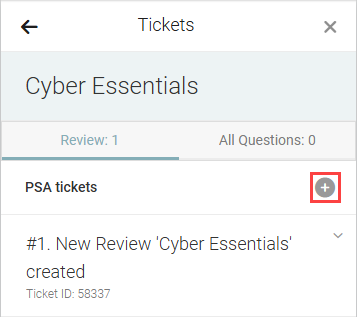
The option to create Autotask tickets for questions in myITprocess reviews is available in existing reviews. These tickets can be sent to a dedicated board with the benefit of someone in centralized services or the support desk remediating that issue.
To create an Autotask ticket for a question in a review, complete the following steps in myITprocess:
- From the top navigation menu, click Alignment.
- From the drop-down menu at the top of the list, select either My Reviews to filter the list by reviews you created, or select All Reviews to populate a list of all reviews in the account.
- Click a review to open it.
- Locate the question you want to create a ticket for, and click the ticket icon.
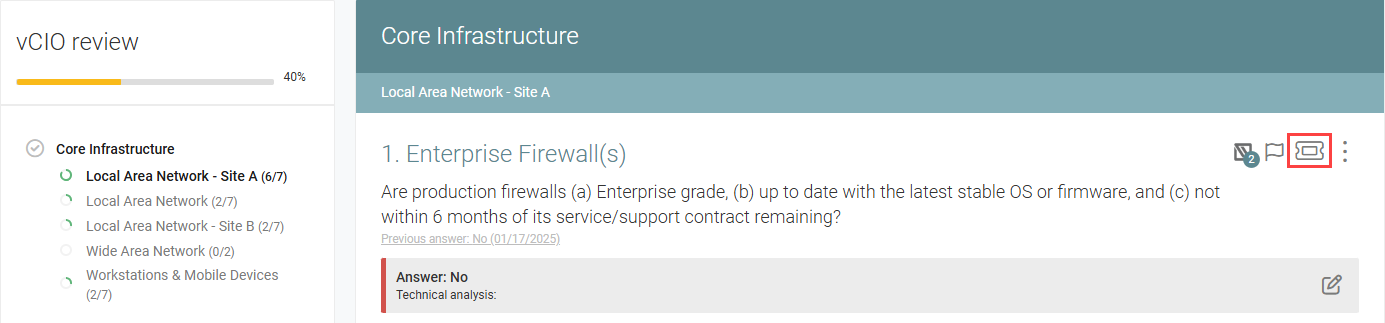
- Click Add.
- The Summary field for the ticket is automatically populated with the review question and can be edited. This field is limited to 500 characters.
- Optionally, enter a description that will appear in the ticket.
- Click Save to create the ticket.
NOTE You have the option to create more than one ticket for a single question. To do so, open the review, click the ticket icon for a question that already has one or more tickets associated with it, and click +.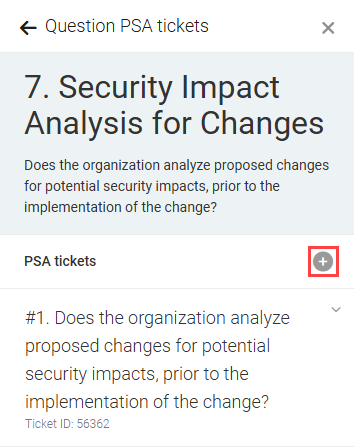
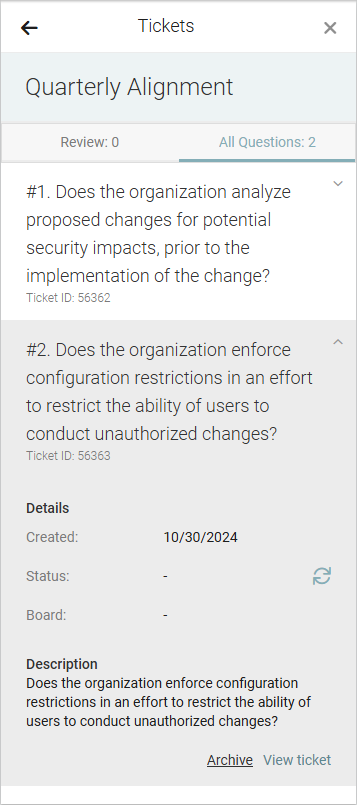
Once a ticket is created for a myITprocess review or question within a review, you can view the ticket details and open the ticket in Autotask directly from the review Tickets pane in myITprocess. Expand the ticket summary to see the ticket details, including the summary, ticket ID, date created, status, board, and description. You can edit these details from the Autotask ticket.
To open the ticket in Autotask , click View ticket.
To sync the latest ticket updates from Autotask to myITprocess, click the refresh icon ⟳.
To archive the ticket from within myITprocess, click Archive, and you will be prompted to confirm this action.
Managing a ticket for a review
Managing a ticket for a review question
To disable the integration, complete the following steps in myITprocess:
- In the upper-right corner of the header, click your username (My Account) and select Account Settings.
- Click the Integrations tab.
- In the PSA connection section, click Update.
- Click Remove connection.
- The confirmation dialog box will indicate that all Autotask opportunities and tickets created through this integration will be deleted in Autotask if you proceed with this action. Click OK to disable the integration and delete all associated Autotask opportunities and tickets or Cancel to close out of the dialog box.


