Integration: Autotask & ConnectBooster
Autotask
NAVIGATION Admin > Activations
PERMISSIONS Administrator
ConnectBooster
NAVIGATION Integrations > Autotask
PERMISSIONS Master Admin > Settings > Integrations
Overview
Simplify your billing process with this direct payment and accounting integration, allowing for review of Autotask PDF invoices and payment directly in the ConnectBooster portal. With this integration, you'll no longer need to manually send a PDF invoice separately to your customers.
ConnectBooster pulls information directly from customer agreements in Autotask, saving countless hours of manually adjusting invoices and preventing billing errors.
The integration with Autotask will result in the following workflow:
- An invoice is generated in Autotask and synced to QuickBooks (online or desktop are supported).
- QuickBooks returns an invoice number.
- The invoice is synced to ConnectBooster at the automated sync time or through a manual sync initiated in ConnectBooster.
- You process the payment in ConnectBooster from the Invoice History or the Invoice page.
- Optionally, you can enable Client Portal users to process payments from the invoice in the Client Portal. Refer to the Autotask Client Portal Help system for details.
- The ConnectBooster Order Summary page opens. You enter the full or a partial amount to pay and select a payment method.
- The payment is processed in the gateway and appears in the organization's transaction history.
- ConnectBooster syncs the payment to QuickBooks. In Autotask, the payment appears on the Payment Search page.
Kaseya 365This integration is included as part of a Kaseya 365 Ops subscription and will be configured for you in a session with an implementation consultant from Kaseya. Refer to Getting started with Kaseya 365 Ops. |
Prerequisites
-
ConnectBooster must be configured with a payment gateway and integrated with your accounting system.
About Autotask Payment Processing using BNG
Autotask Payment Processing is an integration of Autotask with the Kaseya BNG Payment Gateway through its ConnectBooster user interface. Once set up, Autotask customers can do the following:
- Accept credit card or eCheck payments right in Autotask.
- Allow their clients to process payments themselves in the Client Portal. Learn about making a payment on an invoice in the Autotask Client Portal Help system.
- Apply payments made to a voided invoice to another invoice.
- Issue full refunds.
Once the integration is set up, you can process payments directly in Autotask, while the client's wallet information is stored in a secure vault in the payment gateway. At no time does Autotask store credit card or account numbers, not even in an encrypted format.
IMPORTANT If you are currently processing payments through another payment gateway such as the QuickBooks payment gateway, make sure that only one payment gateway is enabled at the same time. ConnectBooster will not allow payments on invoices that have already been paid, provided that the payment has been applied in the accounting package and your sync remains up to date. Maintaining up-to-date syncs for your integrations will help ensure duplicate payments do not occur.
Processing a payment means collecting payment information (that is, credit card or account numbers) in Autotask, applying it to an invoice, and transmitting it to the payment gateway. A Transaction ID is issued by the gateway network and synced to Autotask.
The transaction type is a sale. On the Payment Search page, the Sale Amount is equal to the Payment Amount and the Applied Amount.
If a customer disputes an invoice item and you end up voiding the invoice the payment was applied to, the sale and the payment transaction still happened, but the invoice it was applied to is longer associated with the payment. So, there is now an Unapplied Amount equal to the sale amount, and the Applied Amount is zeroed out.
The unapplied amount can be applied to another invoice with an equal or lower total.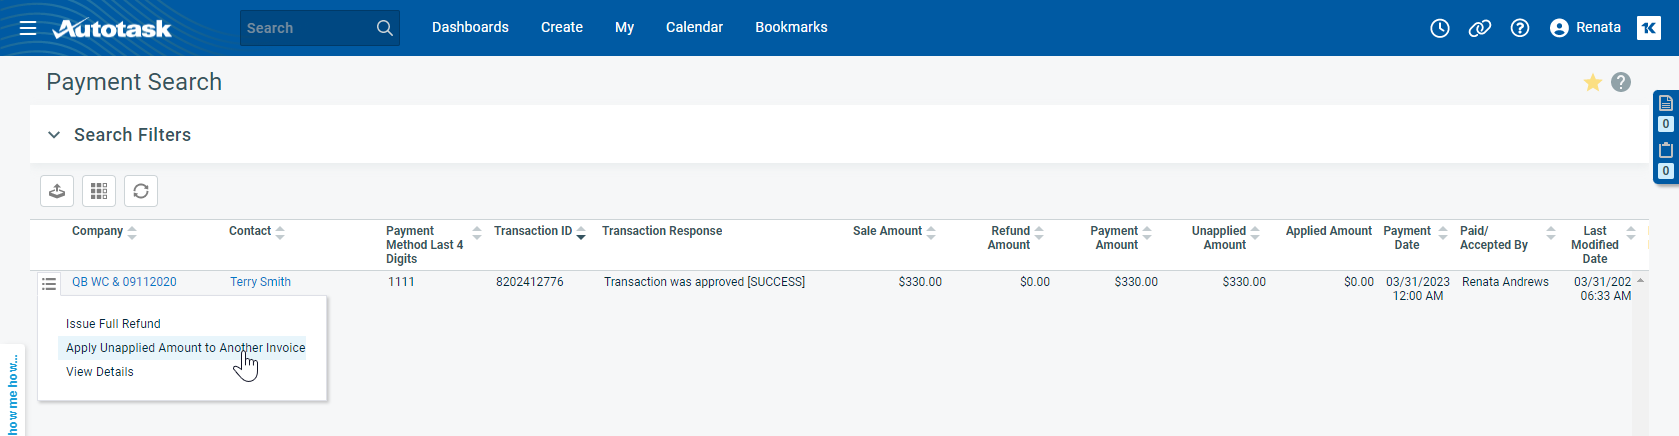
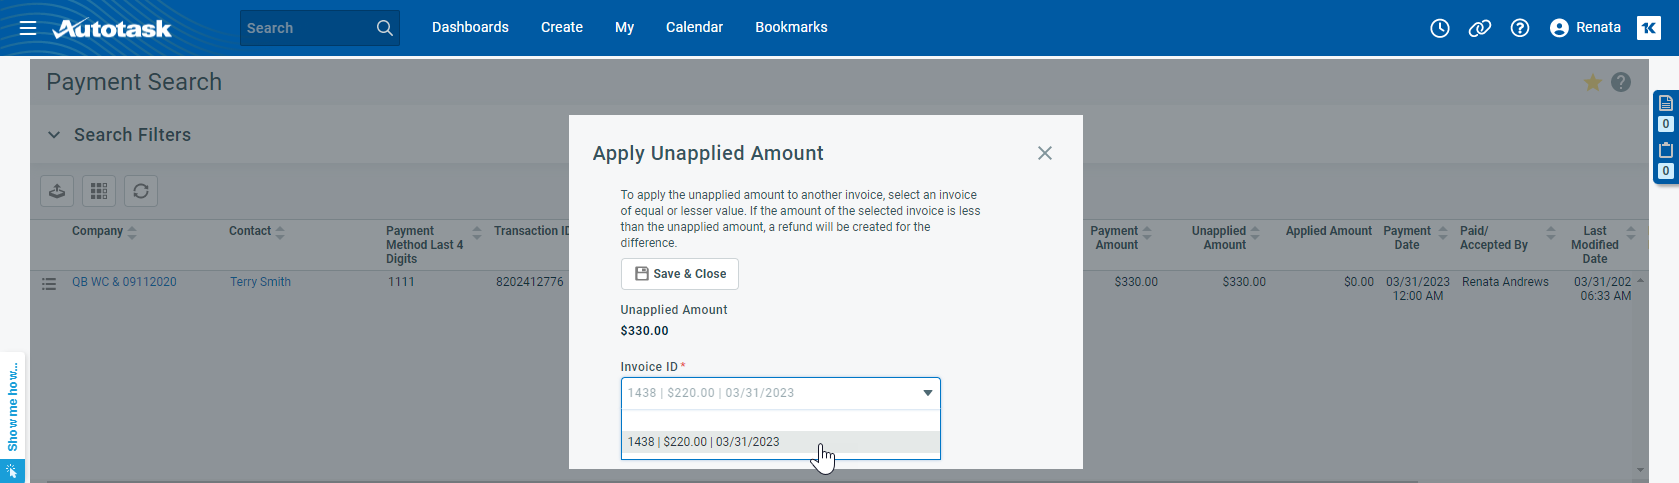
If an unapplied amount was applied to an invoice with a lower sales total than the original invoice, a refund is issued for the difference. As a result, the Unapplied Amount is now 0.00, and the Refund Amount is the difference between the total of the original invoice and the invoice the unapplied amount was applied to (the Applied Amount).
The same transaction has now a sale and a partial refund listed.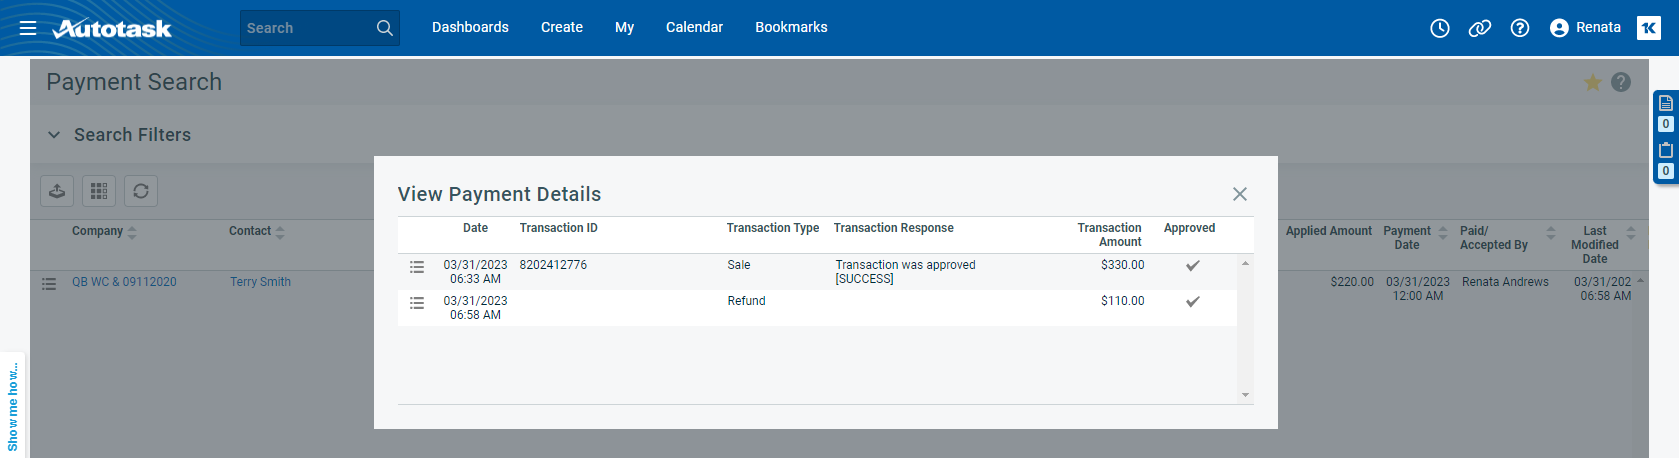
Instead of applying the unapplied amount to another invoice, you can also issue a full refund. On the table, the entire amount is now shown in the Refund Amount column, and the Unapplied Amount is now $0.00.
On the View Payment Details window, a second row shows the refund.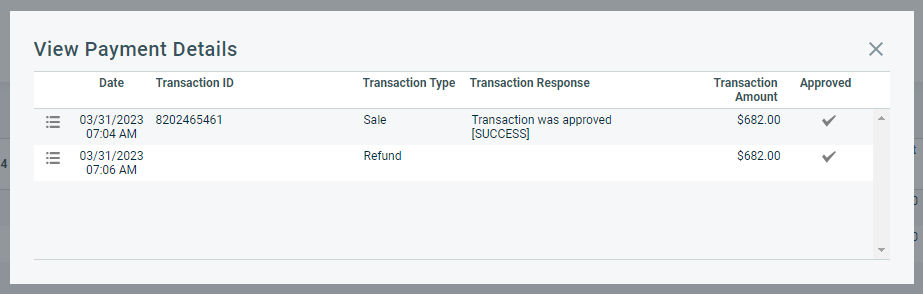
IMPORTANT The refund will not be communicated to the payment gateway. To actually issue a refund to your client, you must issue it manually from the payment gateway.
It is possible that something prevents a transaction from settling in the payment gateway: a credit card is frozen, an account is overdrawn, and so forth. Currently, this information is not synced to Autotask. To remove this payment that now does not exist in the payment gateway, you have the option to cancel the payment in Autotask.![]()
If you cancel, the check mark is removed from the transaction. The payment happened (there is a Transaction ID), but the Sale Amount, Refund Amount, Unapplied Amount and Applied Amount are all set to 0.00. The Date Paid is removed from the associated invoice and the invoice is returned to the state before the payment was processed.
In KaseyaOne, a Cooper Insight will remind you to Enable the Autotask and CB integration for electronic payments.
How to...
This integration is currently in limited release and available only to selected users. Kaseya must enable the integration for individual customer organizations.
Once enabled, you must activate the integration in Autotask via Admin > Admin Categories > Activations.
You have the option to set up a custom security level in Autotask with minimum permissions that you can use specifically for managing this integration with ConnectBooster. Complete the following steps in Autotask to do so:
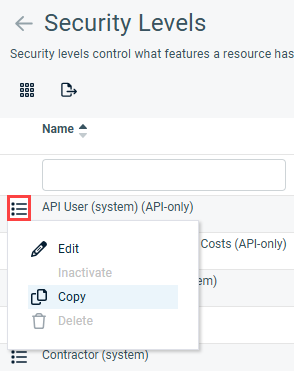
- Navigate to Admin > Organization Settings & Users > Resources/Users (HR) > Security Levels.
- From the context menu for the API User (system) security level, which is configured with the settings needed for the new security level you will create, select Copy.
- Enter a name indicating that this security level is used for the integration with ConnectBooster.
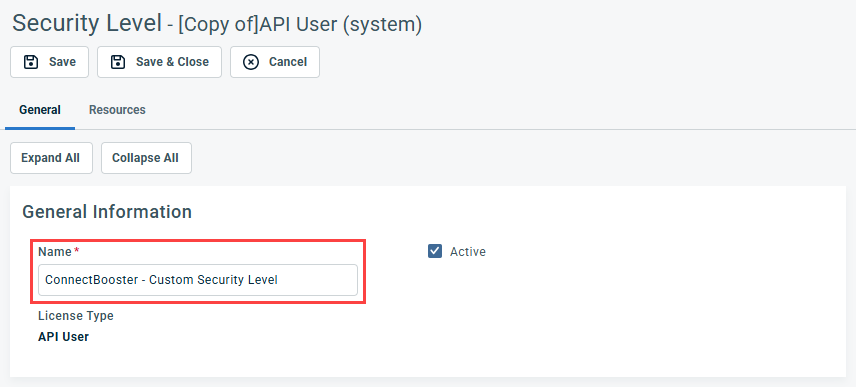
- Click Save & Close.
Autotask allows you to create API-only access user types for the purpose of OAuth integrations with other applications. An Autotask security level with Admin permission to configure Resources/Users (HR) can complete the following steps to create credentials for an API user in Autotask, which will not have access to the Autotask user interface. The API user credentials configured in the following steps will be used for connecting this integration:
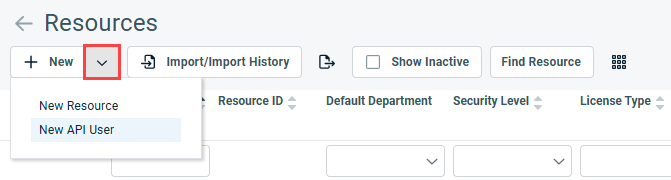
- Navigate to Admin > Organization Settings & Users > Resources/Users (HR) > Resources/Users.
- From the New drop-down menu, select New API User.
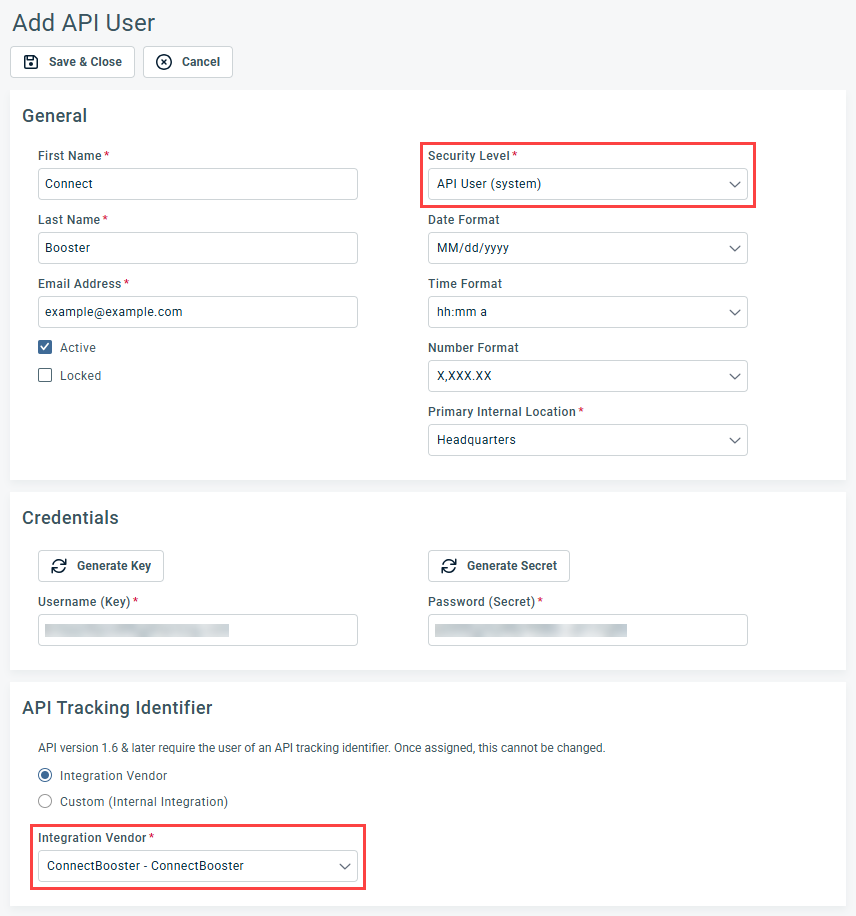
- In the General section, fill in the required fields. From the Security Level drop-down menu, select API User (system) or the custom security level you set up in Create a dedicated security level in Autotask (optional).
- In the Credentials section, click Generate Key and Generate Secret to populate those fields. Copy and securely save these values, which you will later enter in ConnectBooster.
- In the API Tracking Identifier section, select ConnectBooster - ConnectBooster as the integration vendor.
- Click Save & Close to create the new user and receive an email with login credentials.
NOTE When creating the API user, it's important to take note of the credentials you create, as you cannot recover the Password (Secret) value from the user record in Autotask once it has been saved.
Learn more about API users in the Autotask Help system.
To establish the connection with Autotask in ConnectBooster, complete the following steps:
- From the left navigation menu, click Integrations.
- Click the Autotask card.
- From the menu in the upper-right corner of the card, select Settings.
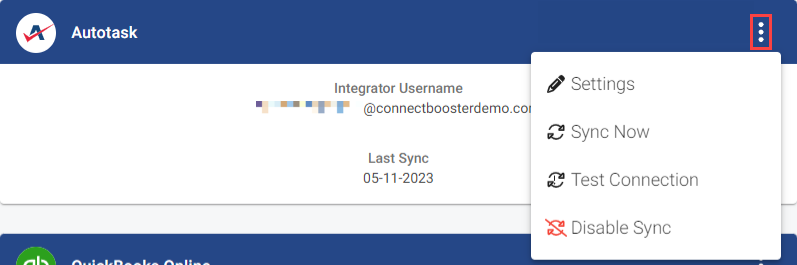
- Enter your Autotask credentials. For details on the Custom Quote URL Mapping field, refer to Allow customers to view Autotask quotes in ConnectBooster.
- Click Save.
- From the menu in the upper-right corner of the card, select Test Connection to validate the credentials.
- The initial synchronization between Autotask and ConnectBooster will begin within the hour and may require some time to finish, as organizations, contacts, contracts, tickets, and the full invoice history are pulled into ConnectBooster.
To initiate an immediate sync, from the menu in the upper-right corner of the card, select Sync Now.
Subsequent syncs will not take long and will automatically pick up new customers created in Autotask.
NOTE If this card is not available, email support@connectbooster.com to request that this integration be added to your portal.
Notifications in ConnectBooster, which are responses to activities triggered in the system or by your clients' initiation, can be sent as email messages to an Autotask contact and create service tickets in Autotask.
Once ConnectBooster is integrated with Autotask, ConnectBooster will default to your integrated accounting package to pull contact information.
To configure the option for automatic Autotask ticket creation in response to ConnectBooster notifications, complete the following steps in ConnectBooster:
- From the Integrations page, navigate to the Autotask integration settings.
- Click Connect to Ticketing.

- On the Autotask login page that opens, log in to the account used to manage this integration.
- Once you've logged in, click Authorize to allow ConnectBooster access to Autotask ticketing.
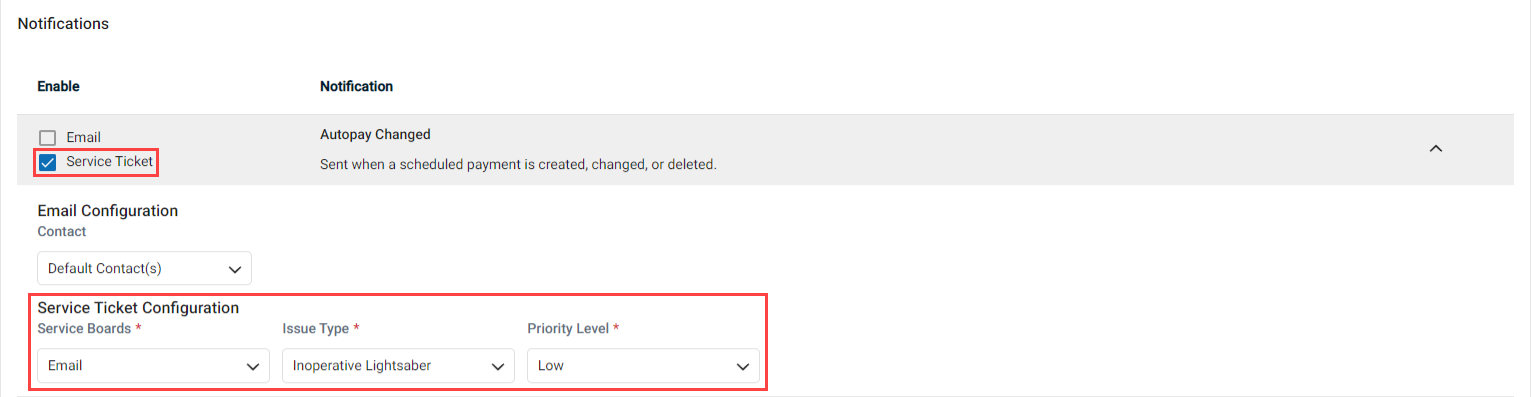
- Now that the ticketing connection is established, you will want to review your internal notifications settings in ConnectBooster and select the Service Ticket check box for the notification types you wish to create Autotask tickets for.
- In the Service Ticket Configuration section, select the Autotask service boards, issue type, and priority level to apply to the automatically created tickets.
In the ConnectBooster Help system, learn about default contacts and internal notifications.
ConnectBooster organizations can view Autotask quotes directly from within the customer-facing portal. The prepared quote document will show only for open opportunities inside of Autotask and if a URL linking to the document exists. If the URL is blank or missing, the customer can still view the open opportunity as usual. This feature is a convenient way for organizations to view proposal documents in the billing portal rather than searching an email inbox.
ConnectBooster's functionality will work with the user-defined field (UDF) regardless of how the URL was inserted into the Autotask opportunity.
- In Autotask, navigate to Admin > Admin Categories > Features & Settings > Sales & Opportunities > Opportunity Categories.
- Select to edit the category you wish to modify, and click the Details tab.
- Click New User-Defined Field.
- In the Name field, enter a name for the UDF.
- From the Field Type drop-down menu, select Text (URL).
- Click Save & Close.
- From the menu for the newly created UDF, select Make Field Visible.
- In ConnectBooster, navigate to Integrations and select Autotask.
- In the Custom Quote URL Mapping field, enter the name of the UDF generated.
- Click Save.
When a client opts to open a quote, a new browser tab will open to display the quote acceptance page.
NOTE If your clients report missing the Service section, you may need to enable the permission to view Quotes. This settings is available via Configurations > Client Users > Client Profiles in ConnectBooster.
- Navigate to Service > Quotes.
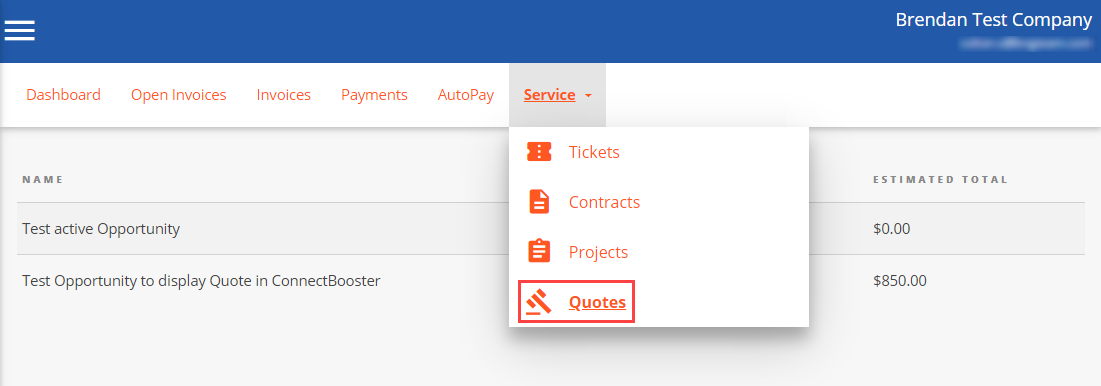
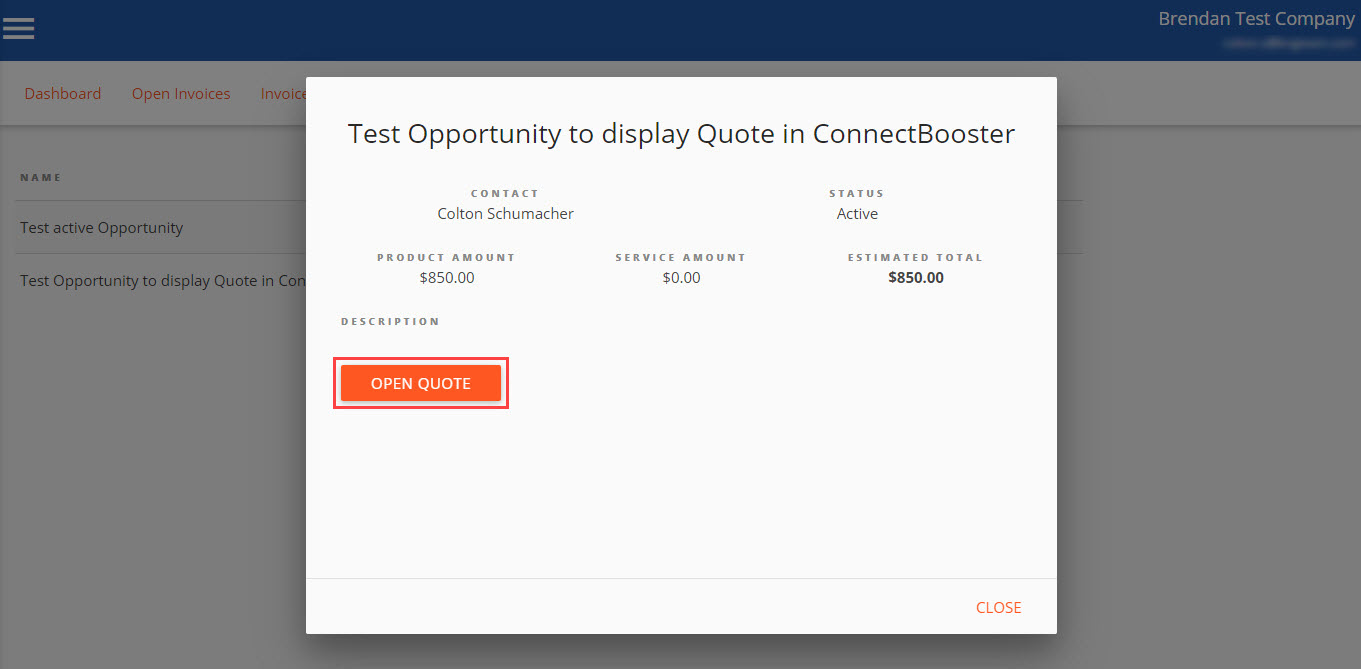
- Select an open opportunity.
- Click Open Quote.
- In ConnectBooster, navigate to Configurations > Billing > Invoice Image Data.
- Select the check box for the Autotask integration.
- Drag the Autotask line item to the top of the list to ensure that when you or a client attempts to view an invoice on the portal, ConnectBooster will first attempt to display the Autotask version of the invoice.
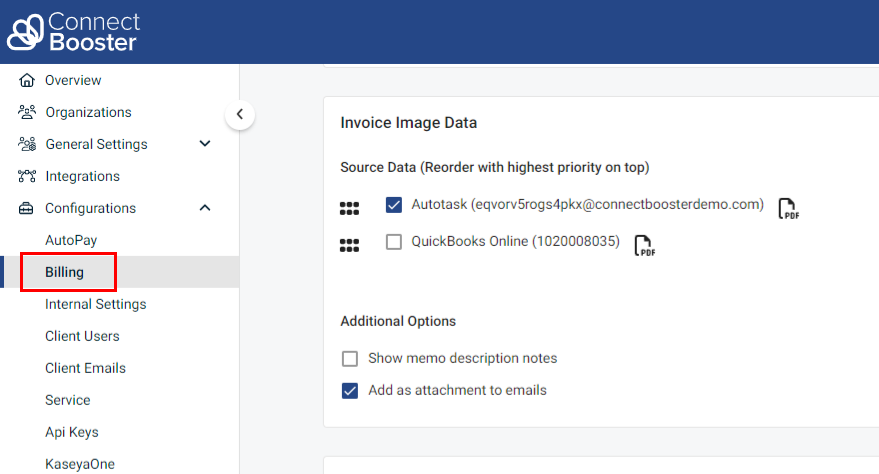
- Click Save.
In the ConnectBooster Help system, learn more about invoice image data and the related functions that impact your portal behavior.
By default, Autotask Electronic Payments is inactive, and the Payment Processing page and other related features are hidden. You must first activate the feature. Learn about activations in the Autotask Help system.
The fields that appear on the Payment Processing page will depend on where you are in the setup process.
After the feature has been activated, the Payment Processing link will appear in the Finance, Accounting & Invoicing section of the Admin pages in Autotask.
- To begin the sign-up process, click Learn more.
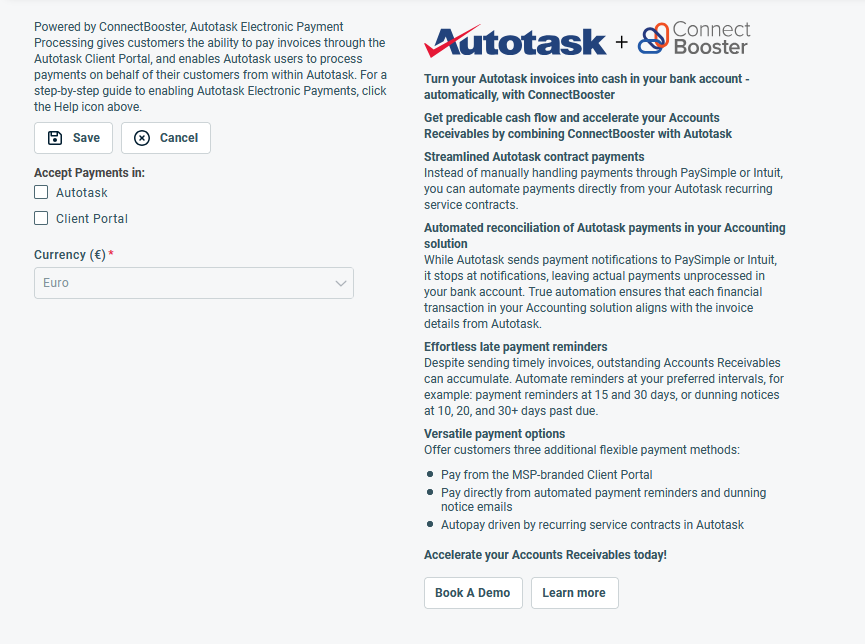
- You will be redirected to the ConnectBooster website to get in contact with our sales team and will receive a confirmation email that someone will be in touch. Complete all required fields and click GET ME A DEMO!
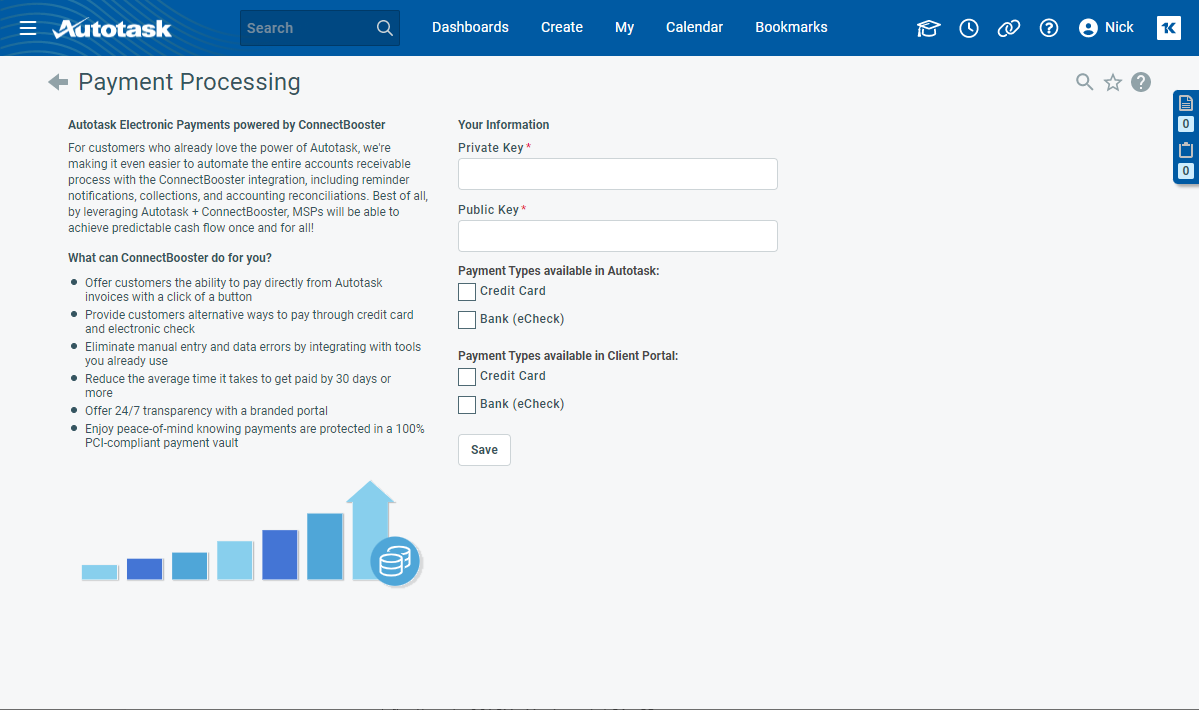
- On the Payment Processing page, the fields that are required for completing the integration will now appear.
IMPORTANT Before you can proceed, you must have an active BNG Gateway account to generate the public and private keys required in the next step.
You can complete the following setup during or after the meeting with your implementation manager:
- With the Autotask integration page open in ConnectBooster, return to the Payment Processing page.
- Complete the following fields:
| Name | Description |
|---|---|
|
Private Key |
During the ConnectBooster account setup, a public key and a private key are generated for the integration with Autotask. These are required before you can proceed. Copy the private and public keys shown in ConnectBooster and paste them into the Private Key and Public Key fields in Autotask. Note that the keys are immediately masked in Autotask and there is no way to unmask them, so proceed carefully. |
|
Public Key |
|
|
Payment Types available in Autotask |
Payments can be entered by you in Autotask and by your client in the Client Portal. Learn about processing a payment in the Autotask Help system and making a payment on an invoice in the Autotask Client Portal Help system. Here, you select the payment types you want to accept in both environments. You can either enable credit cards, eChecks, or both. At least one payment type in one environment must be enabled for the Payment Processing feature to be activated and the Process Payment option to be available on the Invoice and Invoice History pages. |
|
Payment Types available in Client Portal |
- Click Save. A banner at the top will confirm that your input was saved successfully.

NOTE We do not validate that the keys are working in the payment portal, only that keys you entered were saved in Autotask.
- To edit your settings or disable payment processing by clearing the Payment Type check boxes, return to this page at any time.
Enabling Payment Processing introduces the following changes to Autotask:
- A Payment Search page lets you search and manage payments.
- A Process Payment button appears on the Invoice page.
- A Process Payment option appears on the Invoice History context menu. Learn about managing invoices from Invoice History in the Autotask Help system.
PERMISSIONS A security level with Admin permission to configure Finance, Accounting, & Invoicing is required for these steps. Refer to Admin security settings in the Autotask Help system.
- In Autotask, navigate to Admin > Admin Categories > Features & Settings > Finance, Accounting & Invoicing > Payment Processing.
- Set your internal currency (the currency you do business in) and select the environments where payment processing can be initiated. Complete the following fields:
- Autotask: The customer must call the service provider to pay an invoice.
- Client Portal: A Client Portal user with access to invoices can process a payment from the Client Portal. Learn about making a payment on an invoice in the Autotask Client Portal Help system.
- Save your settings.
| Field | Description |
|---|---|
|
Accept Payments in: |
Select the environments payment processing can be initiated from: |
|
Currency |
In single-currency databases (most customers), this field will be blank. Click the drop-down control and select the currency you do business in (your internal currency). The list is limited to the list of currencies ConnectBooster supports: USD, CAD, AUD, NZD, EUR, and GBP. NOTE If you are in a multi-currency database, your internal currency is already set, and you cannot edit this field. IMPORTANT Once set, the internal currency cannot be changed. Be certain to select your actual currency. |
You are now ready to process payments.
PERMISSIONS Manager permission is required for these steps.
Payments can be processed from the invoice history, the invoice, and by the client contact from the Invoice page in Client Portal.
IMPORTANT Before you process payments in ConnectBooster, make sure that the invoices have been transferred to QuickBooks and are associated with the QuickBooks invoice number. The invoice number is what keeps everything aligned.
IMPORTANT Be aware that the synchronization frequency between QuickBooks and ConnectBooster is usually one hour.
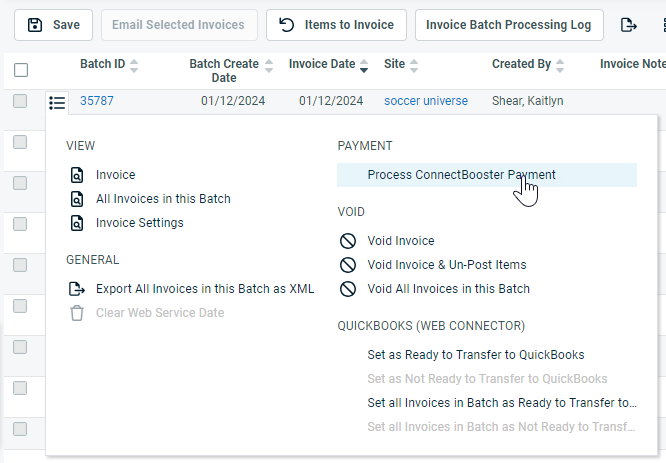
The Process Payment window in ConnectBooster can be launched from an individual invoice or from the context menu of the Invoice History page. Complete the following steps in Autotask:
- Navigate to either CRM > Search > Organizations > click Search > click an organization name > accessory tabs > Invoices or Contracts > Invoice History > context menu.
- Make sure the Invoice Number field has been populated from QuickBooks and the Date Paid field is empty.
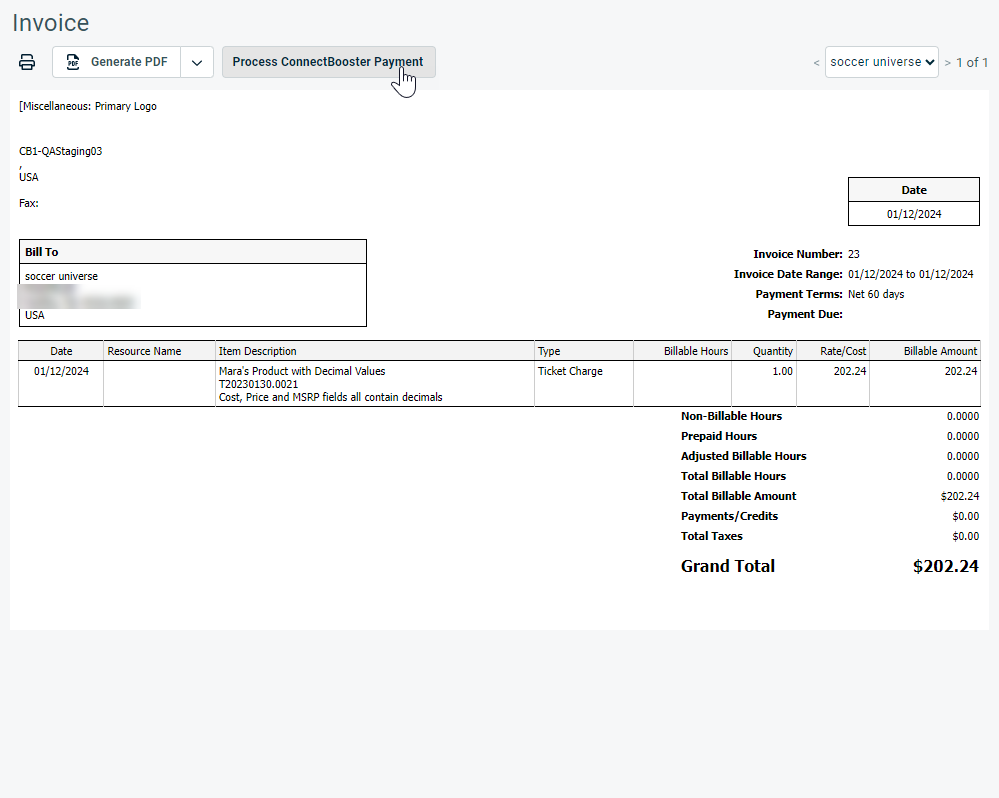
- On the Invoice History page, select Process ConnectBooster Payment from the context menu.
- On the Invoice page, click Process ConnectBooster Payment.
- The Assign Payment Contact dialog window will appear. You must enter the name of the contact on whose behalf you are making the payment.

- Start typing or select an organization contact.
- Click Continue to ConnectBooster. The Order Summary page will open.
- By default, the total balance will be paid. Enter a different amount if desired.
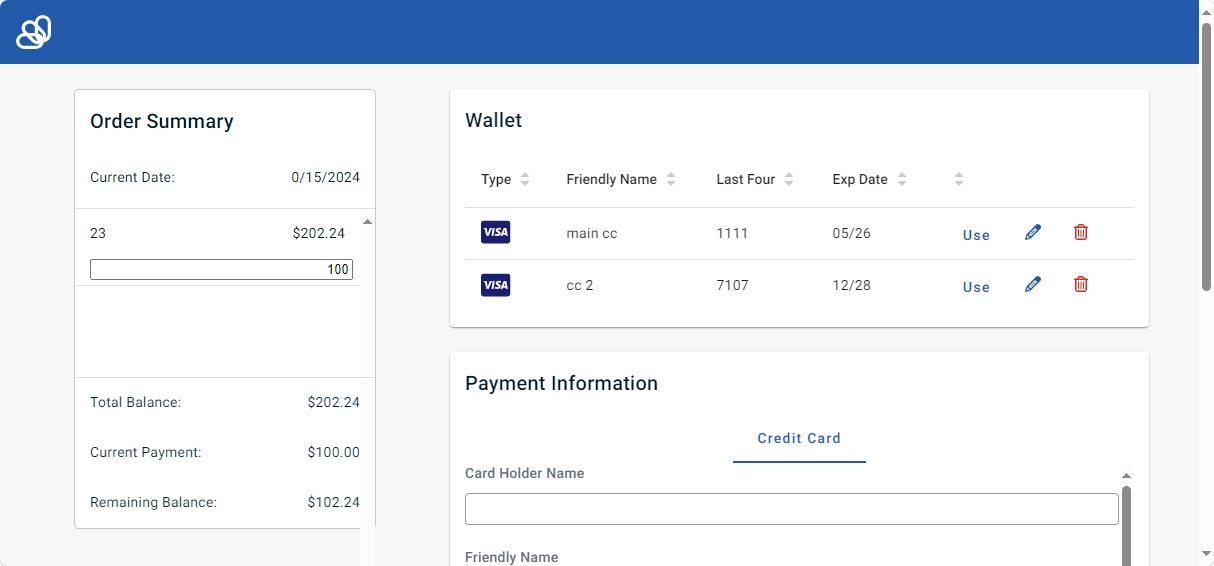
- In the Wallet pane, click Use. To confirm your selection, click Pay.
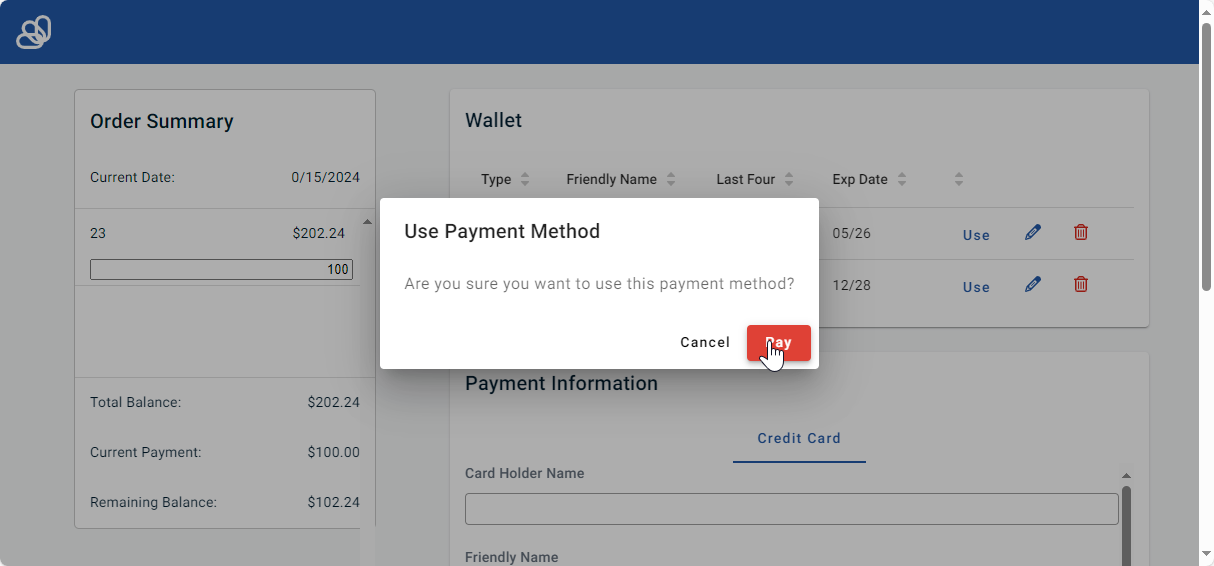
- You will see several verification, processing, and success dialog pages.
- If there is an error, you can close the dialog and try again or go back to Autotask.
- To add a new payment method, complete the Payment Information section.
The resulting payment will be synced to Autotask. To view it, navigate to Contracts > Invoices & Adjustments > Payments. Learn about searching and managing payments in the Autotask Help system.
To disable the integration, complete the following steps in ConnectBooster:
- From the left navigation menu, click Integrations.
- Click the Autotask card.
- Click Delete.
- In the confirmation dialog box, click Confirm.


