View and pay invoices
NAVIGATION Home > Subscriptions & Billing > View and Pay Invoices
PERMISSIONS Admin or Billing and Purchasing role
This article explains how to carry out billing and invoicing tasks in Kaseya Store.
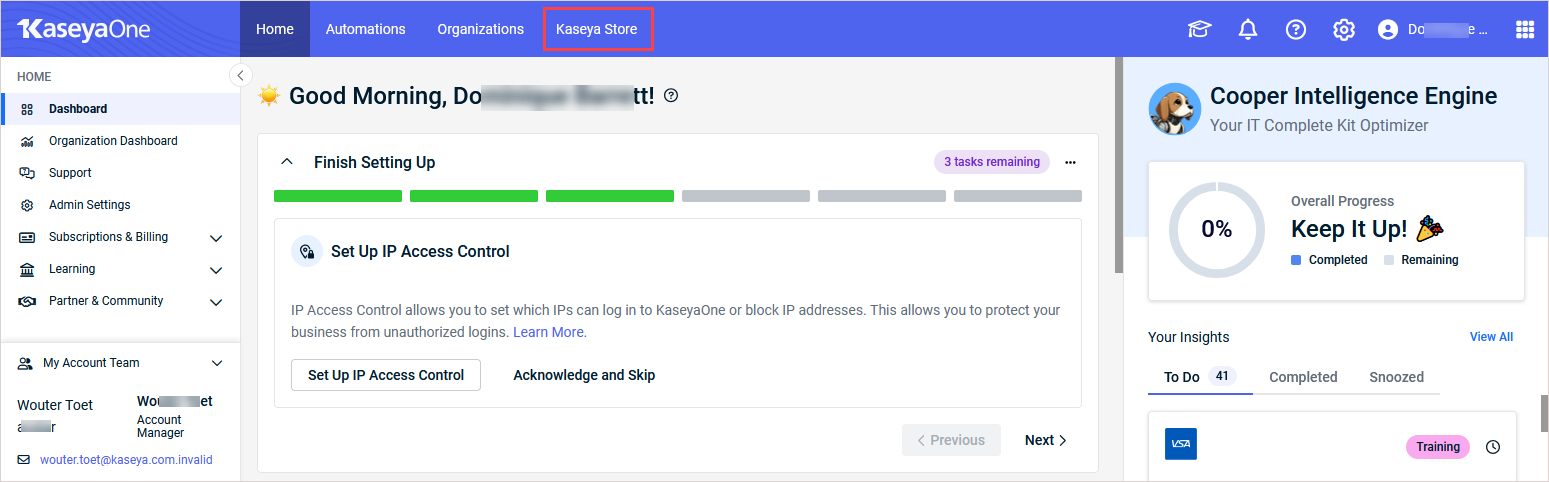
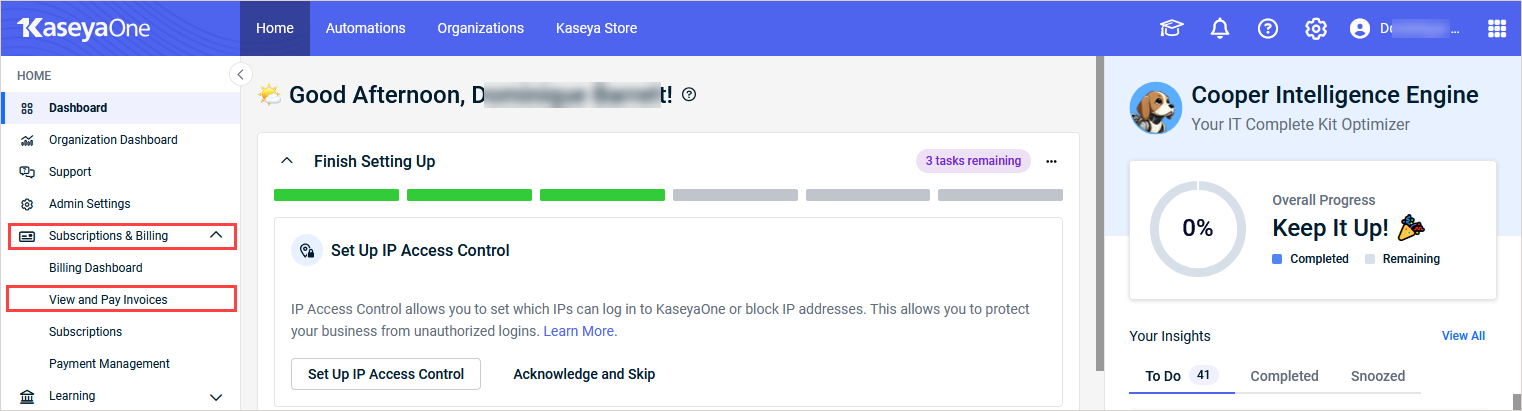
Users with the Admin or Billing and Purchasing role can access Kaseya Store from KaseyaOne by:
-
clicking Kaseya Store in the top navigation menu. The Kaseya Store opens in a new tab.
OR
-
clicking Subscriptions & Billing > View and Pay Invoices in the left navigation menu. The Kaseya Store opens in a new tab and the Invoices page displays.
Once you've accessed the Kaseya Store, see the topics that follow to perform billing tasks.
How to...
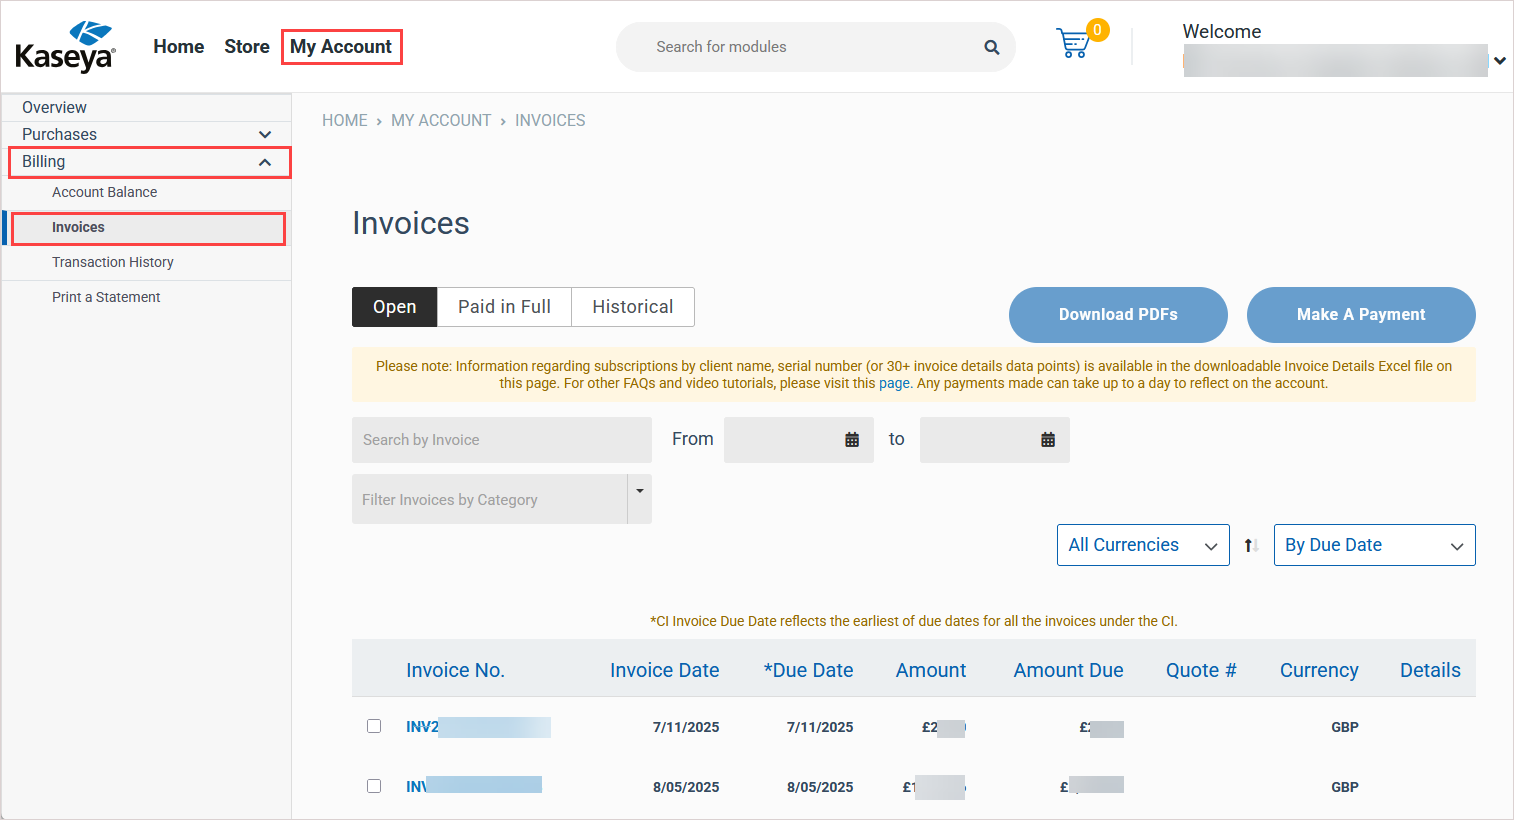
To pay a bill or make a payment:
-
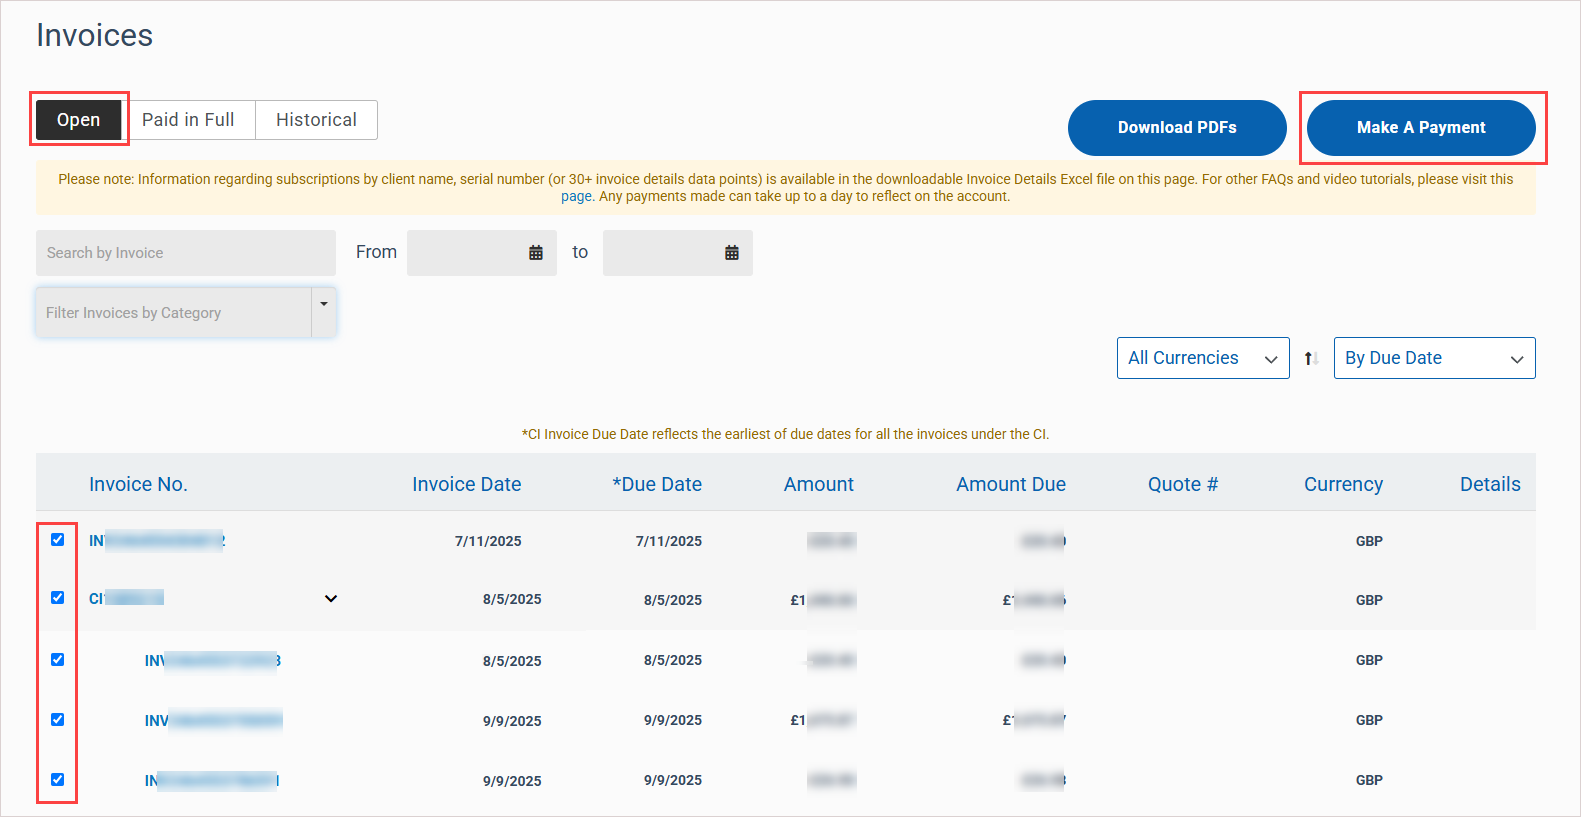
In Kaseya Store, navigate to My Account > Billing > Invoices. Open invoices display on the Open tab.
-
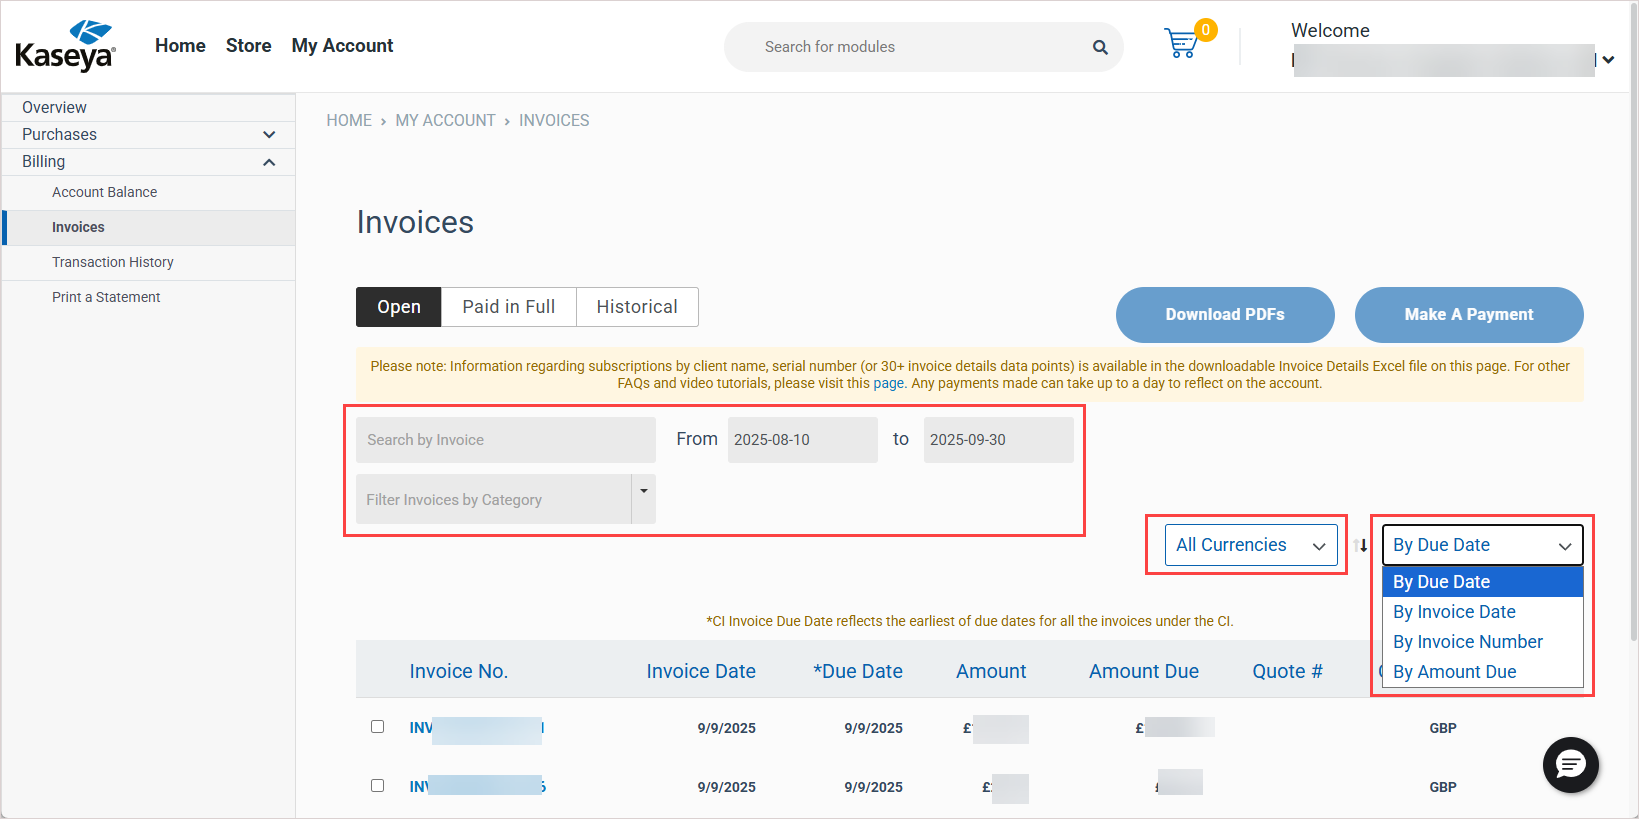
Select the check box next to each invoice where you want to make a payment. (To find invoices you can filter and search the list by invoice number, date range, due date, invoice date, currency, and so on.)
-
Click Make a Payment to initiate the transaction. The Make a Payment page displays.
-
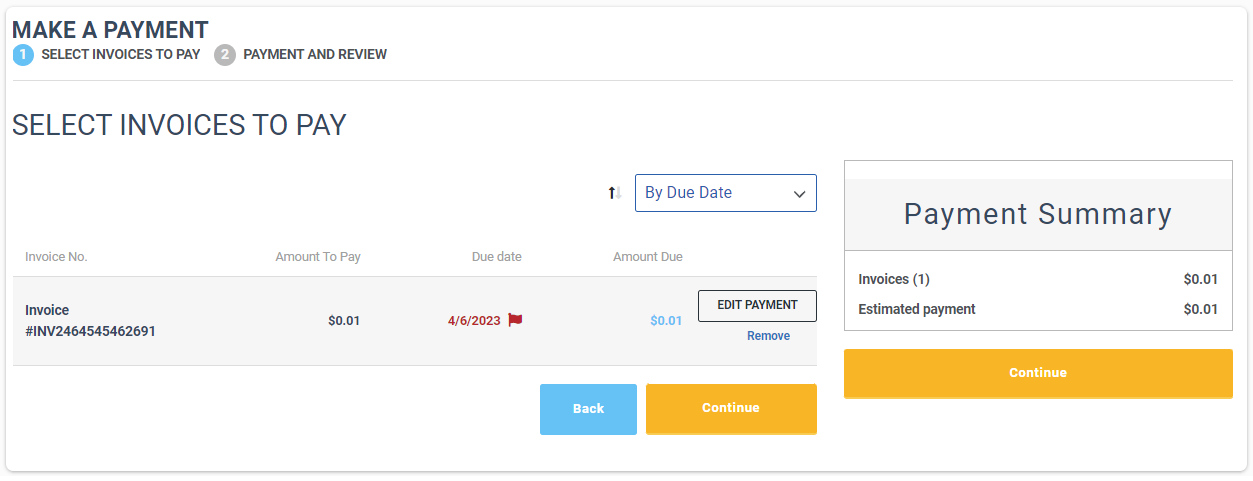
In the Select Invoices to Pay step, review the invoice details and edit as required. Then Click Continue to proceed.
NOTESEdit invoice examples:
- Click Edit Payment next to a line item, change the Amount to Pay in the dialog that opens and then click Save. Note that the amount to pay cannot exceed the remaining balance and must be positive.
- Click Remove next to a line item to remove it from the Select Invoices to Pay list.
-
In the Payment and Review step, choose how you will pay the invoices by selecting one or more credits, a payment method, or a combination of both. Then click Submit.
NOTES
- If your account has any open or partially applied credits, these display in the Credits area. To apply credits, check one or more Credit Memo boxes.
- The account's ACH or Credit/Debit Card payment methods display in the Payment Method area. Choose a payment method by clicking its Select option.

You can view and download past invoices up to three years from the current date. If you are a previous Datto customer, you can also view and download older historical invoices.
See these procedures for details:
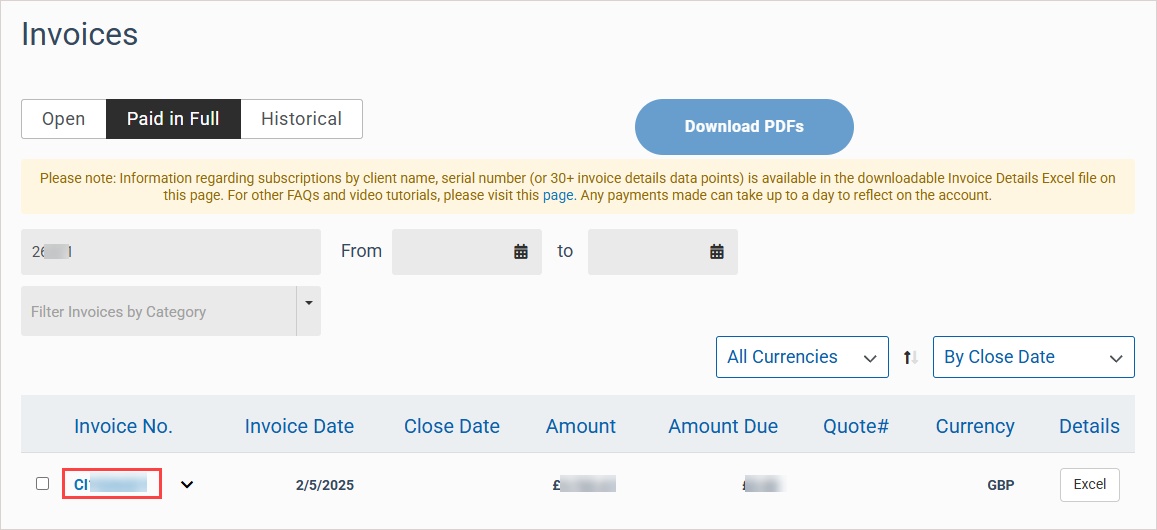
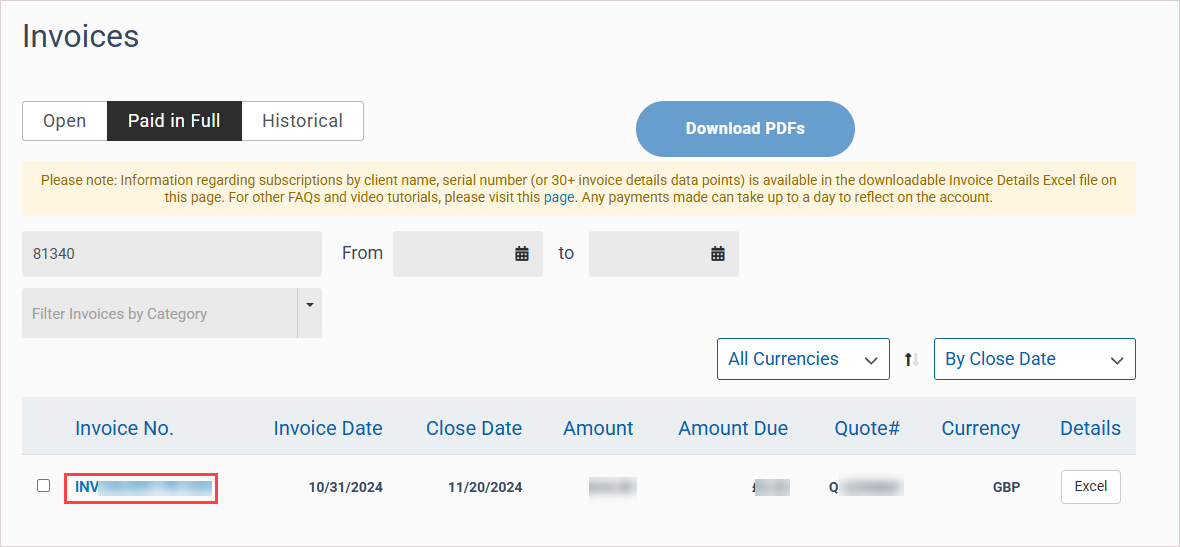
NOTE Where indicated, options in this procedure may apply only to consolidated invoices or to individual invoices. An invoice that starts with the letters CI is a consolidated invoice (e.g., CI1231231). An invoice that starts with the letters INV is an individual invoice (e.g., INV123123123123). For more on invoices, see Understanding your invoice.
-
In Kaseya Store, navigate to My Account > Billing > Invoices. Open invoices display on the Open tab.
-
In the invoices list, locate the invoices you would like to view or download. If needed, you can filter and search the list by invoice number, date range, due date, invoice date, currency, and so on.
-
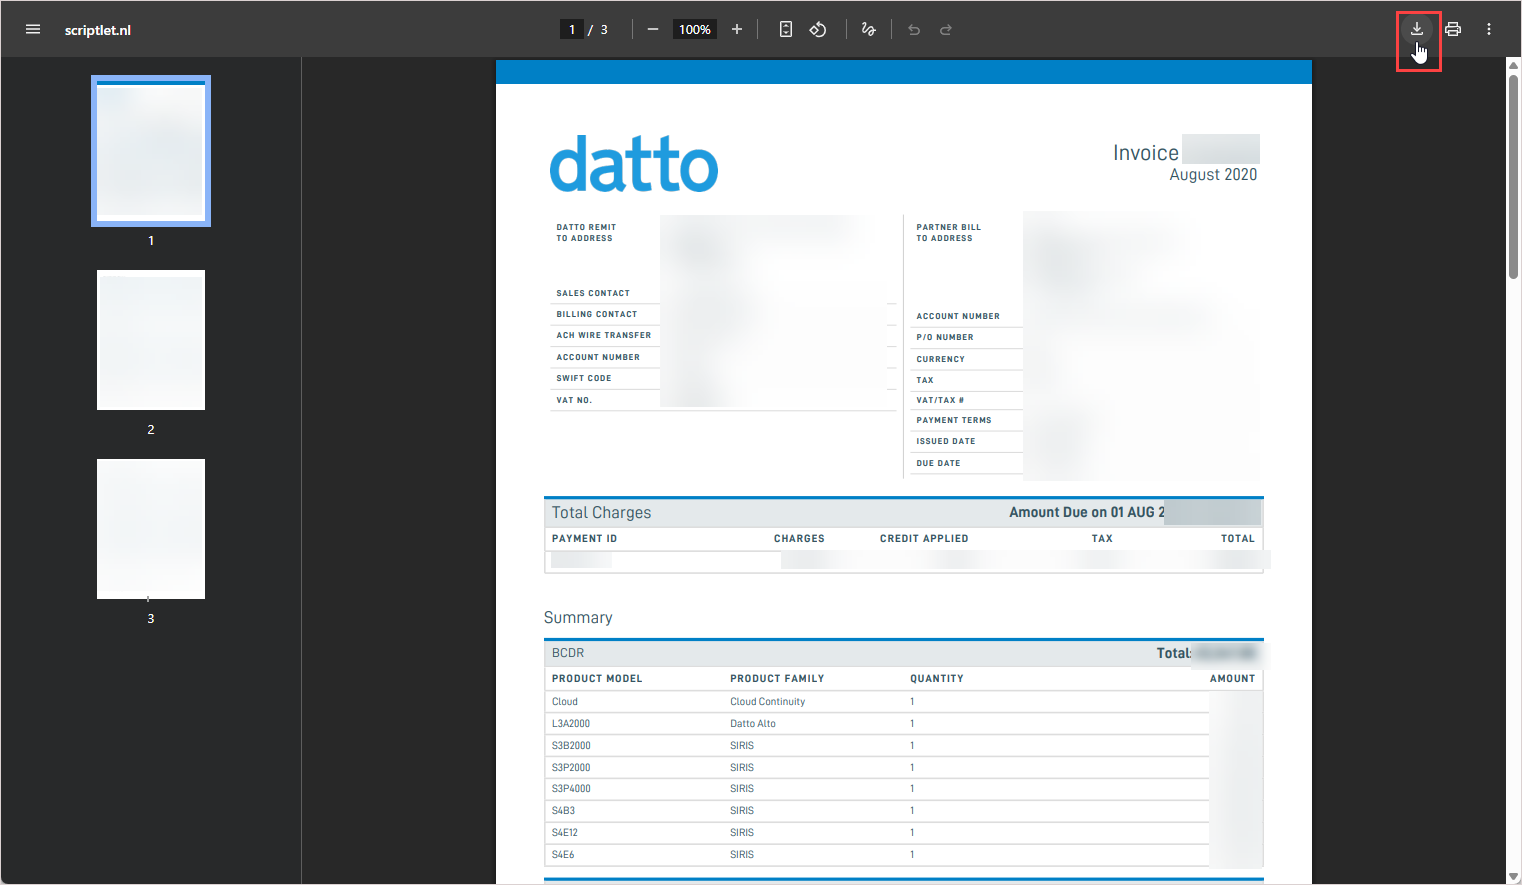
To view an invoice, click its Invoice No. link. The invoice displays as follows:
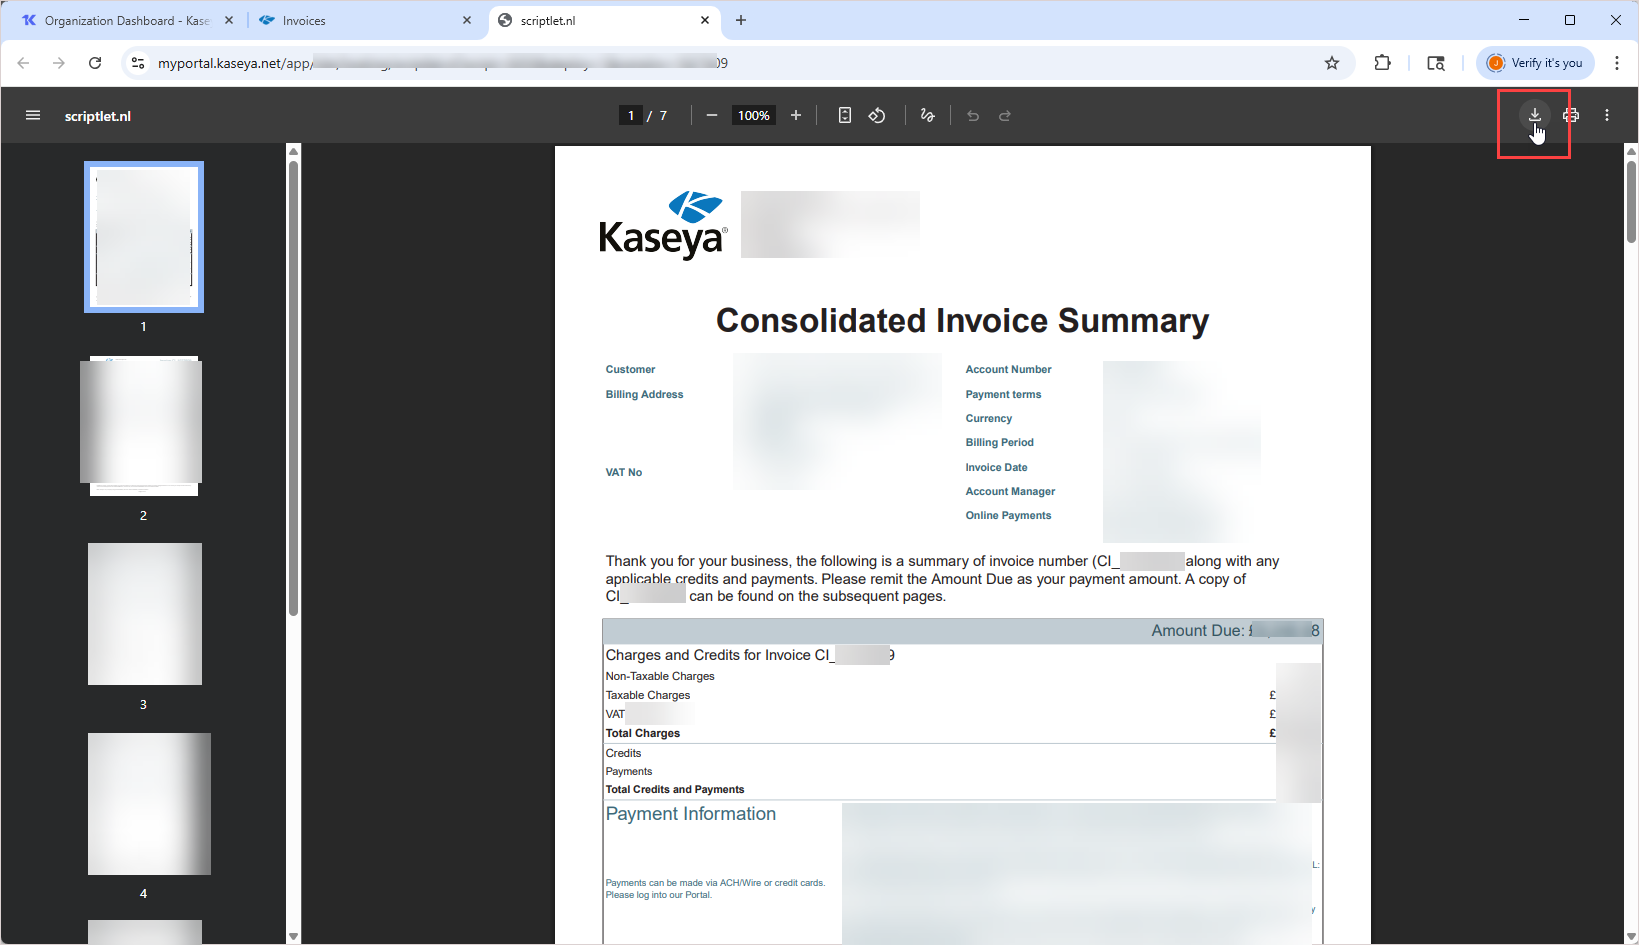
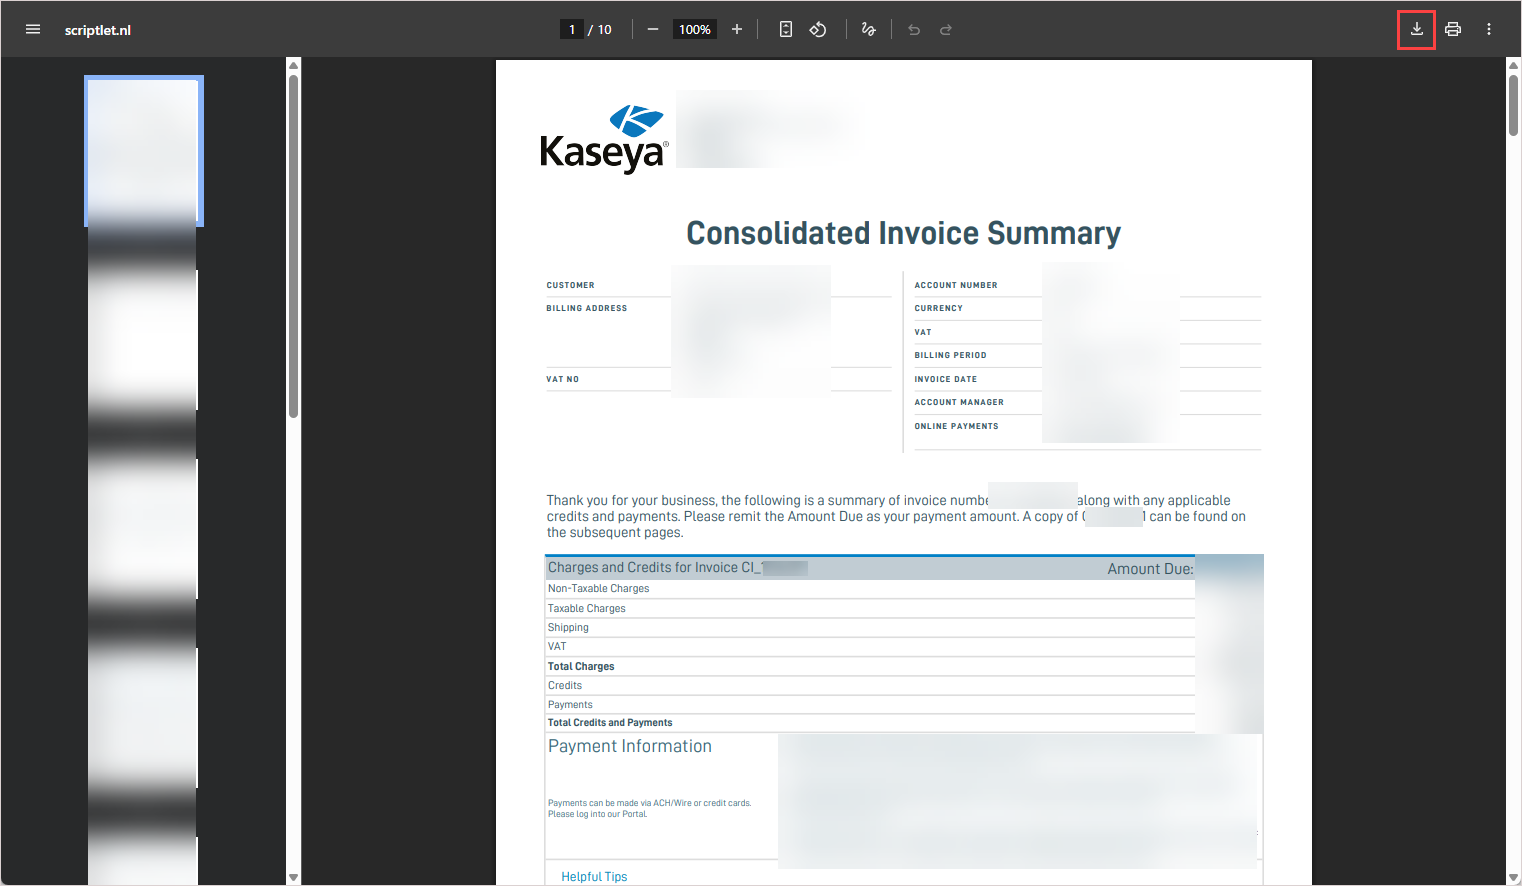
For consolidated invoices, the invoice displays in PDF format in a separate browser tab. To download a copy of the invoice, click your browser's download button.
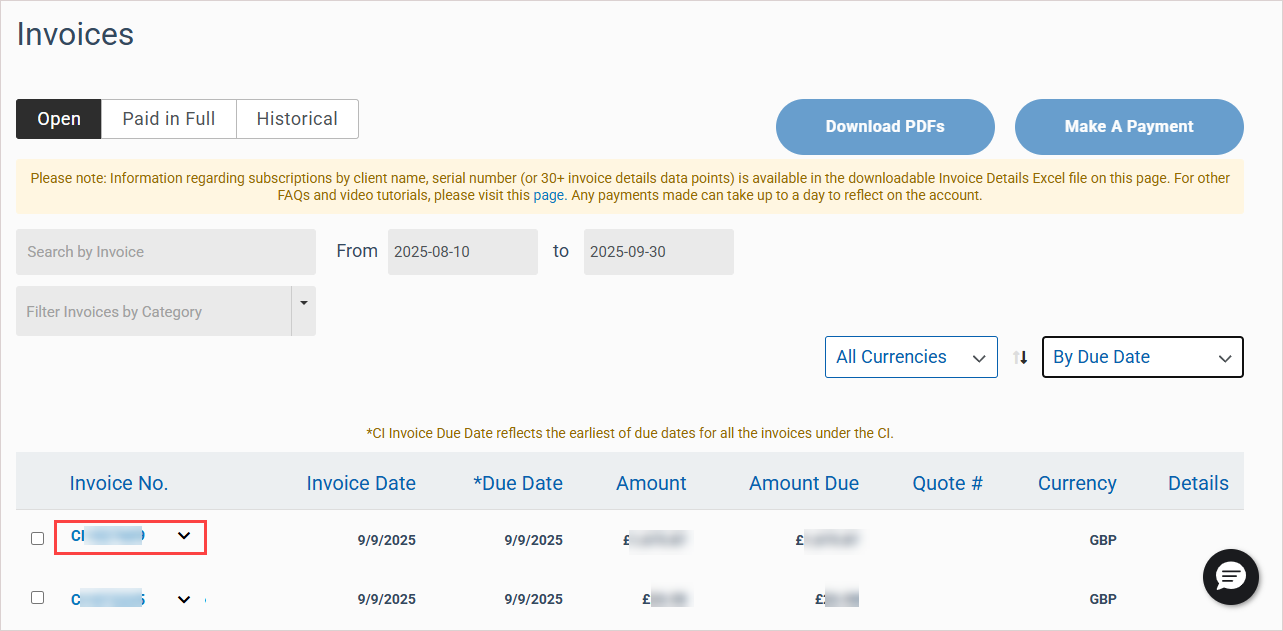
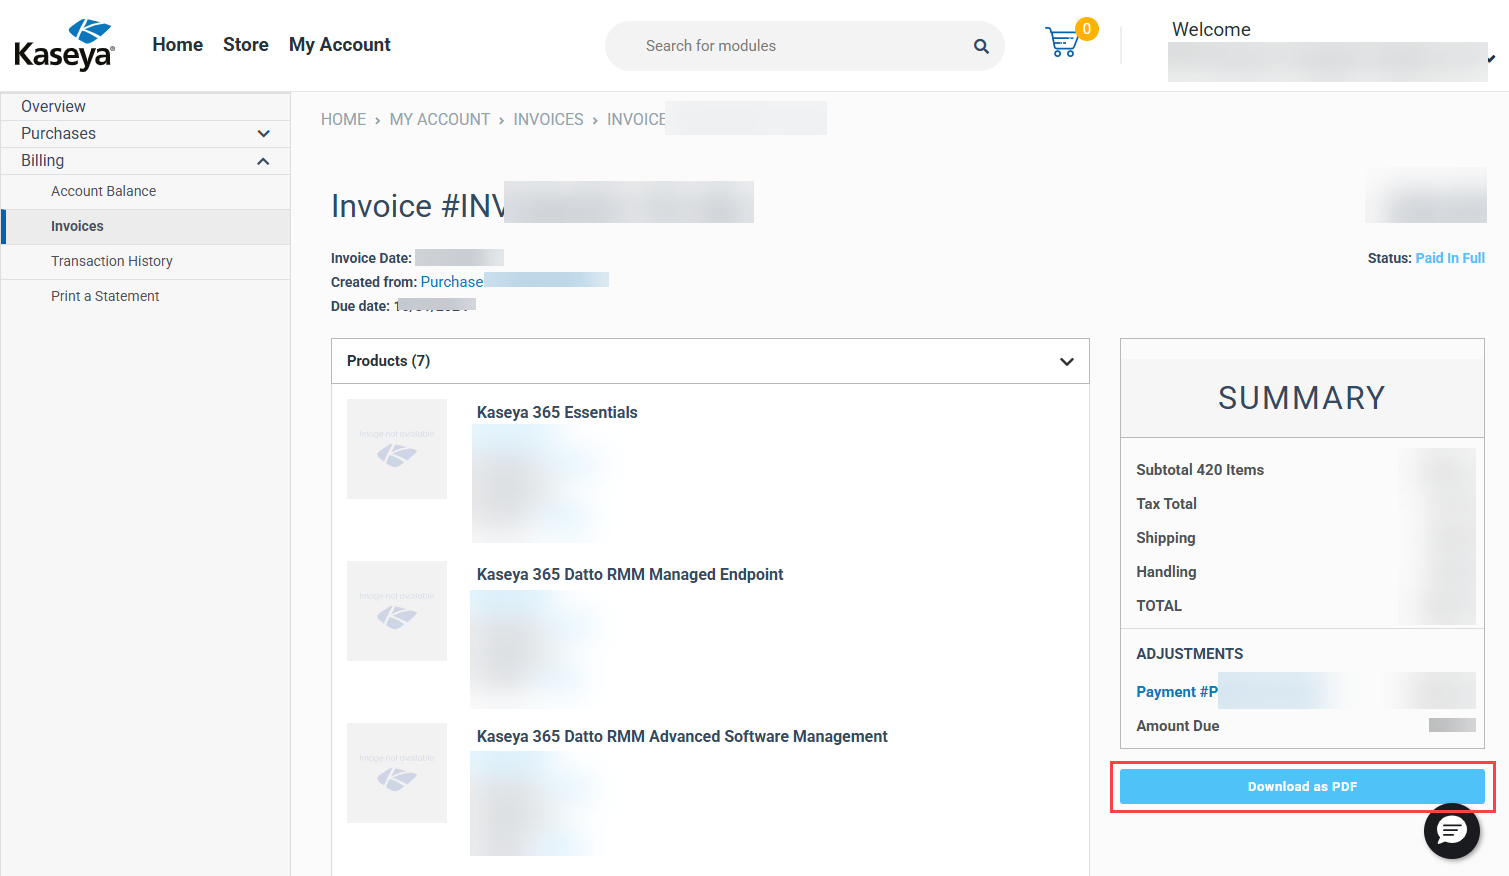
For individual invoices, the invoice displays on the Invoice # page. To download a copy of the invoice, click Download as PDF.


-
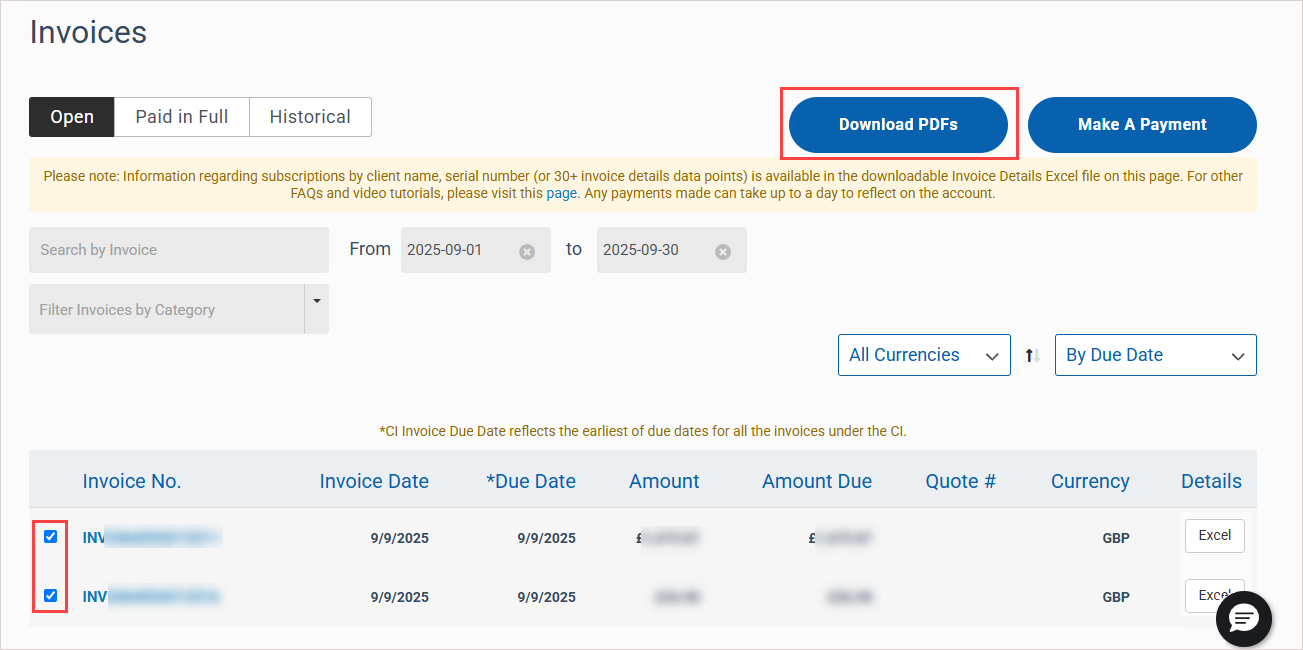
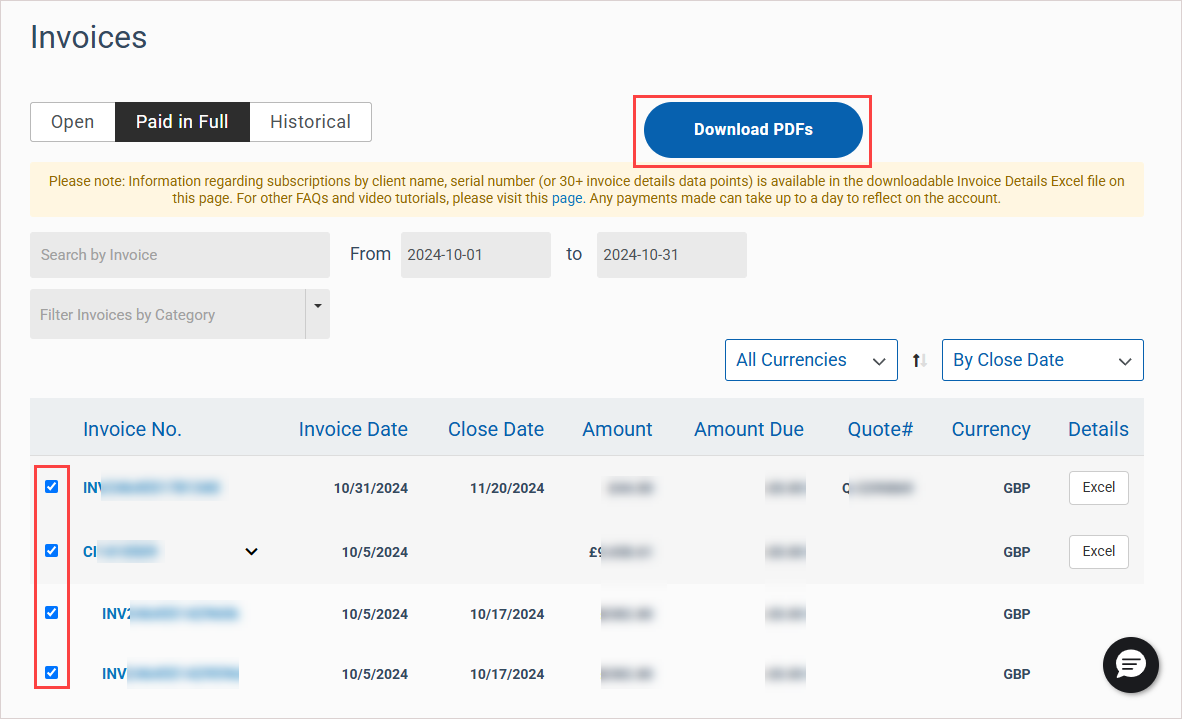
To download more PDF invoices, return to the Invoices page and either view and download a single invoice as described in the preceding step, or quickly download one or more invoices as follows:
Check boxes to select one or more invoices.
Click Download PDFs. PDF versions of selected invoices are downloaded as a ZIP archive.
-
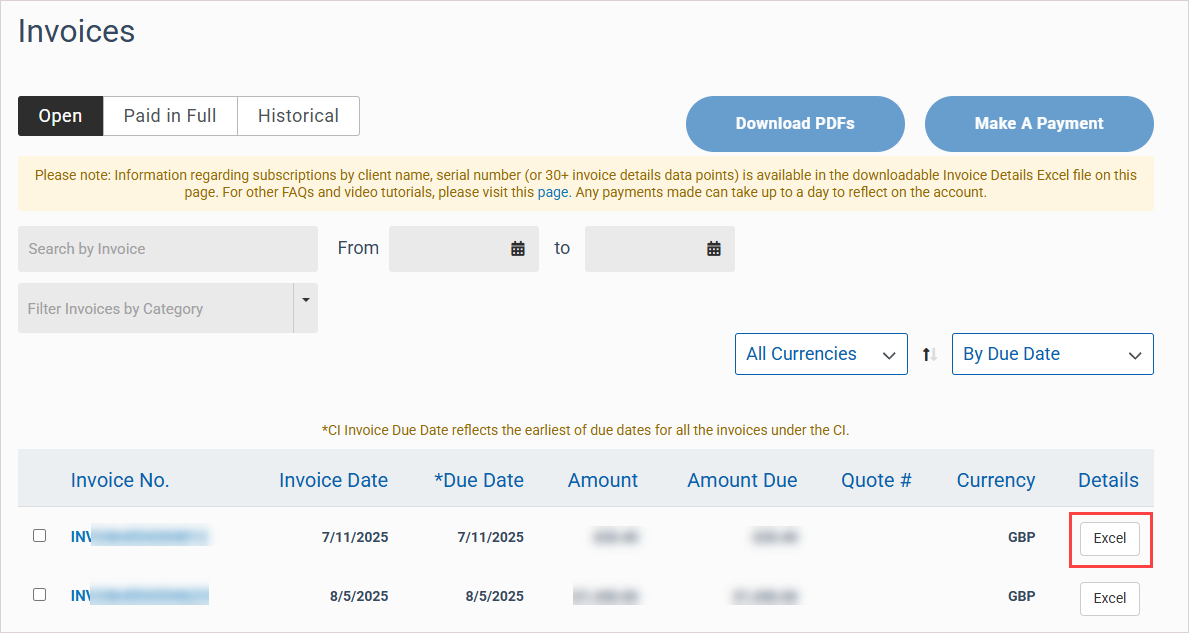
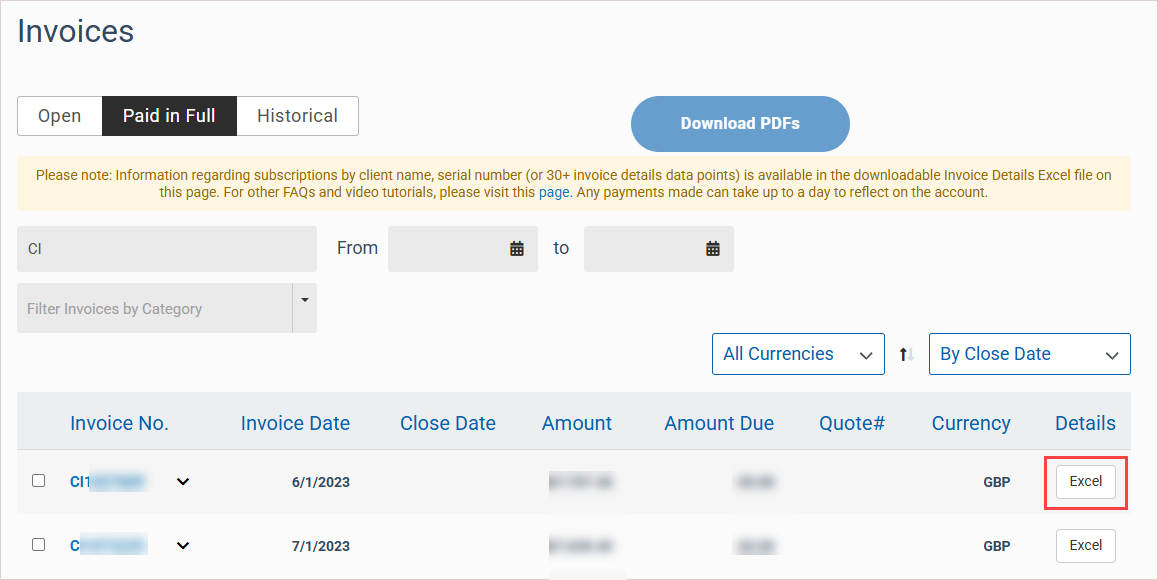
To download a copy of an invoice in Excel format, click Excel in the invoice's Details column. The downloaded Excel file contains line-item details for charges, as well as fields to bring in end user activity insights.
NOTE Where indicated, options in this procedure may apply only to consolidated invoices or to individual invoices. An invoice that starts with the letters CI is a consolidated invoice (e.g., CI1231231). An invoice that starts with the letters INV is an individual invoice (e.g., INV123123123123). For more on invoices, see Understanding your invoice.
-
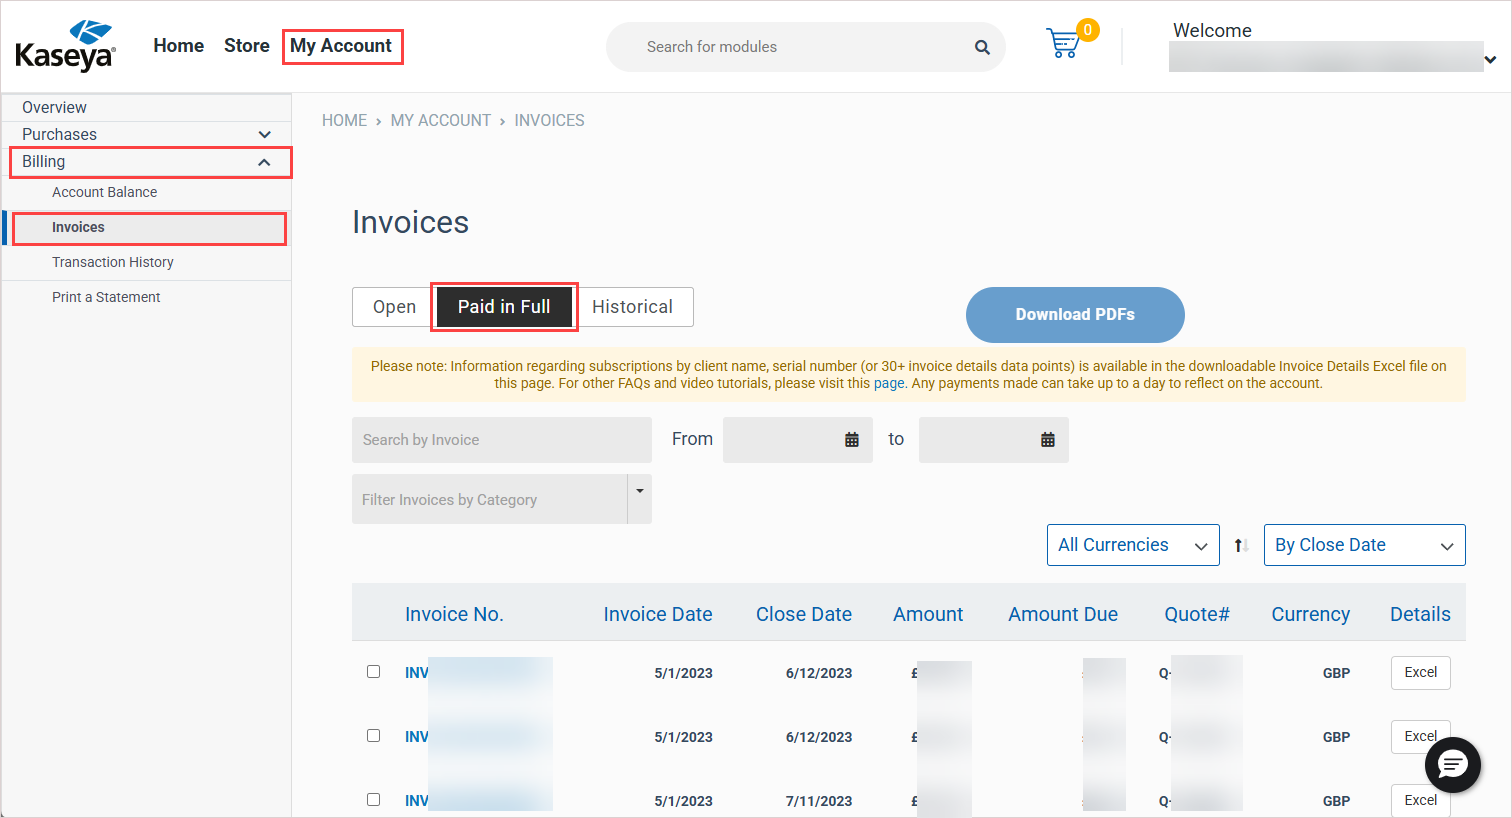
In Kaseya Store, navigate to My Account > Billing > Invoices.
-
On the Invoices page, click Paid in Full.
-
In the invoices list, locate the invoices you would like to view or download. If needed, you can filter and search the list by invoice number, date range, due date, invoice date, currency, and so on.

-
To view an invoice, click its Invoice No. link. The invoice displays as follows:
For consolidated invoices, the invoice displays in PDF format in a separate browser tab. To download a copy of the invoice, click your browser's download button.
For individual invoices, the invoice displays on the Invoice # page. To download a copy of the invoice, click Download as PDF.
-
To download more PDF invoices, return to the Invoices page and either view and download a single invoice as described in the preceding step, or quickly download one or more invoices as follows:
Check boxes to select one or more invoices.
Click Download PDFs. PDF versions of selected invoices are downloaded as a ZIP archive.
-
To download a copy of an invoice in Excel format, click Excel in the invoice's Details column. The downloaded Excel file contains line-item details for charges, as well as fields to bring in end user activity insights.
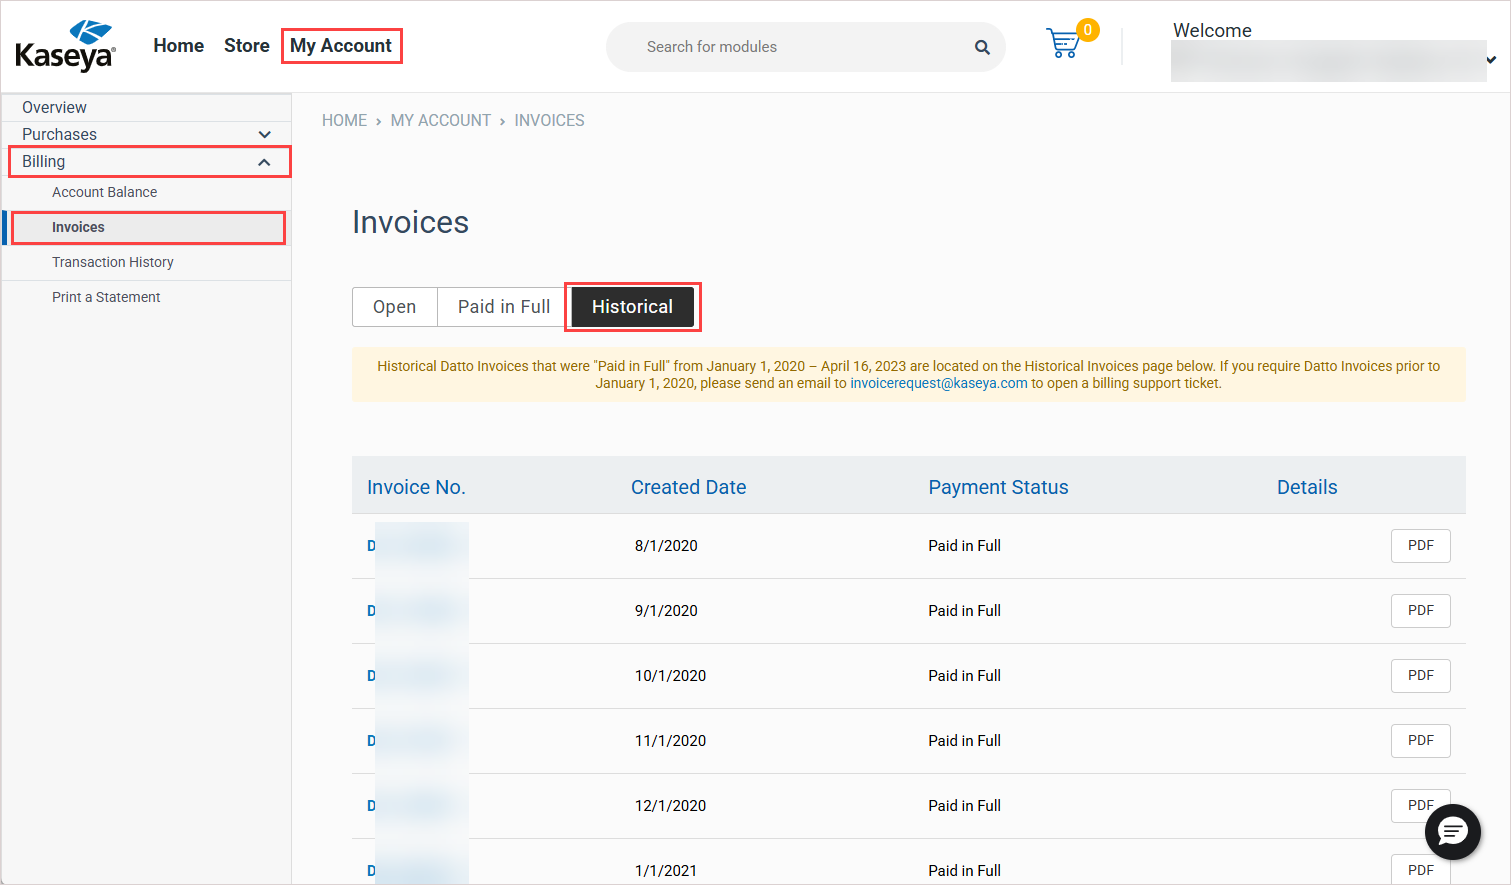
If you were a previous Datto customer, the Historical tab contains any legacy Datto invoices that you received prior to May of 2023. Use these steps to view and download historical invoices:
-
In Kaseya Store, navigate to My Account > Billing > Invoices.
-
On the Invoices page, click Historical.
-
In the invoices list, locate the invoice you would like to view or download. The list is ordered by invoice number, from smallest to largest.
-
To view or download an invoice, click its PDF button. The invoice displays in PDF format in a separate browser tab. To download a copy of the invoice, click your browser's download button.
-
To view or download another historical invoice, simply return to the Invoices page and click the invoice's PDF button.
To monitor your organization's aging account balance (which is an overview of outstanding payments from customers and how long they are past due):
-
In Kaseya Store, navigate to My Account > Billing > Account Balance.
-
On the Account Balance page that opens, review the aging account balance graph.
-
Click View Invoices to view invoices and initiate a payment transaction. Refer to Pay a bill.
-
Click Print Statement to print a custom statement showing the outstanding payment details. Refer to Print a custom statement.
Steps to review your transactions are given in the following procedure. See the example that follows to see how to view payments and credits in your transaction history and apply credits to open invoices.
-
In Kaseya Store, navigate to My Account > Billing > Transaction History.
-
On the Transaction History page that opens, a list of your past transactions displays.
Open: A credit has been issued and is available to be applied to your account.
Partially Applied: Part of the credit has been applied and there is a balance remaining that can be applied to another invoice.
Fully Applied: The credit has been fully applied (there is no remaining balance).
Unapproved Payment: The payment has been received and is currently being processed. Note that processing time for ACH, wire, and Go Cardless payments is 3-7 days.
Not Deposited: The payment has been received and applied to the relevant invoice(s).
Deposited: The payment has been successfully processed and completed.
-
You can opt to filter the list by entering a from/to date range and selecting one or more filter options.
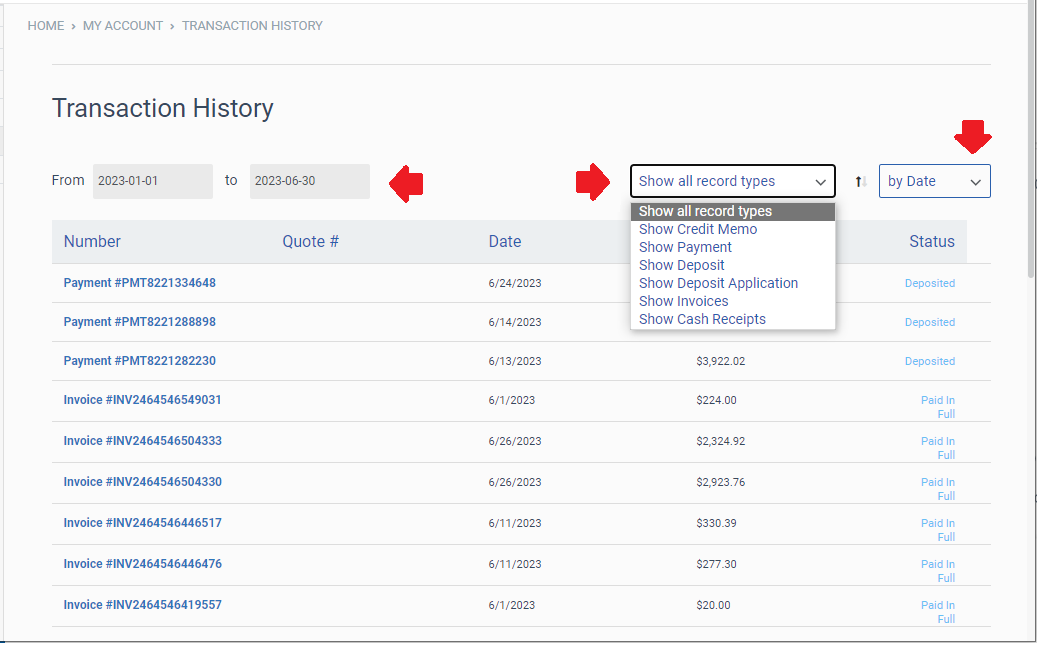
Select a record type:
Show all record types (default option)
Show Credit Memo
Show Payment
Show Deposit
Show Deposit Application
Show Invoices
Show Cash Receipts
Select a currency type:
All Currencies (default option)
A single currency type from the list. The list contains each currency that has been used in your transactions. Examples: GBP, USD, or EUR.
Select an option for how transactions are sorted:
by Date (default option)
by Number
by Amount
This example demonstrates how to access your transaction history, view any credits on your account, and apply credits to open invoices.
-
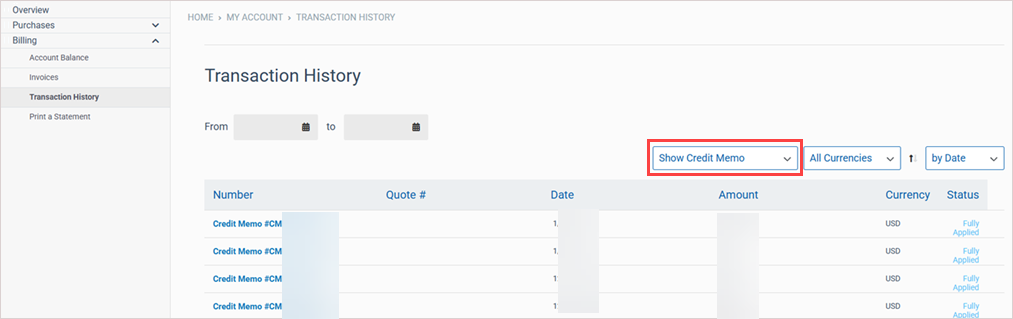
In Kaseya Store, navigate to My Account > Billing > Transaction History. A list of all transactions on your account displays, such as payments, credits, and invoices.
-
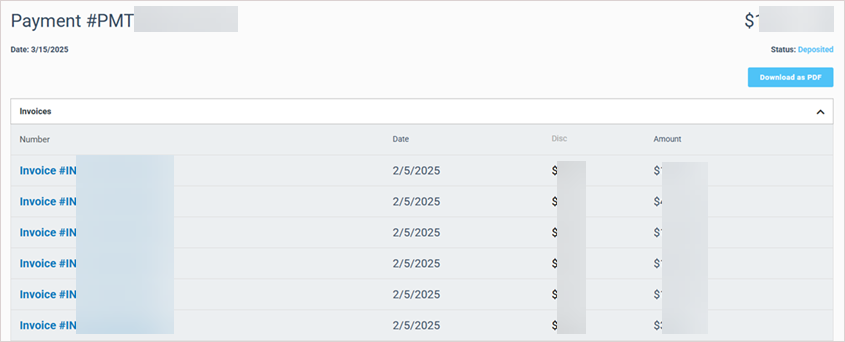
Click a transaction to view the details. For example, click on a payment number to view all the details for that payment, including the specific invoices that were paid as well as the payment method that was used. You can also download a receipt for that payment if you need it.
-
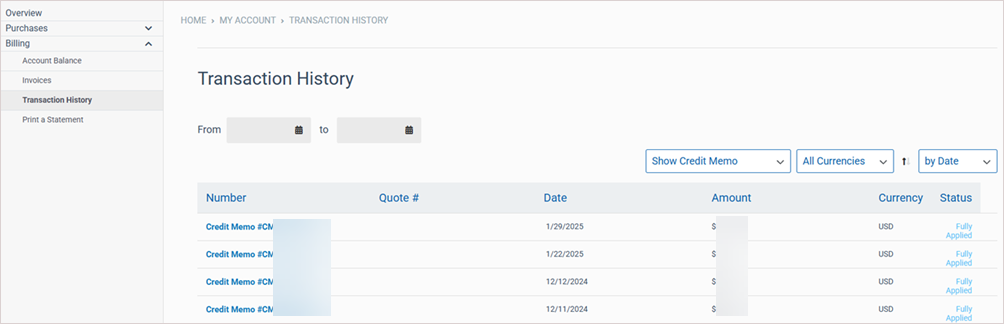
Filter your transactions to show credit memos.
The status of a credit memo shows as Fully Applied if its entire balance has already been used to pay open invoices.
The status of a credit memo shows as Partially Applied if part of the credit has been applied and there is a balance remaining that can be applied to another invoice.
If a credit memo has not been used or applied towards paying an invoice, the status of that credit memo shows as Open.
An open or partially applied credit memo can be applied to an invoice, as shown in the remaining steps in this example.

-
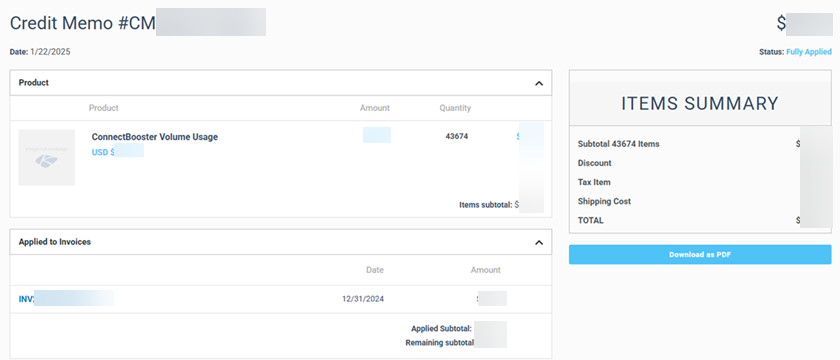
Click a credit memo number to see its details. In this example, this credit was used to pay the invoice shown here:
-
In the left navigation menu, select Billing > Invoices. Open invoices display on the Open tab.
-
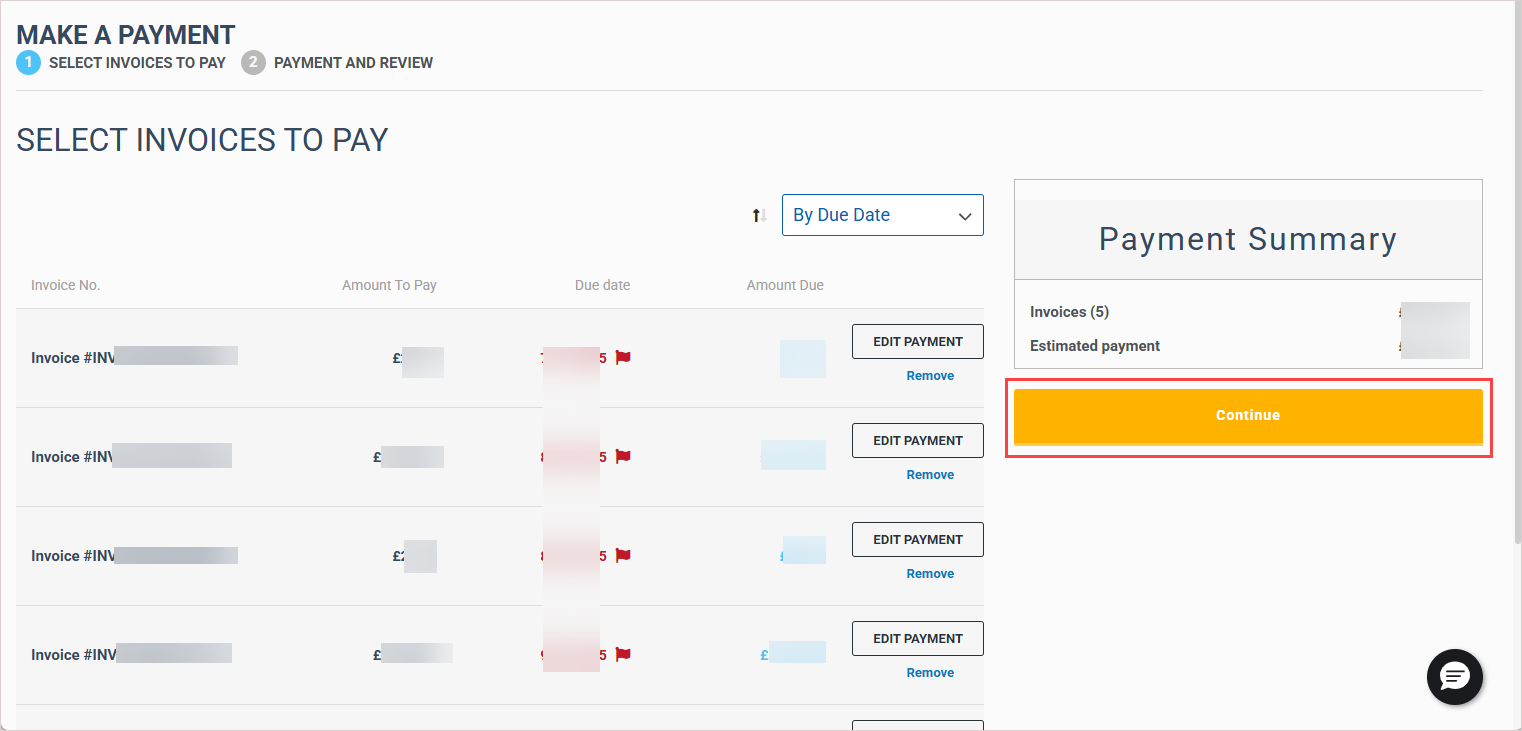
To pay an invoice, select its check box. You can select multiple invoices at the same time. Note that if you select a consolidated invoice, all of the individual invoices that are part of it are selected. You can customize this by removing or adding specific invoices. Once done, click Make A Payment.

-
Review the invoices that you selected. If needed, edit the payment amount for an invoice by clicking Edit Payment. Then, click Continue.
-
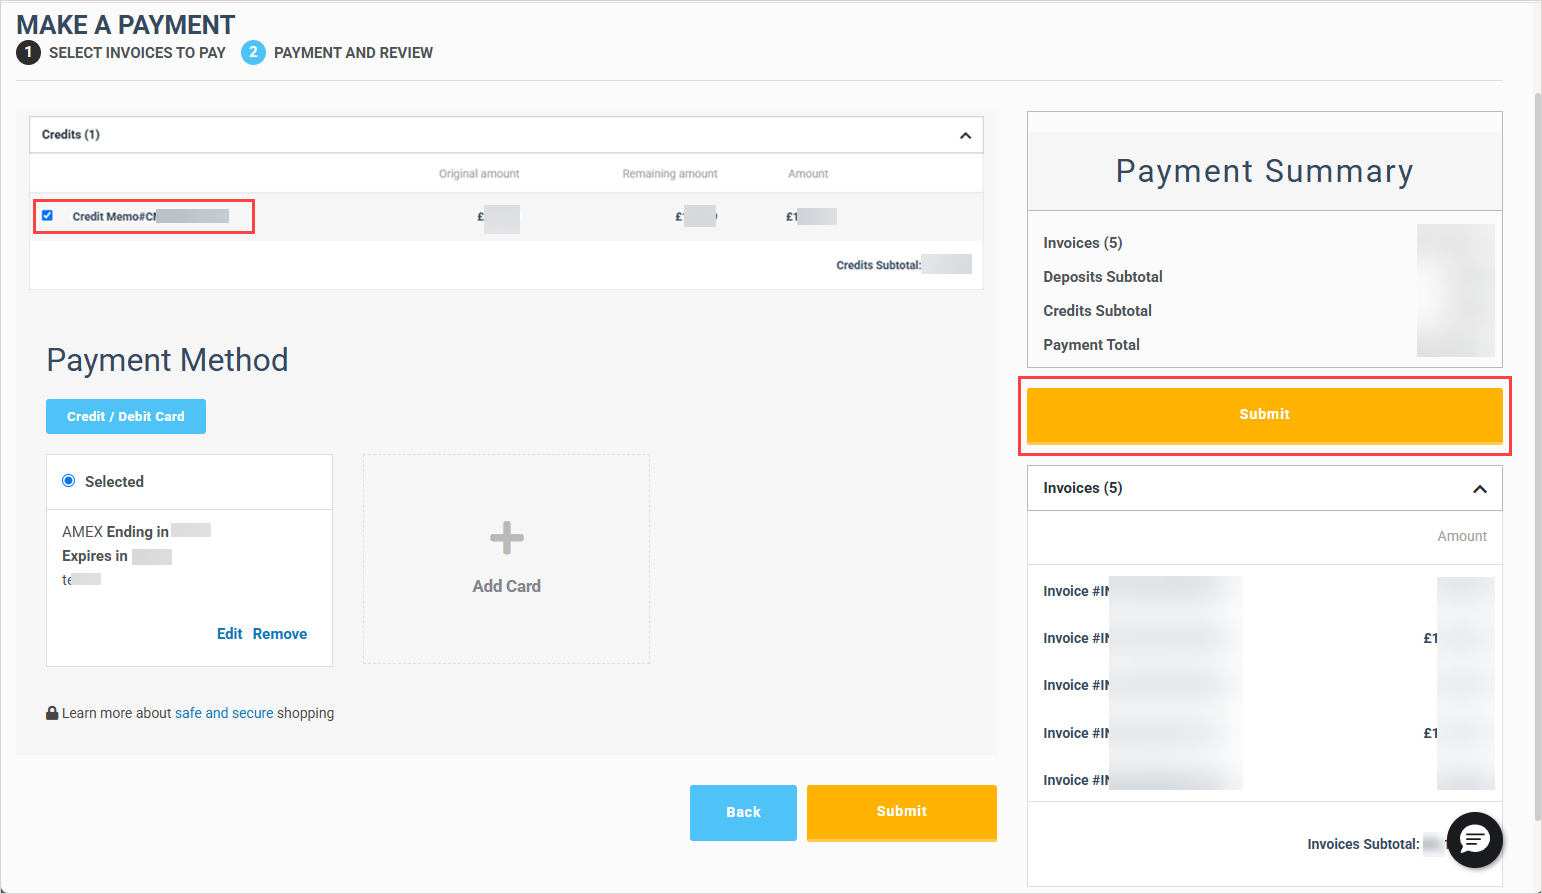
In this last step, you can select the payment method you wish to use for paying your invoices. Any open credits on your account are listed here and available for you to use towards your payment amount. If you do not wish to use your credit at this time, simply uncheck the box next to it. Once you've made all of your selections, click Submit to complete your payment.
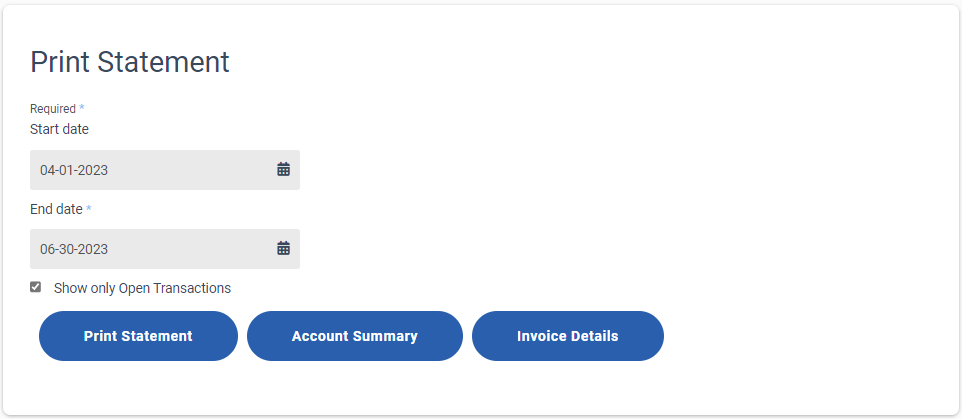
To print a custom statement:
-
In Kasey Store, navigate to My Account > Billing > Print a Statement.
-
On the Print Statement page that opens:
Specify a date range for the statement.
Select the Show only Open Transactions check box if required.
Click Print Statement to download the statement in PDF format.
Click Account Summary to download an account Summary Report in Excel format.
Click Invoice Details to download an Invoice Detail report in Excel format.
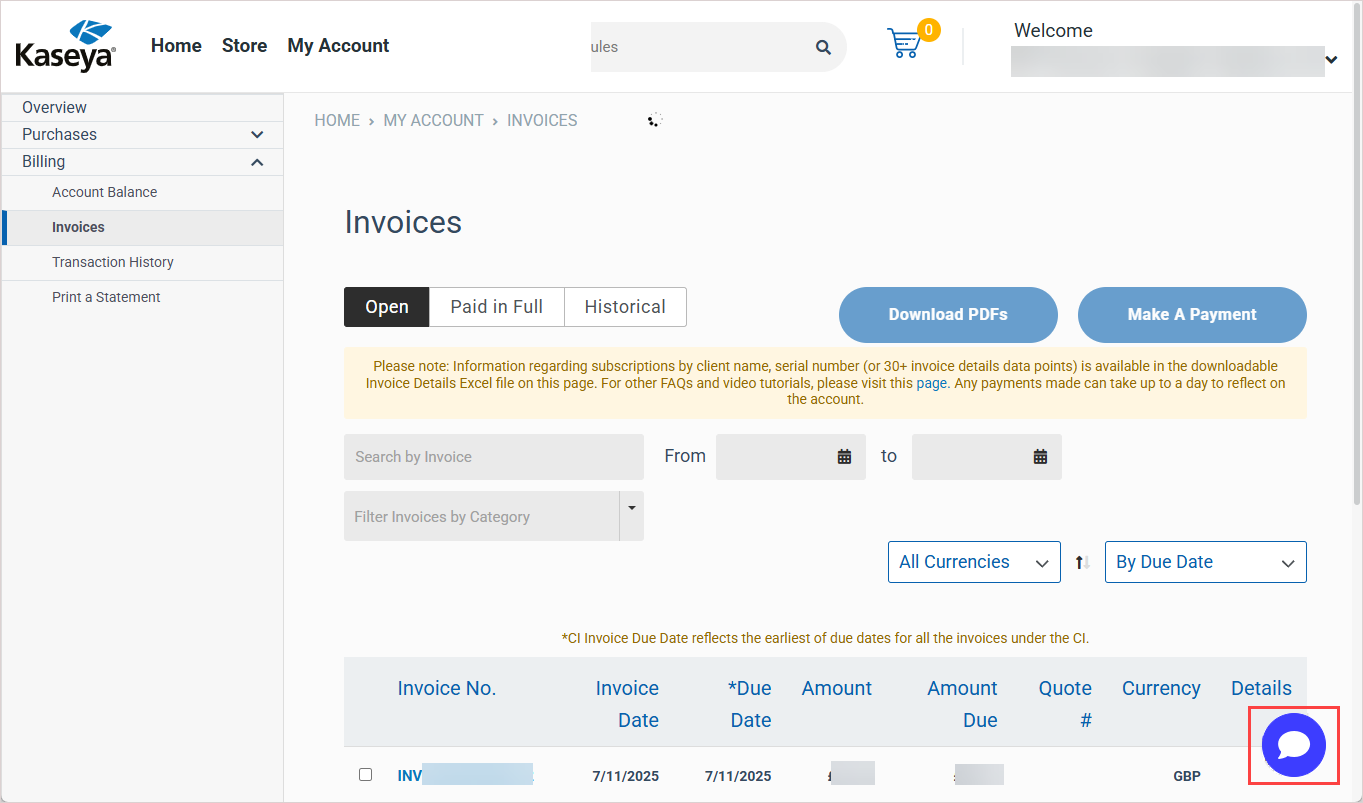
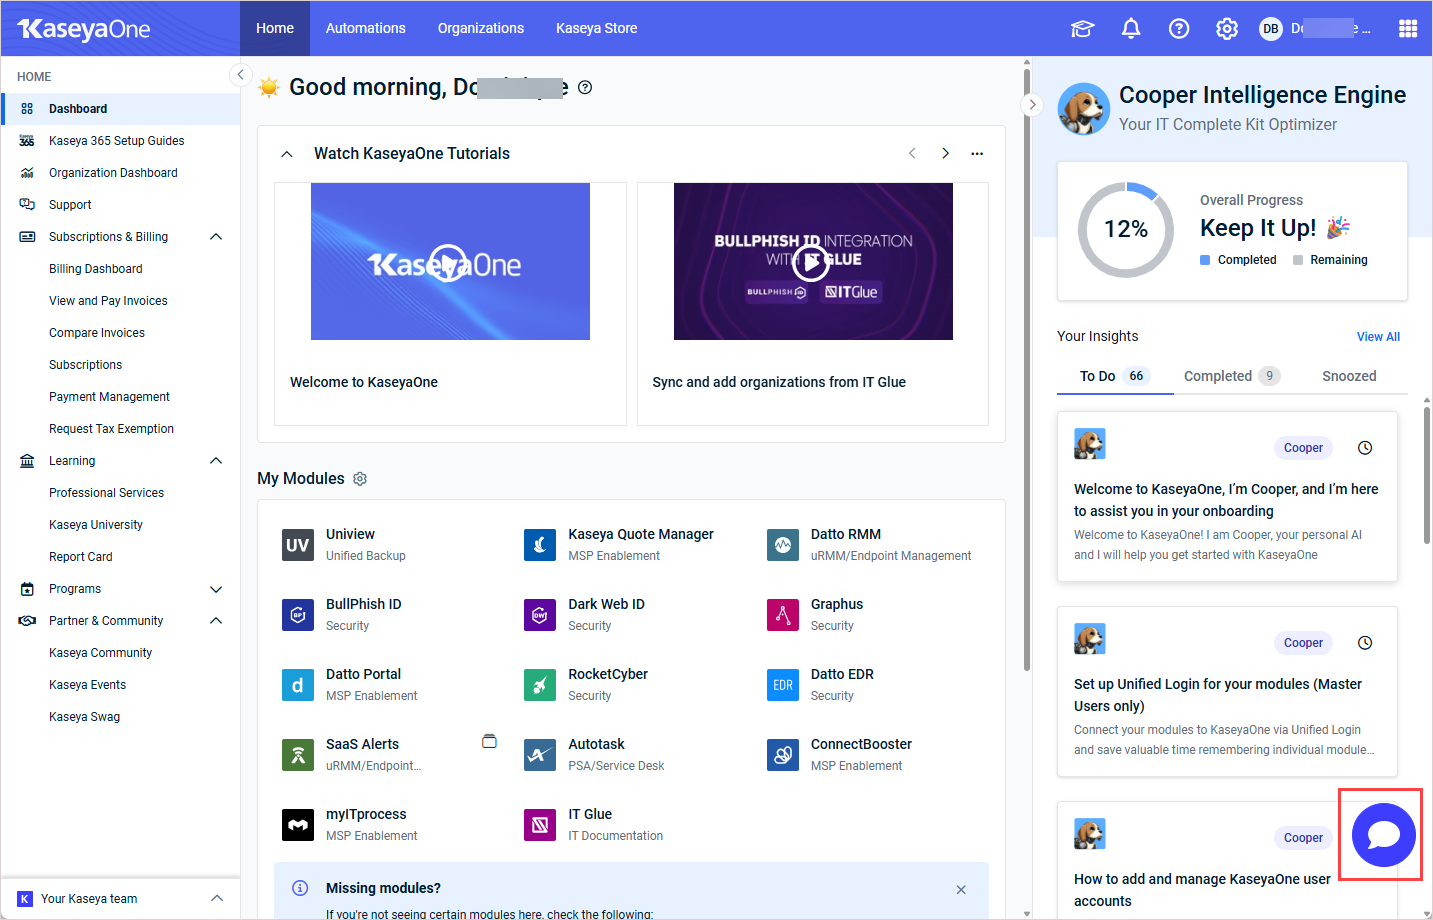
Chat with Kaseya Assist to get quick answers to questions. To access Kaseya Assist, click the chat icon in the lower-right corner of any page in KaseyaOne or Kaseya Store.